

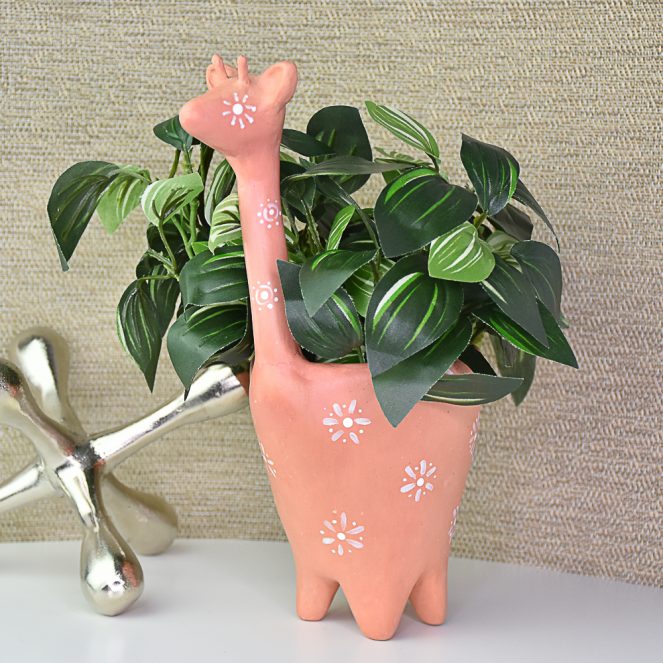
Sculpey Model Air® Clay Terra Cotta Giraffe Planter
Sculpey Model Air® Clay Terra Cotta Giraffe Planter
Designedby Linda Hollander
Read More
Read Less
This Giraffe Planter is so perfect for your indoor plants! It also makes a perfect house-warming gift.
TIME TO COMPLETION: 2 hours not including drying time
ADDITIONAL SUPPLIES
• 4” clay pot
• Paint brushes: flat, round, liner
• Medium and fine grit sanding sponges
• 2-straight pins
• Wooden skewer
• Wine cork
• Craft knife
• E-6000 glue
• Thick rubber band
• Tall drinking glass or jar
• Sand or small dried peas
• Old towel
• Paints and mediums: White acrylic paint, Delta All Purpose Sealer and Delta Faux Finish Glaze Base
Project Instructions
- Getting Started:
Start with clean hands, unwrap and knead clay until soft and smooth. Wash hands after use. Wrap any extra clay in then wrapper and then put in an air tight container.
- Tips:
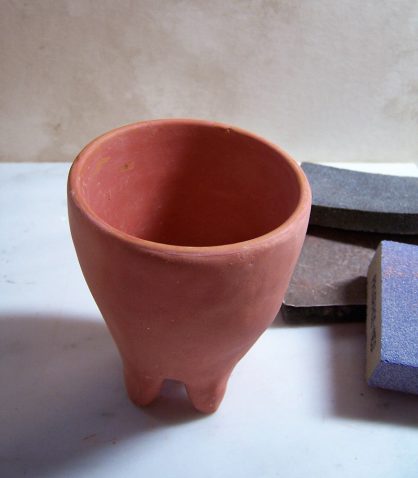
1. Cut off a piece of clay and roll into a baseball sized ball. Roll into a sheet approximately 1/4” thick. Use the Super Slicer to trim edges straight. Wrap around base of pot under rim and over bottom of pot. The idea is to build up clay on the pots base, so the collar is even with the new clay. Use chisel tip shaper to blend seams (Fig. 1). Set aside to dry.

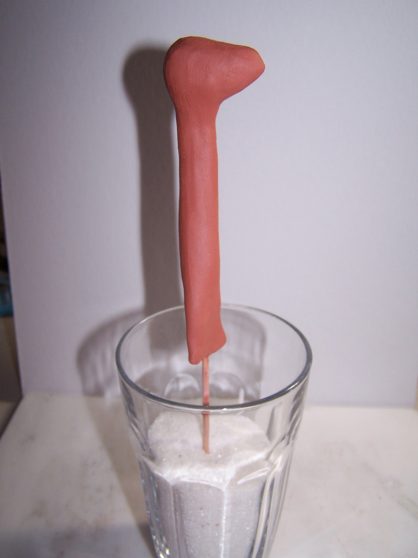
2. Use the craft knife to carefully carve the snout of the giraffe. Roll out a golf ball sized piece of clay into a cylinder approximately 4” long. Carefully insert the pointed end through middle of the clay. Twist the skewer back and forth in a screwing motion until the pointed end comes through the other end. Insert the pointed end into the cork as shown. Roll out a small sheet of clay and use it to cover the cork. Blend clay where head and top of neck meet.


Flatten the other end of the neck so that it will sit flush on pot later. Stand the head/neck armature in a tall glass or jar filled with sand. Let dry.
Roll and 1” ball of clay and cut in half evenly. Shape a pair of ears and position on toward the back of the head. Use the Ball End Tool to indent the inside of the ears. Let dry. Use the Needle Tool to carefully make two small holes in dried clay in front of the ears for the ossicones (horns). Insert the straight pins into the holes and push into the cork until just about 1/2” of the pins are showing. Carefully cover the pins with clay. Let dry.

Roll out enough clay to cover the entire outside of the pot including the collar. Cover sides including collar completely. Roll a golf ball sized ball of clay and divide int 4 equal parts. Form 4 cone shaped pieces of clay for legs. Turn pot upside and attach legs one at a time smoothing into the wet clay on the sides of the pot . Let dry

Carefully sand to smooth dried clay on pot, head, and neck.
Use craft knife to cut off skewer from bottom of neck. Apply glue to the bottom of the neck and place on body. Use the rubber band to keep neck in place. Lay the giraffe on its side one on old towel until dry. Roll a thick sheet of clay to cover the bottom of the neck. Smooth edges over giraffe’s body. Let dry. Sand.

Use the flat brush to apply a coat of All-Purpose Sealer to the giraffe. Do not seal the inside of the pot if you are going to use it for a live pant. This planter is ideal for cactus, succulents, and other plants that do not require heavy watering.

Mix white paint and the glazing medium (1:1). Use the ball stylus and the round and liner brushes to paint designs on the head, neck, and body

