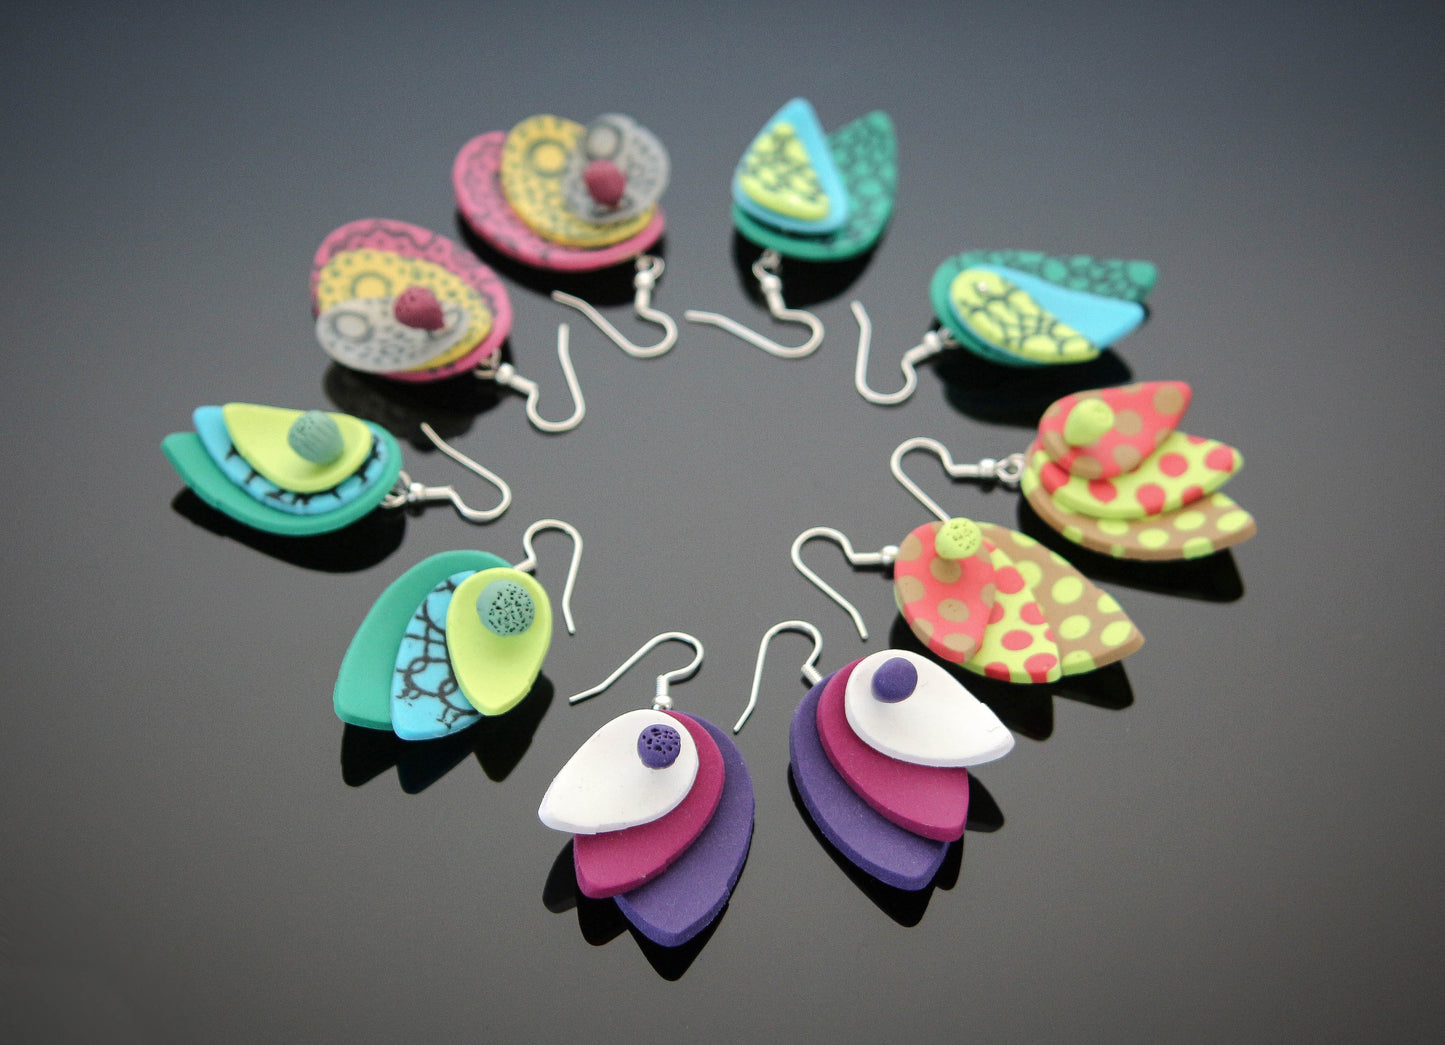
Tear Drop Earrings
Tear Drop Earrings
Read More
These colorful and fun earrings will brighten your day! They are easy and quick to make. You don’t need a lot of material and there are no difficult techniques you need to know. This is an ideal beginner’s project. Also perfect if you’d like to create a quick jewelry item.
Read Less
ADDITIONAL SUPPLIES
2 eye pins
Pair of earring hooks
Jewelry pliers and cutter (I used round nosed pliers with a little built-in cutter)|2 eye pins
Pair of earring hooks
Jewelry pliers and cutter (I used round nosed pliers with a little built-in cutter)

Project Instructions
Getting Started:Polymer clay may stain. CLAY MAY DAMAGE UNPROTECTED FURNITURE OR FINISHED SURFACES. DO NOT USE polymer clay on unprotected surfaces. We recommend working on the Sculpey® Work ‘n Bake Clay Mat, wax paper, metal baking sheet, or disposable foil. Start with clean hands and work surface area. Knead clay until soft and smooth. For best results, clean your hands in between colors. Shape clay, pressing pieces together firmly. Bake on oven-proof glass or metal surface at 275°F (130 °C) for 30 minutes per ¼" (6 mm) thickness. For best baking results, use an oven thermometer. DO NOT USE MICROWAVE OVEN. DO NOT EXCEED THE ABOVE TEMPERATURE OR RECOMMENDED BAKING TIME. Wash hands after use. Baking should be completed by an adult. Begin by preheating oven to 275 °F (130 °C). Test temperature with oven thermometer for perfectly cured clay. For best results, condition all clay by running it through the Clay Conditioning Machine for several passes on the widest setting. Fold the clay in half after each pass and insert the fold side into the rollers first.
Open your clay packages and divide them in halves. Condition your three half blocks of clay well and roll them out at the second thickest setting of your clay conditioning machine.


Use the tear drop cutters to cut out two pieces of each color of clay. The smallest size will be from the White, the middle size will be from the Bordeaux and the largest size will be from the Royalty. They will be in this order of your finished earrings.

Use a needle tool to make small holes at the round end of each tear drop.

Place the tear drops in the hollow bead maker so they make a nice curve. Make sure they are stuck to the hollow bead maker. Use the inside of the biggest form for your biggest tear drop and place the smaller ones it smaller forms of the bead maker. Set to the side and make your eye pins now.

Make two little clay balls, just a bit bigger than the loops on your eye pins. I used the same color of clay as my biggest tear drop has. Cut a little slit in the balls that goes only half the way through. It looks like a tiny pac man after the cut ;-) Place the loop of your eye pins in the slit and close the clay around your pin. Shape it so the slit is gone and your pins look a little like big matches.

Add some texture to your “match” pins: I added little round holes at the top and striped increases all around the head of the “match”. Cure your tear drops in the hollow bead maker and your pins with the clay heads for 30min. at 275°F. Take them out of the oven when they have cooled down.

Insert one pin into your stack of three tear drops through the little holes you made earlier. Cut the pin off so you still have enough length to bend a loop at the back of the tear drop stack. Hang the tear drop stack at the ear hook to finish your earrings. This is the basic tear drop earring!


To make your earrings a bit more decorated and interesting you can do all kinds of variations to the basic shape! They are so easy and quick to make that you can play with colors shapes and embellishments to make them yours! In the top row you see the basic tear drop earrings. In the second row you see earrings that were stamped with black archival ink before the were placed in the hollow bead maker. Be careful that the ink is dry before you touch the surface! You could also use silk screened clay for that. You could either use all tear drops with stamped/ silk screen printed clay or only some. The earrings on the right side have different pins in them. The pins I used here has a little silver ball insert of an eye. So the pin also gives options for variations. You could also use a pin with a flat head and / or ad a seed bead to your earring. In the third row I used different shaped cutters on the left. These are oval shaped cutters. Of course you can try out all kinds of shapes! The last pair of earrings has patterned sheets of clay instead of one solid color! I made some polka dot sheets and played with my colors. You pattern does not have to be complicated to add some interest! Think dots, stripes or rings. Depending on different placement of your pattern you can get lots of different designs for your earrings! And now it´s time to play…;-)


