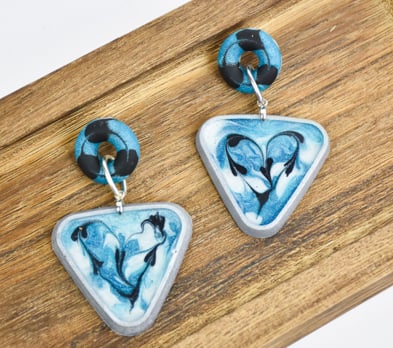

Swirly Triangle Earrings Created with Liquid Sculpey®
Swirly Triangle Earrings Created with Liquid Sculpey®
Designed by Amy Koranek
Read More
Read Less
The Sculpey® Silicone Bezel Mold makes it easy for you to frame a swirly liquid pattern. Combine with the Cabochon Silicone Mold to make a double earring style.
ADDITIONAL SUPPLIES
- Paper towels
- Disposable paintbrush
- Flat nose pliers
- Bright silver tone pinch bails (2)
- 10mm Bright silver tone heavy jump rings (2)
- Silver tone ear posts (2)
- Silver tone ear nuts (2)
- Silicone glue or super glue gel

Project Instructions
- Getting Started with Liquid Sculpey:
- Baking:
Preheat the oven to 300 degrees F and place the Bezel mold inside. While the mold is pre-heating, test the Silver Liquid Sculpey® to see if it flows well or if it needs to be thinned. Thin with Sculpey® Liquid Clay softener so that it is slightly runny. Always stir the liquids completely, especially when mixing softener or tints into them.
Remove the heated mold from the oven and allow it to cool for 2 minutes. Carefully touch the mold with your hand. If you can touch the mold comfortably with your hand and feel that it is still quite warm, it is ready to fill. Pour the thinned Silver Liquid Sculpey® into the mold starting with the frame area but don’t overfill. Tap the filled mold on a flat smooth surface to release air bubbles. Place the filled silicone mold in the preheated oven and cure for 20 minutes. When the mold is completely cool, gently flex it to release the shape. For this project we will need two of the largest triangle bezel shapes.
Squirt little squiggles of Peacock Pearl LS into the Silver bezel as shown.

Add drops of Pearl LS as well but don’t fill the bezel completely.

Swirl the colors together slightly by dabbing at them with a disposable paintbrush. Make sure the bezel is filled from edge to edge with the swirly pattern.

Add six little Black drops on top of the swirled background. Place them in the arrangement shown.

Use the very tip of the needle tool to drag the Black drops from one to the next starting at the bottom point and dragging upward. Pull the needle tool out when you reach the center.

Place the needle tip in the center again and swirl the Black dots together on the other side. Drag the needle through the bottom dot leaving a little trail at the bottom of the heart shape. Repeat this pattern for the second triangle bezel. Bake both triangles following the baking instructions for LS.

Place three drops of Black LS as shown in the donut shape of the cabochon mold.

Place three drops of Peacock Pearl LS in between the Black dots. They should fill the mold enough that they all touch.

Dip the needle tool into one of the Black dots and make sure the needle goes all the way through touching the bottom of the mold shape. Drag the needle in a circle all the way around the donut shape keeping the tip of the needle tool on the bottom of the donut shape all the time. Then carefully lift the needle out.

If the donut shape is not full, back fill it with Silver LS. Bake the mold following the baking instructions for LS.

Repeat the steps to make and bake a second donut shape. When the mold is completely cool remove the piece by gently flexing it. Assemble the earrings by setting a pinch bail in the center top of each triangle shape. Squeeze the bails closed gently with flat nosed pliers. Attach the donut shapes to the pinch bails with jump rings.
Glue ear posts to the top center back of each donut shape.
Glue ear posts to the top center back of each donut shape.
