

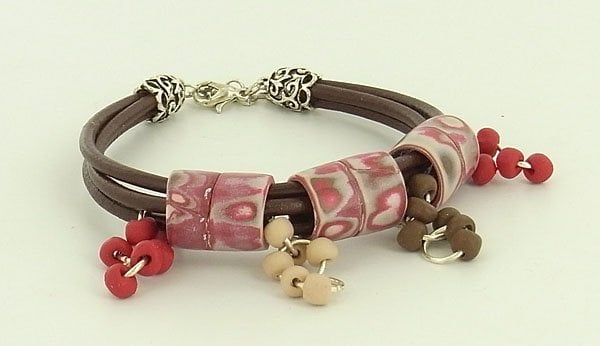
Sculpey Soufflé Leather Bracelet with Polymer Clay Beads
Sculpey Soufflé Leather Bracelet with Polymer Clay Beads
Read More
Wear this Country-Chic bracelet with jeans & a tee!
Design by: Sherri Kellberg http://Beadazzleme.etsy.com
Read Less
ADDITIONAL SUPPLIES
Drinking straw, paint brush, 1 package silver jump rings, silver art foil, leather bracelet with end caps & lobster claw clasp, 1/2" round pen, clear fast-drying glue|Drinking straw, paint brush, 1 package silver jump rings, silver art foil, leather bracelet with end caps & lobster claw clasp, 1/2" round pen, clear fast-drying glue
Project Instructions
Getting StartedPolymer clay may stain. CLAY MAY DAMAGE UNPROTECTED FURNITURE OR FINISHED SURFACES. DO NOT USE polymer clay on unprotected surfaces. We recommend working on the Sculpey clay mat, wax paper, metal baking sheet, or disposable foil. Start with clean hands and work surface area. Knead clay until soft and smooth. For best results, clean your hands in between colors. Shape clay, pressing pieces together firmly. Bake on oven-proof glass or metal surface at 275°F (130 °C) for 30 minutes per ¼" (6 mm) thickness. For best baking results, use an oven thermometer. DO NOT USE MICROWAVE OVEN. DO NOT EXCEED THE ABOVE TEMPERATURE OR RECOMMENDED BAKING TIME. Wash hands after use. Baking should be completed by an adult.Begin by preheating oven to 275 °F (130 °C). Test temperature with oven thermometer for perfectly cured clay. For best results, condition all clay by running it through the Clay Conditioning Machine for several passes on the widest setting. Fold the clay in half after each pass and insert the fold side into the rollers first.
Condition all the clay colors and roll out sheets of clay on the #3 setting of the clay conditioning machine

Use the 1/2" circle cutter to cut about 10 circles of each color. Stack the circles varying the colors.

Extrude the stack through the slotted disc.
Apply silver foil to one side of the extruded strip. Cut into 2 pieces that are 1.5” long.

Take the 1/2" pen and spray with a release agent, I used Armorall. Wipe all the excess off. Wrap the extruded strips around the pen, (foil on the inside) edges butted together, smooth ends. Slide the tube bead off the pen and bake as directed above.

After baking, distress the beads using wet sandpaper. Sand the beads gently, in a haphazard pattern, to reveal the colors below the layers of clay. Now, you may choose to coat them with Sculpey Gloss or machine buff them.

Making the Dangle Beaded Chains- Using the clay conditioning machine on the #2 setting create sheets of each color of clay. Make tiny beads of each color using a straw as a cutter. Make holes in the beads using the skewers from the bead baking rack. Bake as directed above on the bead baking rack.

Open the jump rings and add 2 beads per ring. Attach the rings together as shown.

Add the beads to the bracelet, alternating the Dangle Beads with the Tube Beads. Add clear fast drying glue to the ends of the leather cords and insert in cap.
