

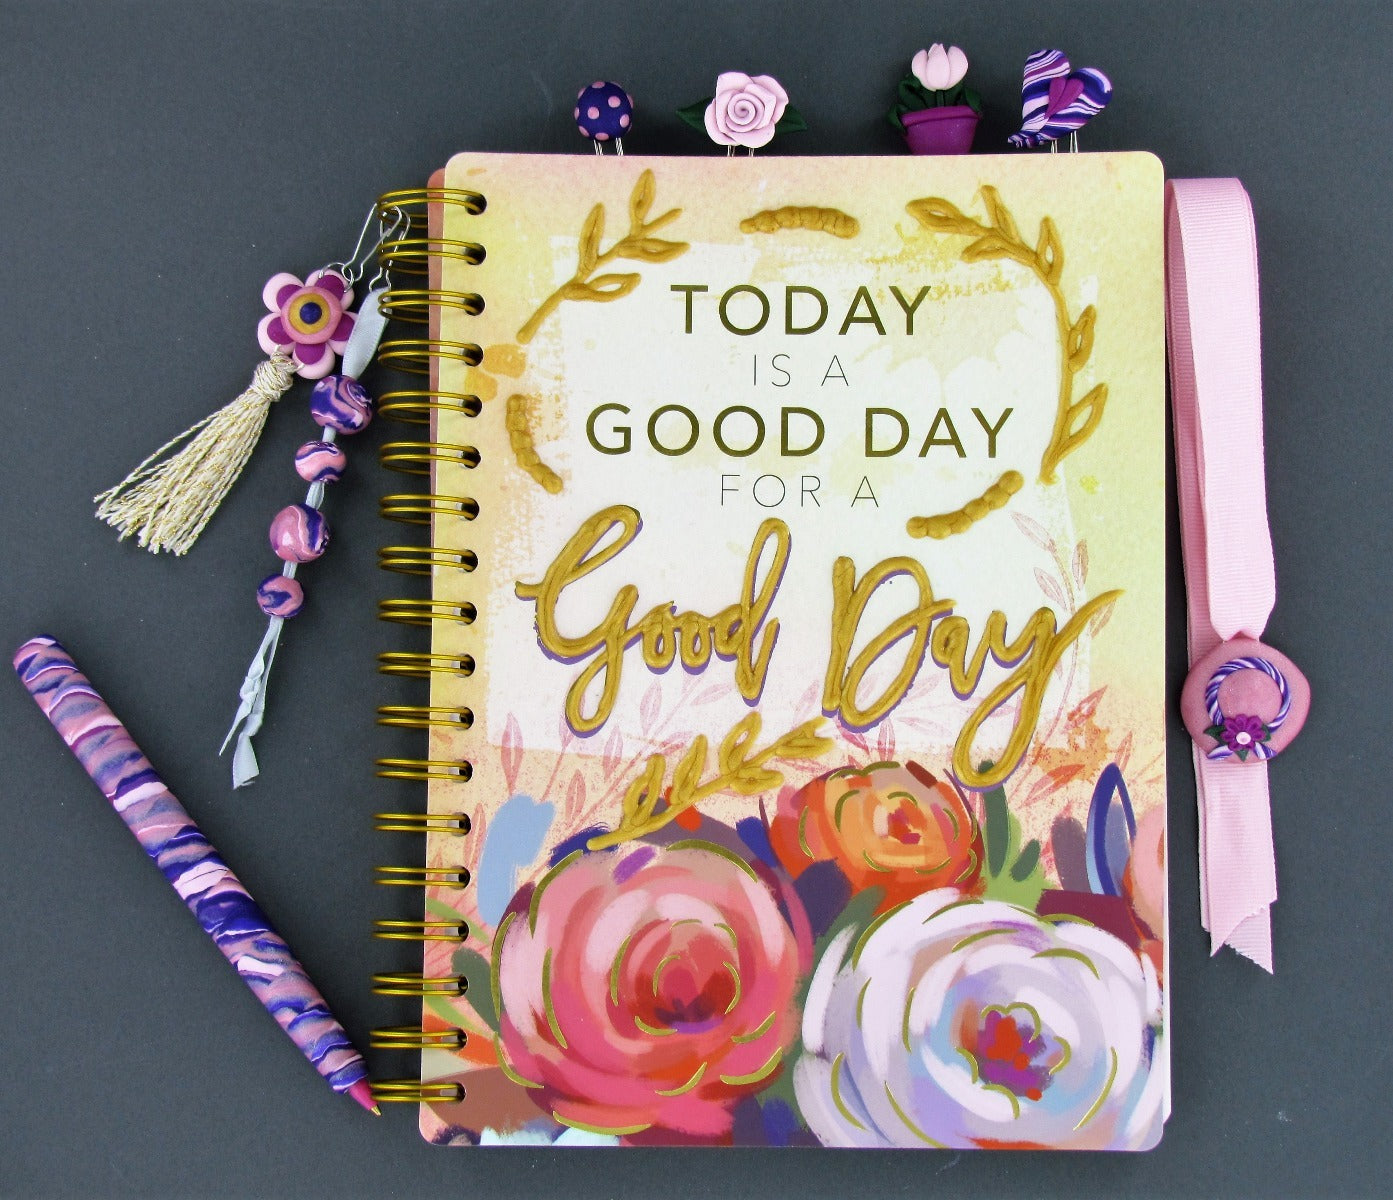
Sculpey III and Liquid Sculpey Decorated Day Planner and Accessories
Sculpey III and Liquid Sculpey Decorated Day Planner and Accessories
Read More
Add a personal touch to your planner with Sculpey III and Liquid Sculpey! With a little creativity you can DIY anything to match your planner and personality!
Read Less
ADDITIONAL SUPPLIES
"BIC® Round Stic ink penPlanner with spiral binding
6mm Jump rings (3)
Paper clips (4)
Lanyard hooks (2)
10” White ribbon 1/4” wide
24” Pink ribbon 1” wide
Skein of coordinating DMC floss for making a tassel
Baking parchment or wax paper or deli wrap paper (I keep deli wrap paper on hand for all my projects but if this is not convenient you can try the other types listed here) White craft glue
6” ruler or heavy card stock 6” wide
Scissors
Needle with eye large enough to accommodate the DMC floss
"
Project Instructions
Getting Started:
Please make sure your work area is covered and you are not working on an unprotected surface. We recommend working on the Sculpey® Work ‘n Bake Clay Mat, wax paper, metal baking sheet, or disposable foil. Uncured clay may damage unprotected furniture or finished surfaces. Be sure to cover your crafting area appropriately.
Start with clean hands, unwrap and knead clay until soft and smooth, or condition by running clay though a Pasta Machine. We recommend using a designated machine for clay purposes only. When working with multiple colors, clean hands with soap and water or baby wipes (we have found that baby wipes work best) before switching colors. Shape clay, pressing pieces firmly together. Wash hands after use.
Sculpey® III Baking:
Begin by preheating oven to 275 °F (130 °C). After you are done creating; for best results bake clay on an oven-proof surface such metal, aluminum foil, an index card or the Sculpey® Clay Mat at 275 °F (130 °C) for 15 minutes per ¼" (6 mm) thickness according to package directions.  Oven safe glass or ceramic surfaces are also acceptable for baking; however please note that the baking times may take longer as the glass or ceramic surfaces take longer to heat up. For best baking results, use an oven thermometer. DO NOT USE MICROWAVE OVEN. DO NOT EXCEED THE ABOVE TEMPERATURE OR RECOMMENDED BAKING TIME.
Liquid Sculpey® Baking:
Baking should be completed by an adult. Begin by preheating oven to 300°F (130 °C). Test temperature with oven thermometer for perfectly cured clay. Gold, Silver, Pearl, Black, and White Liquid Sculpey may be cured at 275°F if used in conjunction with solid clays.
Instructions-Planner Liquid Sculpey® Elements:
Designer’s Note - Gold and Silver Liquid Sculpey are usually thick enough to letter with but you should test it first. Squirt out a small amount of Liquid Sculpey onto your baking paper. Watch to see if the liquid holds it’s shape or if it starts to run. If it runs it is too thin and you may want to let the bottle air with the lid off for a few days. Or you can pour it out into a silicone baking cup and let it air for a few days before returning it to the bottle.
Test your paper by writing a liquid word on it. Bake the liquid word on the paper according to the baking instructions. Allow it to cool completely and then gently peel the liquid from the paper. You want the liquid to peel off easily and completely so that it can be used on your planner cover. If the paper tears easily or leaves a lot of debris on the back of your liquid word, then try a different type of paper.
Planner Liquid Sculpey® Elements:
The planner used in this project had a very pretty decorated cover. Chose to highlight the designs that were already on the planner with Gold Liquid Sculpey®. Lay a piece of deli wrap paper over the planner. Trace the “Good Day†lettering on the planner onto the deli wrap paper very carefully. Bake the words on the paper and allow to cool completely.
The planner used in this project had a very pretty decorated cover. Chose to highlight the designs that were already on the planner with Gold Liquid Sculpey®. Lay a piece of deli wrap paper over the planner. Trace the “Good Day†lettering on the planner onto the deli wrap paper very carefully. Bake the words on the paper and allow to cool completely.

On a separate piece of baking paper, trace other design elements that you want to highlight. In this photo I’m tracing the shape of a leaf in a string of pearls.

Also trace any additional details on this planner it is a series of leafy vines that were on the planner cover.

Bake all the liquid elements following the baking instructions. When they are completely cool, gently peel them from the paper. Glue them onto your cover using a super thin layer of white glue spread on the back of the baked liquid pieces.

Instructions-Sculpey® III Pen:
Carefully remove the ink stick from a BIC pen. Set the ink aside for now.
Carefully remove the ink stick from a BIC pen. Set the ink aside for now.

Make long ropes of Purple, Ballerina, Princess Pearl, and Fuchsia Pearl. Place the ropes side by side and on top of each other as shown.

Twist the ropes together to form a striped snake.

Fold the snake twice.

Roll and twist the snake to make it thinner and to multiply the stripes. Keep rolling and twisting until the rope is only about 3/16†thick.

Flatten the rope by rolling over it with the acrylic roller.

Wrap the rope laying the flat side against the barrel. Leave little gaps between the wraps.

Trim off the rope at both ends of the pen barrel.

Gently roll the pen barrel on the work surface. The little gaps should close up between the wraps.

Fold the clay around the closed end of the barrel and smooth it with your fingers.

Trim the clay at the open end with a blade.

Bake the clay pen barrel following the baking instructions. When it is cool, re-insert the ink stick.

Instructions-Sculpey® III Paper Clips:
For the Polka Dot Ball Clip, place a ball of Purple on the end of a paper clip. Smooth the ball where the clip goes in to correct the ball shape and to make sure the clip is held in place. Add tiny dots of Princess Pearl.
For the Polka Dot Ball Clip, place a ball of Purple on the end of a paper clip. Smooth the ball where the clip goes in to correct the ball shape and to make sure the clip is held in place. Add tiny dots of Princess Pearl.

For the Marbled Heart, use some of the left over clay from the pen and make a little dot of clay. Imbed the top of a paper clip half way down into the clay.

Make two (2) teardrop shaped pieces and place them side by side.

Flatten the teardrops together and curl the tip to make a heart. Sandwich the paper clip between the dot and the heart.

Make two (2) little teardrops from Fuchsia Pearl and press them into place in the middle of the marbled heart.

For the rose paper clip, make a small dot from Leaf Green and two leaf shapes. Sandwich a paper clip between the dot and the leaves.

Flatten a 1.25†rope of Ballerina. Curl it up to make a rose center.

Flatten oval shapes of Ballerina for rose petals.

Arrange the petals around the outside of the rose center. If your rose is very tall, carefully trim the back off flat with the blade. This will also help it sit nicely on the leaves. Pinch the leaves to give them a more natural look. Use a tiny drop of Gold Liquid Sculpey® to attach the flower to the leaves.

For the tulip paper clip, flatten a dot of Fuchsia Pearl and embed the top of the paper clip half way into it. Arrange some thin tulip frond shapes at the top of the dot.

Make a little Leaf Green stem. Make some little tulip petals from Ballerina and place them atop the stem.

Add a couple more tulip petals to the front of the flower. Make a little pot shape from Fuchsia Pearl and add a band to the top of the pot. Gently bend the tulip fronds over the top of the pot.

Bake all the clips following the baking instructions for Sculpey® III.
Instructions-Sculpey® III Planner Tassel:
Make five (5) little teardrop shapes from Ballerina and flatten them in a circle to form a flower shape. Embed a jump ring at the top and at the bottom of the flower half way into the clay.
Make five (5) little teardrop shapes from Ballerina and flatten them in a circle to form a flower shape. Embed a jump ring at the top and at the bottom of the flower half way into the clay.

Sandwich the jump rings into place with a smaller set of Fuchsia Pearl petals.

Set a Princess Pearl ball in the middle and flatten it into place with the large ball tool. Add a little pool of Gold Liquid Sculpey® in the center. Place a little ball of Purple in the middle of the liquid. Bake the clay piece before going on to make the tassel.

Wrap several coils of DMC floss around the 6†ruler. Cut the coils at one of the loop sides and string them all through the bottom jump ring to the half way point.

Tie another piece of floss around the tassel pieces just under the jump ring.

Wind another piece of floss around the top of the tassel just under the jump ring, covering up the knot. When you have wound it too your liking, cut a 3†tail. Thread the end of the tail through a needle. Push the needle through a few strands in the wound portion and pull the end of the tail into the wound part. Trim the tail and also trim the tassel. You can place a lanyard hook through the top jump ring so that you can display the tassel on your planner spiral.

Instructions-Sculpey® III Straw Hat Bookmark:
Make a 1.5†flat pancake from Princess Pearl. Embed a jump ring in the back with a little piece of Princess Pearl.
Make a 1.5†flat pancake from Princess Pearl. Embed a jump ring in the back with a little piece of Princess Pearl.

Add a little dome to the center of the brim to make the hat.

From scraps of the marbled colors make a little rope. Flatten it and add it to the hat for a ribbon. Trim the ends at angles.

Add three (3) little Leaf Green leaf shapes. Add seven (7) tiny daisy shaped petals. Texture with the flat rubber tip tool.

Add a tiny ball of Ballerina to the center and poke a hole in the middle. Bake following the baking instructions for Sculpey® III.
When the piece is completely cool, thread the wide ribbon through the jump ring to the half way point. Tie the ends together and trim.
When the piece is completely cool, thread the wide ribbon through the jump ring to the half way point. Tie the ends together and trim.

Instructions-Sculpey® III Marbled Bead Dangle:
Make a series of ball beads from remaining marbled clay. Poke holes in each one with the large Etch ’n Pearl.
Make a series of ball beads from remaining marbled clay. Poke holes in each one with the large Etch ’n Pearl.

For my dangle, I made four beads, two smaller and two larger. Bake the beads following the baking instructions for Sculpey® III. String the smaller ribbon through a lanyard hook to the half way point. String both ends of the ribbon through each bead leaving a space between each one. Tie knots at the ends.

Assemble, grab some fun pens and get to planning!
