

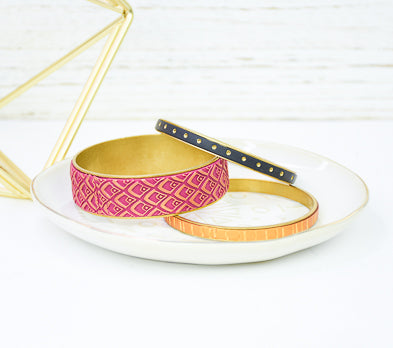
Sculpey Souffle™ Wild Orchid Textured Channel Bracelet Set
Sculpey Souffle™ Wild Orchid Textured Channel Bracelet Set
Designed by syndee holt
Read More
Gorgeous colors, rich textures – what is NOT to love about this bracelet set?
TIME TO COMPLETION: 60 minutes
Read Less
ADDITIONAL SUPPLIES
- Brass channel bracelets – mine are .5 inch width (1) and .25 inch width (2) (available from Etsy)
- Gold-toned mica powder (mine is Jacquard Pearl Ex Aztec Gold which is a warm reddish gold)
- Small brush for glaze
- Small spray bottle of water
Project Instructions
- Getting Started:
Start with clean hands, unwrap and knead clay until soft and smooth, or condition by running clay though a Pasta Machine. We recommend using a designated machine for clay purposes only. When working with multiple colors, clean hands with soap and water or baby wipes (we have found that baby wipes work best) before switching colors. Shape clay, pressing pieces firmly together. Wash hands after use.
- Baking:
Sheet about 1/2 of the conditioned Wild Orchid out on the middle setting on the Clay Conditioning Machine. Lightly spray the texture sheet with water and press firmly into the clay. I prefer to put the clay and the texture between a sheet of folded paper, then I put that on my concrete floor and step on it. BAM! Perfect deep texture.
NOTE: I have two sets of this texture. One set is a full sheet (for using multiple textures together) and the other set I’ve cut apart the individual textures. Repeat to make another sheet of texture.
NOTE: I have two sets of this texture. One set is a full sheet (for using multiple textures together) and the other set I’ve cut apart the individual textures. Repeat to make another sheet of texture.

Trim up the edges of the texture and lay the texture into the channel on one side and lightly press the other side – which will give me a slight dent in the clay to show me where to cut. Cut on the center of the dent.

I always start in the center of the bracelet. The texture should be just slightly wide. GENTLY pull on the opposite long end to slightly stretch the clay and it will fall into the channel nicely.
The reason I do this is because it thins the sheet just enough that the clay doesn’t stick up from the channel. I’ve pulled on the right side of this clay and it is laying in the channel, while the left side sticks up a little. Now repeat the little stretch for the left side and trim the two ends straight.
The reason I do this is because it thins the sheet just enough that the clay doesn’t stick up from the channel. I’ve pulled on the right side of this clay and it is laying in the channel, while the left side sticks up a little. Now repeat the little stretch for the left side and trim the two ends straight.

Now you need to cut two more pieces that match the design. Both on the long edges and the two shorter edges. This is why I make 2 or 3 sheets of the texture! It sounds harder than it actually is though. Fill the length of the channel bracelet with these pieces.

Blend those edges carefully together. I like to use the rubber chisel end of the medium Dual End Detail Tool. The mica powder will cover tiny errors.

Dip your finger into the LID of the mica powder and lightly rub it on the top surface of the texture. Set this completed bracelet aside.

For both of the smaller bracelets, just cut a thin piece of the conditioned clay sheeted on the medium (or next thinner) setting. This is an easy width to eyeball and I cut lengths that are about 4-5 inches.
Remember to stretch the clay slightly to get it to lay down in the channel! Use the chisel tool to help blend the seams. (I use my finger too!)
I dipped the smallest ball stylus from the Dual End Detail Tools into the JAR of mica powder and gently pressed the stylus into the clay. I aimed for .25 inches apart for each dot.

Lay the Gold clay like you did in Step 8 and this time, dip the chisel tool into the mica powder and emboss vertical lines into the clay. I chose to make my lines random spaced.
Bake the three bracelets as directed in Step 1 above.
Bake the three bracelets as directed in Step 1 above.

Once the bracelets have baked and cooled, I apply the Gloss Glaze to just the areas with glaze because I want the beautiful matte surfaces of the Souffle to show.

- Choosing a selection results in a full page refresh.
- Opens in a new window.