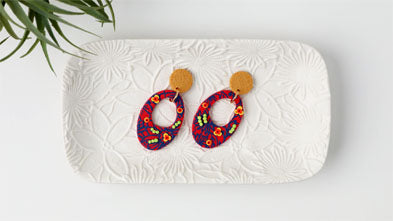


Sculpey Soufflé™ Silkscreen Slab Earrings
Sculpey Soufflé™ Silkscreen Slab Earrings
Designed by Amy Koranek
Read More
Using a silkscreened image in the background makes the perfect easy start to a little slab building technique.
COMPLETION TIME:
60 Minutes to make, bake, and assemble
Read Less
ADDITIONAL SUPPLIES
- Glossy navy blue acrylic paint
- Water basin large enough to accommodate the silkscreen
- Small piece of stair tread for texture
- 10mm Gold tone jump rings (2)
- Gold tone ear posts with backs (2)
- Silicone glue

Project Instructions
- Getting Started:
Start with clean hands, unwrap and knead clay until soft and smooth, or condition by running clay though a Pasta Machine. We recommend using a designated machine for clay purposes only. When working with multiple colors, clean hands with soap and water or baby wipes (we have found that baby wipes work best) before switching colors. Shape clay, pressing pieces firmly together. Wash hands after use.
- Baking:
For just one pair of earrings you will need 1/4 bar of Raspberry Soufflé™. In this tutorial I have sheeted the entire bar.
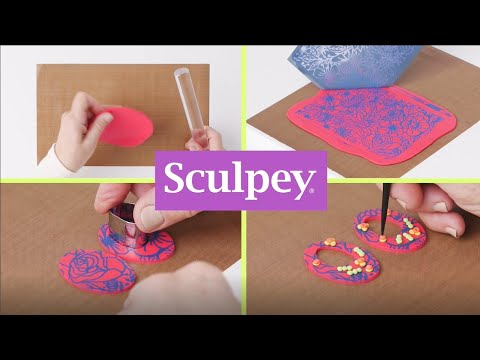
Sheet conditioned Raspberry to 1/8” thick and place on your work surface. Roll it so that it sticks down well and won’t move while you silkscreen the clay.
Burnish the silkscreen (shiny side down) onto the clay pressing out air bubbles with your fingertips.
Prepare a basin of water that you can immediately place the silkscreen and squeegee into when you have completed the screen.

Squirt a bead of paint across one of the short edges of the screen.

Holding the squeegee at a 45-degree angle, slowly and carefully pull the paint across the silkscreen.

Peel the silkscreen away from the clay starting at one corner. Immediately place the screen and the squeegee into the water.

Allow the paint to dry completely on the clay before cutting.

Once the paint is dry, cut two of the largest oval shapes.

We will use the medium sized Irregular Oval Cutter to remove the centers. For the right-hand sample (shown), cut the center out leaving a 1/8” border at the top of the Raspberry piece.
For the left-hand sample (shown), flip the Raspberry piece over. Remove the center with the medium Irregular Oval Cutter leaving a 1/8” border at the top.
For the left-hand sample (shown), flip the Raspberry piece over. Remove the center with the medium Irregular Oval Cutter leaving a 1/8” border at the top.

Carefully flip the left piece right side up. As shown here, cutting from the back side will create mirror image earrings.

Next add the details.
From Pistachio, add little strings of tiny balls in series.
Make tiny petals from Canary and add these as shown.
Use the Ball Tool to press divots in the centers of the Canary pieces.
Add little balls of Mandarin to the divots in the Canary decorations.
Poke all the Mandarin balls with the Blunt Point Tool.

Roll 18K Gold Premo to 1/8” thick sheet. Cut two 3/4” Circles from the clay. Texture the circles with the piece of stair tread. Lay them out above the ovals to audition for assembly.

Here’s the earring layout that I have chosen. Poke holes in the bottom of the gold buttons for later assembly.
Bake the pieces following the baking instructions for Sculpey Premo™. Allow the pieces to cool completely before handling.
Bake the pieces following the baking instructions for Sculpey Premo™. Allow the pieces to cool completely before handling.

Use flat nose pliers to assemble the earrings with the jump rings. Glue posts to the back of the buttons and allow to dry completely before handling.

- Choosing a selection results in a full page refresh.
- Opens in a new window.