
Sculpey Soufflé™ Mist Over Fiji Bracelet
Sculpey Soufflé™ Mist Over Fiji Bracelet
Designed by Diana Ferguson
Read More
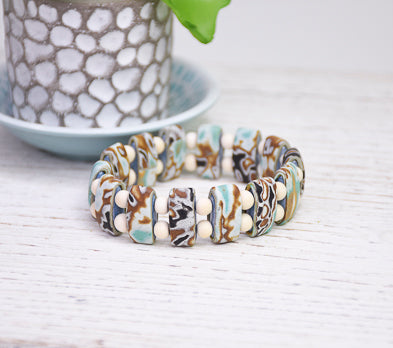
This tropical island inspired stretch bracelet is as fun to make as it is to wear. It’s constructed using two-hole Czech glass carrier beads covered with a Mokume Gane veneer. The addition of natural color wood rounds adds a breezy, boho vibe.
Carrier beads are typically used to “carry” strips of Peyote Stitch beadwork in order to create complex looking bracelets and necklaces. But I thought, why not use them to “carry” a beautiful polymer clay veneer instead? For this project, we’ll use a layered Mokume Gane technique paired with a gorgeous palette comprised of Sculpey® Soufflé™ Fiji, Poppy Seed, Igloo, Latte, and Cowboy.
TIME TO COMPLETION: Time (excluding baking): 2 to 2-1/2 hours
DESIGNER TIPS:
• For this tutorial, Setting 1 on the Pasta Machine represents the thickest setting.
• There are many different Mokume Gane techniques and any of them can be used to create veneers that will work for this bracelet design. The technique I used was inspired by a tutorial from Angela Barenholtz of Angela Designs.
• Feel free to experiment! Layering the clay colors differently and varying sheet thicknesses can give you a different look. Or, select different accent bead sizes and materials. What about 8 mm wood beads instead 4-5 mm? Or coral instead of wood? The options are endless.
Read Less
DESIGNER TIPS:
• For this tutorial, Setting 1 on the Pasta Machine represents the thickest setting.
• There are many different Mokume Gane techniques and any of them can be used to create veneers that will work for this bracelet design. The technique I used was inspired by a tutorial from Angela Barenholtz of Angela Designs.
• Feel free to experiment! Layering the clay colors differently and varying sheet thicknesses can give you a different look. Or, select different accent bead sizes and materials. What about 8 mm wood beads instead 4-5 mm? Or coral instead of wood? The options are endless.
ADDITIONAL SUPPLIES
- Deli paper
- Brayer
- 1” flat head stencil brush (dickblick.com)
- 13-15 Czech Glass carrier beads, two-hole, 9 mm x 17 mm, in color of your choice. I used Blue Luster (jillwiseman.com)
- 13-15 4-5 mm round wood beads, Taiwanese cheesewood (waxed) (Firemountain.com)
- Crystal Tec 1 mm elastic cord in clear (amazon.com)
- Bead stopper or binder clip
- Scissors
- Baby Wipes
- E6000, Loctite Super Glue, or Alene’s Jewel-It Embellishing Glue

Project Instructions
- Getting Started:
Start with clean hands, unwrap and knead clay until soft and smooth, or condition by running clay though a Pasta Machine. We recommend using a designated machine for clay purposes only. When working with multiple colors, clean hands with soap and water or baby wipes (we have found that baby wipes work best) before switching colors. Shape clay, pressing pieces firmly together. Wash hands after use.
- Baking:
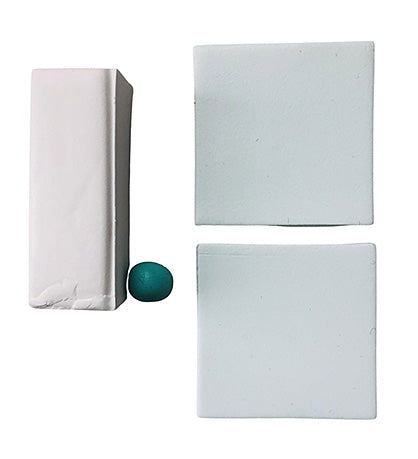
Condition together 1/4 package of Souffle Igloo and a pea-sized amount of Souffle Fiji. Run through Pasta Machine at Setting 1. Cut 2 squares 1-1/2” x 1-1/2”. Set aside.
Condition a quarter package each of Souffle Fiji, Souffle Latte, and Souffle Cowboy. Run through Pasta Machine at Setting 1. Cut a 1-1/2” x 1-1/2” square of each (use a square cutter if you have one).
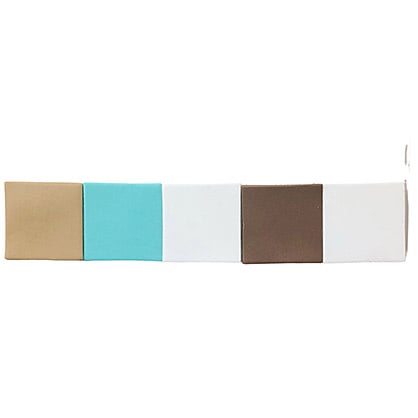
Create a stack of Latte, Fiji, Fiji-tinted Igloo, Cowboy, and Fiji-tinted Igloo.

Run this stack through the pasta machine on Setting 1.

Flip the Rectangle so the Latte side is facing up and cut in half. Set aside.

Condition 1/4 package of Souffle Poppy Seed. Run through Pasta Machine on Setting 4. Using your clay blade, cut 2 pieces that roughly match the size of one of the rectangle pieces created in Step 6. The objective is to create a sandwich layer of these two pieces that is slightly thicker than the thickness of the first rectangle you created.

Create your final sandwich by layering as follows: black rectangle, black rectangle, multicolor rectangle, lightest side down, multicolor rectangle, lightest side down.

Run this sandwich through Pasta Machine on Setting 1.

Make sure your texture sheet is clean. If necessary, dust lightly with cornstarch to prevent sticking. Place texture sheet on final sandwich, with black clay side facing up.

Applying firm pressure (I like to work on a low table for better leverage), slowly and carefully run the roller over the texture sheet. Firm pressure is important so that the texture goes deep but not all the way through the clay sandwich. Slow is important so the sandwich doesn’t bunch up under the pressure of the roller

Carefully lift texture sheet from clay sandwich.

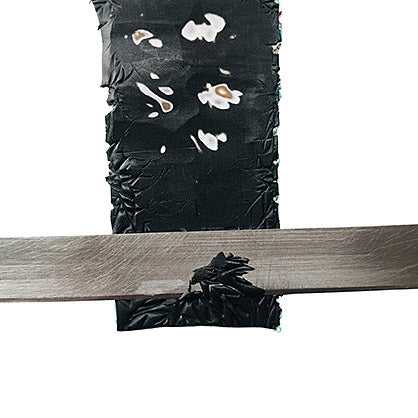
Place your textured sandwich on a hard surface that it will stick to. I like a ceramic tile for this purpose. Using a flexible clay blade, shave off the raised areas of the sandwich. Do this with the blade parallel to the sandwich and slightly bent. Go very slowly, shaving off very thin layers, bit by bit. The objective is reveal the colored patterns that lies beneath the black. Take your time and go slowly and methodically. Never shave the entire sheet at once. It’s helpful to clean the blade with a baby wipe between every few shaves, or even after every shave.
Note: The excess clay can be wadded together in a ball to be saved for a future use.
Stop when you reached a point where you’re satisfied with the revealed pattern. I wanted lots of the beautiful Fiji to show through, so I made sure to shave down to reach that point somewhat regularly throughout the sheet.
Once you’ve obtained the desired pattern, place the veneer between two sheets of deli paper and roll lightly with your brayer to smooth and even the sheet.
Do not run the sheet through the Pasta Machine as this will distort the pattern.
Note: the veneer is fairly thin, so handle carefully.
Do not run the sheet through the Pasta Machine as this will distort the pattern.
Note: the veneer is fairly thin, so handle carefully.

Lay the carrier beads across your veneer and use as a guide to cut the veneer into strips the width of your carrier beads (approximately 5/8” wide) and a little over 1-1/2” long, using your clay blade. Cut as many strips as the number of carrier beads you’re using. I find 14 carrier beads interspersed with the 5 mm wooden beads fits a 6-1/4” to 6-1/2” wrist nicely.

Now you will cover your carrier beads with the veneers. Flip the veneer strips over so the un-patterned side is facing up.
Place the carrier bead on the strip about a third of the way from the top of the strip.
Fold strip around carrier bead, so that the ends meet. This doesn’t have to be a precise edge; they can even overlap a little bit.
Use your fingers to gentle meld the seam and push the strip against the edges of the bead.

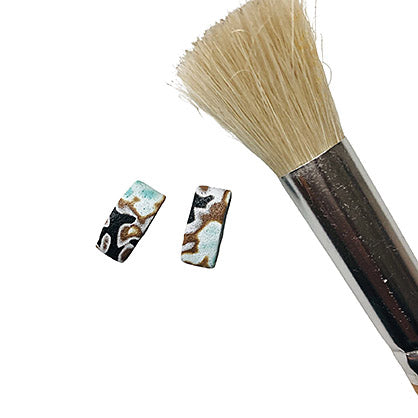
Using the flat head stipple brush, gently tap into the veneer strip. This adds a fun, beachy texture and helps adhere the veneer to the bead. Using a light tapping motion with the stipple brush, push the veneer just slightly over the edge of the carrier bead. If you go too far, you can clean up any extra clay by slicing it off with your clay blade.
Repeat this veneering process for all the carrier beads.
Bake the veneered carrier beads according to the instructions for Souffle.
Repeat this veneering process for all the carrier beads.
Bake the veneered carrier beads according to the instructions for Souffle.
Cut two lengths of elastic cord, each about 13” long. Stretch the cord, release and then clip the two strands with a bead stopper or binder clip.
Begin the stringing process. Alternate round wood beads with veneered carrier beads. Begin with a set of the wood beads and end with a carrier bead.
Begin the stringing process. Alternate round wood beads with veneered carrier beads. Begin with a set of the wood beads and end with a carrier bead.

Using a Surgeon’s Knot, tie the elastic cord ends together.
Secure knots with a dab of E6000, Loctite Super Glue, or Aleene’s Jewel-It Embellishing Glue. Allow to dry, then trim excess cord. The bracelet is now ready to wear!
Secure knots with a dab of E6000, Loctite Super Glue, or Aleene’s Jewel-It Embellishing Glue. Allow to dry, then trim excess cord. The bracelet is now ready to wear!

Here is a closeup shot of the finished bracelet!

- Choosing a selection results in a full page refresh.
- Opens in a new window.