

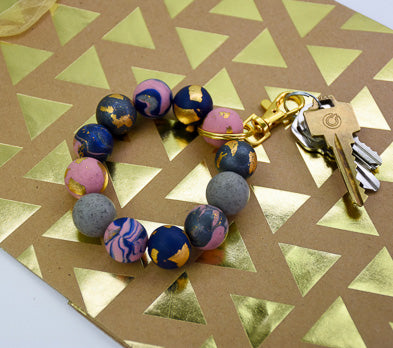
Sculpey Soufflé™ French Pink Beaded Keychain Wristlet
Sculpey Soufflé™ French Pink Beaded Keychain Wristlet
Designed by Gretchen Amberg
Read More
Sculpey Soufflé™
Read Less
ADDITIONAL SUPPLIES
Sculpey Soufflé™ French Pink teams up with classic colors of Sculpey Premo™ to create this awesome keychain wristlet. wear your key in style!
TIME TO COMPLETION: 75 minutes including baking
Project Instructions
- Getting Started:
Start with clean hands, unwrap and knead clay until soft and smooth, or condition by running clay though a Pasta Machine. We recommend using a designated machine for clay purposes only. When working with multiple colors, clean hands with soap and water or baby wipes (we have found that baby wipes work best) before switching colors. Shape clay, pressing pieces firmly together. Wash hands after use.
- Baking:
Condition a 3/4 package of each of the colors listed in this set of instructions.
Pick two or three colors and roll small logs, about 3/8” in diameter and 1” long. If you prefer to have less of one color, make one of the logs smaller in diameter: an example of this is shown in the image.
Pick two or three colors and roll small logs, about 3/8” in diameter and 1” long. If you prefer to have less of one color, make one of the logs smaller in diameter: an example of this is shown in the image.

Use the tweezers to add pieces of the gold leaf to the top of the clay. The amount of gold leaf added will determine how much gold fleck you will see in the finished beads.

Twist and roll the clay with your hands until you achieve the desired amount of marbling.

Press the marbled lump of clay into the 18 mm measuring tool from the bead making kit.
Use the super slicer blade to trim the clay flush with the surface of the measuring tool. Remove the excess clay and set to the side and remove the clay from the measuring tool. Press an indentation into the flat sliced side of the lump of clay and roll the sides up over the indentation: this will help the marbling appear seamless.
Use the super slicer blade to trim the clay flush with the surface of the measuring tool. Remove the excess clay and set to the side and remove the clay from the measuring tool. Press an indentation into the flat sliced side of the lump of clay and roll the sides up over the indentation: this will help the marbling appear seamless.

Roll the clay into a ball-like shape and place in the groove of one half of the 18 mm rollers. Place the other half of the roller tool on top and slide the two halves of the tool back and forth against each other a few times. Check the roundness of the bead and, if needed, continue rolling the bead. When finished shaping the bead carefully remove the bead from the rolling tool and set to the side.

For the solid color beads measure the clay using the measuring tool from the bead roller kit. Roll the clay into a ball and apply flakes of the gold leaf to the surface.
Add the clay ball to the rollers and follow step 6 to shape the bead.
If not adding flakes of gold leaf to the bead, as in the case of the Grey Granite beads, measure the clay, roll a ball, and add it directly to the bead rollers.
Add the clay ball to the rollers and follow step 6 to shape the bead.
If not adding flakes of gold leaf to the bead, as in the case of the Grey Granite beads, measure the clay, roll a ball, and add it directly to the bead rollers.

Continue making beads until you have a couple of each variety.

Use the long skewer part of the bead baking set to make the holes in your beads. Place the bead on the pointed tip of the skewer and slowly turn the bead as you push it onto the skewer. After you have the skewer pushed through to the other side of the bead, remove the bead, turn the bead 180-degrees, and slide the skewer through the hole. Remove the bead and set to the side.
Note: Slowly turning the bead and pushing the skewer back through from the other side creates a smooth hole which will make it easier to string the beads onto the cord.
Note: Slowly turning the bead and pushing the skewer back through from the other side creates a smooth hole which will make it easier to string the beads onto the cord.

After you have put holes in all the beads add them back to the skewers making sure to leave space in between each bead. Bake the beads for 45 minutes, remove from the oven, and let cool completely before removing the beads from the skewers.

Cut a piece of elastic beading cord which will is long enough to wrap at least two times around your wrist. Slide the keychain finding onto the cord and start adding the beads. Continue adding beads until the bracelet is long enough to fit comfortably around your wrist without sliding off your hand.
Tie the ends of the cord into an overhand knot and pull the knot as close to the beads as possible. Add a small dab of glue and let dry. Once the glue is dry trim the excess cord to about a 1/4” away from the knot.
Tip for getting the knot down to the beads After you have finished stringing the keychain finding and beads onto the cord form an overhand knot around the end of a needle tool. Hold the ends of the cord and slowly pull the needle, with the cord, down towards the beads. Keeping the needle tool in the opening of the knot will keep the knot from closing before you get close to the beads. Once the knot is where you want it, remove the needle tool, and add the drop of glue to the knot.

- Choosing a selection results in a full page refresh.
- Opens in a new window.