Skip to product information
1 of 1

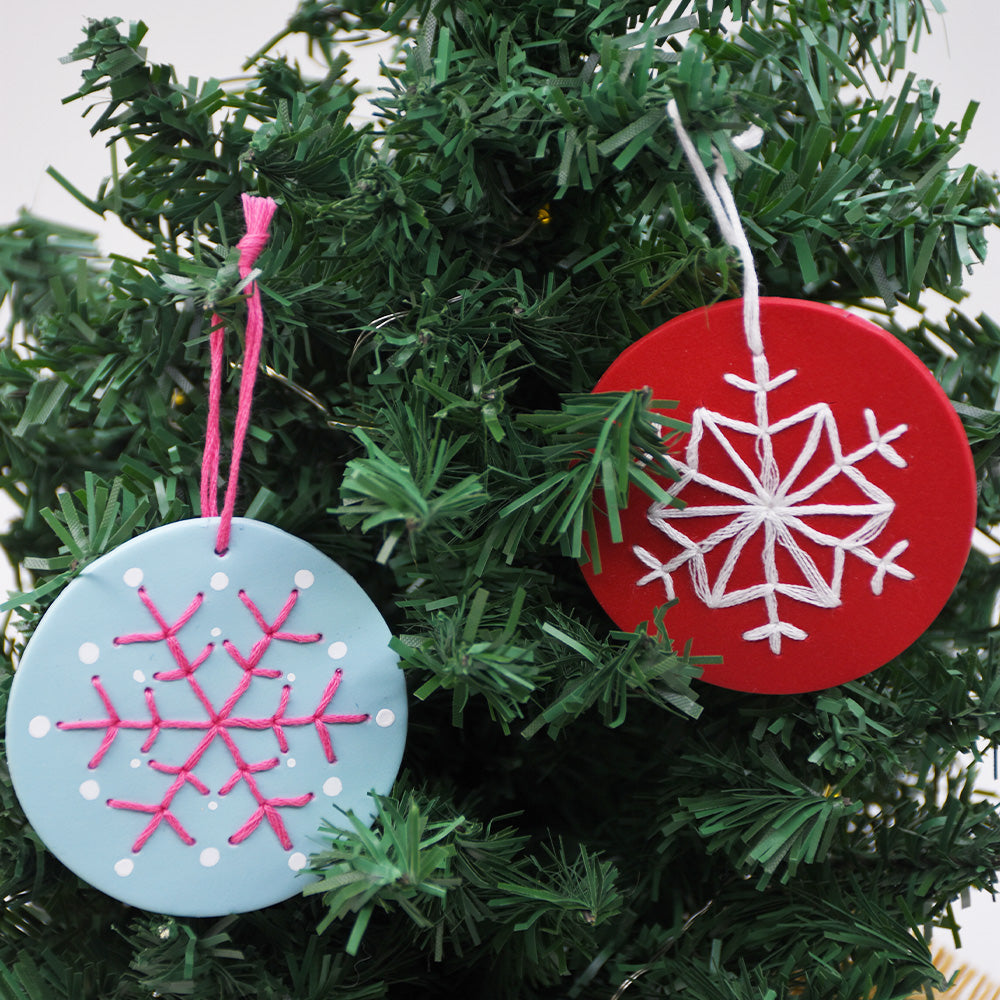
Sculpey Soufflé™ Embroidered Snowflake Ornaments

Sculpey Soufflé™ Embroidered Snowflake Ornaments

Designed by Amy Koranek
Read More
Soufflé™ is so strong and flexible that you can sew or embroider into it. It is not necessary to pre-poke the pattern like I’m showing you in this tutorial. However, it is easier on the hands and fingers to make a pre-poked pattern. Download or draw a snowflake to get yourself started with a good pattern. In this tutorial I’m showing you two different color variations as well as two different finishing ideas. TIME TO COMPLETION: 2 Hours to make, bake (bakes 2X), and assemble (each snowflake); some time needed for paint to dry if adding acrylic paint dots
Read Less
ADDITIONAL SUPPLIES
  • Snowflake graphic - mine was downloaded from a free website
  • 2.5” Circle cookie cutter or size of your choice
  • Red fine tip marker
  • Embroidery floss in white and bright pink
  • Embroidery needle
  • Scissors
  • White acrylic paint marker
View full details
Project Instructions

Step 1

Getting Started:

Please make sure your work area is covered and you are not working on an unprotected surface. We recommend working on the Sculpey® Oven Safe Work Mat, wax paper, metal baking sheet, or disposable foil. Uncured clay may damage unprotected furniture or finished surfaces. Be sure to cover your crafting area appropriately.

Start with clean hands, unwrap and knead clay until soft and smooth, or condition by running clay though a Pasta Machine. We recommend using a designated machine for clay purposes only. When working with multiple colors, clean hands with soap and
water or baby wipes (we have found that baby wipes work best) before switching colors. Shape clay, pressing pieces firmly together.  Wash hands after use.

Baking (also called Curing):

Begin by preheating oven to 275 °F (130 °C). After you are done creating; for best results bake clay on an oven-proof surface such as metal, aluminum foil, an index card or the Sculpey® Oven Safe Work Mat at 275°F (130 °C) for 30 minutes per ¼" (6
mm) of thickness according to package directions. Oven safe glass or ceramic
surfaces are also acceptable for baking; however please note that the baking times may take longer as the glass or ceramic surfaces take longer to heat up. For best baking results, use an oven thermometer. DO NOT USE MICROWAVE OVEN. DO NOT EXCEED THE ABOVE TEMPERATURE OR RECOMMENDED BAKING TIME.

Step 2

The first step is to draw or download a snowflake pattern. Make sure the pattern fits inside the circle shaped cutter that you will be using.

Step 2

Step 3

Next, use a fine tip red marker to make points on the snowflake pattern where you want the needle to go through. You can make this part as detailed as you want.

Step 3

Step 4

Sheet Cherry Pie through the pasta machine on the third thickest setting. Cut out two same sized circles for each snowflake - one for the front and one for the back. Set one circle aside for the backing.

Step 4

Step 5

For the circle which will be the embroidered front, place the snowflake pattern on top of the clay as centered as possible.

Step 5

Step 6

Use a Needle Tool to poke through every red marked point. Push the Needle Tool all the way through the paper and into the clay until the tip touches the work surface. With the needle still in place, carefully awl the hole slightly larger than just a poke.

Step 6

Step 7

Remove the paper template to see the pattern.

Step 7

Step 8

Make one hole slightly larger at the top for the hanger position with the Blunt Point Tool.

Step 8

Step 9

I also want to show you a blanket-stitched finish around the edge. If you want your ornament to have a blanket stitch, poke a row of holes all the way around the outer edge at least 1/8” from the edge. To view this variation, please see the finished photos.

Step 9

Step 10

No matter which variation you prefer, make sure you have a slightly larger hole at the top for hanging the ornament. This hole can be made with the Blunt Point Tool.

When all the holes are placed, bake this disk following the baking instructions for Sculpey Soufflé™. Allow to cool completely before handling. In this tutorial I am baking two different versions of the front snowflake pattern: one has just a snowflake and one has the snowflake plus empty holes for the blanket stitch to be added later.

Step 10

Step 11

When the ornament front is completely cool, start the stitching process to make it look embroidered. Cut a 24” length of six stranded embroidery floss and thread it through an embroidery needle leaving at least a 6” tail. Tie a knot at the end. The knot will be hidden in the back. Begin the stitching anywhere you want to. All the back of the stitching and knots will be hidden by the other disk of clay later. You can stitch in and out through the same holes many times without worrying that the clay will break, so you can stitch the snowflake in any order that you wish. Here I’m starting with one of
the main arms of the snowflake.

Step 11

Step 12

This is my halfway point. You can see that I used the center hole many times without worrying that it will break.

Step 12

Step 13

Here is the finished pattern. This pattern will not have the blanket stitch around the edge.

Step 13

Step 14

This is another variation showing how the blanket stitch will work. Place a the raw disk (set aside in Step 4) directly onto a baking sheet.
This way it will not need to be moved for baking. Lay the embroidered piece on
top of the raw circle of Cherry Pie clay matching the edges. PLEASE NOTE: this
is 2 layers thick - the top layer has the embroidered snowflake and the bottom
layer is a raw clay circle.

Use the Needle Tool to poke through the holes around the edge in the top baked disk and into the raw disk below. This way the two disks will line up perfectly for stitching together. Press down slightly on the embroidered snowflake pattern to embed the back of the stitches into the raw disk below.

Step 14

Step 15

Remove the top embroidered disk to show the raw disk below.

Step 15

Step 16

Squirt a small bead of Oven Bake Clay Adhesive on top of the clay as shown.

Step 16

Step 17

Smooth the Oven Bake Clay Adhesive all over in a thin layer with your fingertip.

Step 17

Step 18

Replace the top embroidered piece exactly as before on top of the raw clay disk with the Oven Bake Clay Adhesive sandwiched inside. Make sure all the edges line up. Use the Needle Tool to make sure the holes are lined up.

Step 18

Step 19

For the version without the blanket stitching around the edges, lay a raw disk of Cherry Pie (set aside in Step 4) on the baking sheet.


Press the top embroidered piece into the clay disk to impress the backside of
the stitching in the clay.

Step 19

Step 20

For the version without the blanket stitching around the edges, lay a raw disk of Cherry Pie (set aside in Step 4) on the baking sheet.
Press the top embroidered piece into the clay disk to impress the backside of
the stitching in the clay.

Step 20

Step 21

Replace the top embroidered piece exactly as before on top of
the raw clay disk with the Oven Bake Clay Adhesive sandwiched inside. Make sure
all the edges line up.

Use the Needle Tool to poke the hanger hole through the bottom
disk.

Bake the ornament(s) again - yes! Bake even the embroidered
ornament following the baking instructions for Sculpey Soufflé™. Allow to cool
completely before handling.

Step 21

Step 22

For the blanket-stitched ornament, please research blanket stitching or whip stitching to sew through both the front and the back of the ornament holding them together.

Add a floss loop to the top of each to create a hanger.

Step 22

Step 23

For the color variation I started with a slightly different snowflake pattern and marked it with red points for my stitching pattern.

Step 23

Step 24

The color is 3 parts Soufflé™ Igloo mixed completely with 1 part Soufflé™ Sea Glass. Sheet the mixed clay through the pasta machine on the third thickest setting and cut out two circles for each snowflake.

Step 24

Step 25

Follow all instructions above to create an embroidered snowflake using bright pink floss. This is the snowflake finished with the blanket stitching as described above.

Step 25