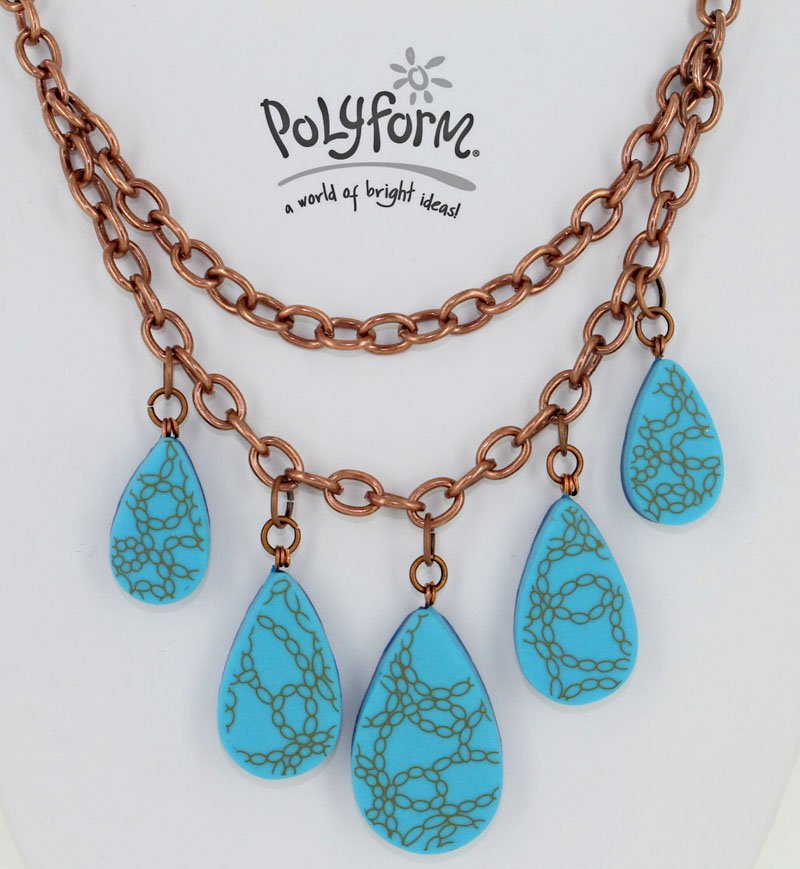
Sculpey Soufflé Chain Link Decal Necklace
Sculpey Soufflé Chain Link Decal Necklace
Read More
Beautiful combination of colors with an added design flare using the new clay decals.
Designed by Amy Koranek
Read Less
ADDITIONAL SUPPLIES
Clear kitchen stretch wrap, Small cup of water, Paper towels, Scissors, Pen or pencil, Copper tone 2” eye pins (5), Copper tone 6mm jump rings (5), Copper tone chain 18”, Copper tone chain 6”, Copper tone toggle clasp set,
Copper tone 8mm jump rings (2)
Jewelry pliers -round nosed|Clear kitchen stretch wrap, Small cup of water, Paper towels, Scissors, Pen or pencil, Copper tone 2” eye pins (5), Copper tone 6mm jump rings (5), Copper tone chain 18”, Copper tone chain 6”, Copper tone toggle clasp set,
Copper tone 8mm jump rings (2)
Jewelry pliers -round nosed

Project Instructions
Getting Started:Polymer clay may stain. CLAY MAY DAMAGE UNPROTECTED FURNITURE OR FINISHED SURFACES. DO NOT USE polymer clay on unprotected surfaces. We recommend working on the Sculpey® Work ‘n Bake Clay Mat, wax paper, metal baking sheet, or disposable foil. Start with clean hands and work surface area. Knead clay until soft and smooth. For best results, clean your hands in between colors. Shape clay, pressing pieces together firmly. Bake on oven-proof glass or metal surface at 275°F (130 °C) for 30 minutes per ¼" (6 mm) thickness. For best baking results, use an oven thermometer. DO NOT USE MICROWAVE OVEN. DO NOT EXCEED THE ABOVE TEMPERATURE OR RECOMMENDED BAKING TIME. Wash hands after use. Baking should be completed by an adult. Begin by preheating oven to 275 °F (130 °C). Test temperature with oven thermometer for perfectly cured clay. For best results, condition all clay by running it through the Clay Conditioning Machine for several passes on the widest setting. Fold the clay in half after each pass and insert the fold side into the rollers first.
Sheet each color through the Clay Conditioning Machine on the thickest setting. You will need sheets 2” X 3” of each color. Layer the Robin Egg over the Lagoon and roll over them with the roller to seal together.

Place clear kitchen stretch wrap over the top of the clays before cutting out the shapes. The clear wrap will keep the cut shapes from getting stuck in the cutters and it will give each shape a nice beveled edge. Using the three smallest teardrop shaped cutters, cut out two small teardrops, two medium teardrops, and one large teardrop. If the clear wrap is stuck to the top of the clay pieces, gently peel it off with your fingernail.

Trace the shapes of the teardrops on the decal sheet on the inside edge of the teardrop cutters. Cut out the teardrop shapes from the decal sheet inside the line. Make sure the decals shapes are just slightly smaller than the clay shapes. Trim as needed.

Soak the decals in a shallow cup of water for 30 seconds. Slide a decal piece off of the paper backing and onto a matching clay shape. Remove excess water with a paper towel.

Smooth out any air bubbles with the squeegee provided in the decal kit.

Repeat Steps 6,7 for each shape.
Push an eye pin up through each teardrop from the bottom to the tip, pushing the eye completely into the clay.. Bake the clay pieces with the eye pins in place according to the directions above and let cool completely.


When the clay pieces are completely cool, bend the remainder of the eye pin down into a coil with the round nose pliers. Repeat for each piece. Add a 6mm jump ring to the eyes. Attach the largest teardrop by the jump ring to the middle of the long chain.

Attach the medium teardrops to the chain on either side of the large teardrop with one inch spacing.

Attach the small teardrops to the chain on either side of the medium teardrops with one inch spacing.

Attach an 8 mm jump ring to the toggle and to the clasp. Attach the toggle to one end and the clasp to the other end of the long chain with the jump rings.

Open a link on the end of the short chain. Attach the opened end to the long chain 1.5” above the small teardrop and close the link. Open a link on the other end of the short chain and attach 1.5” above the other small teardrop. Close the link and enjoy!

