

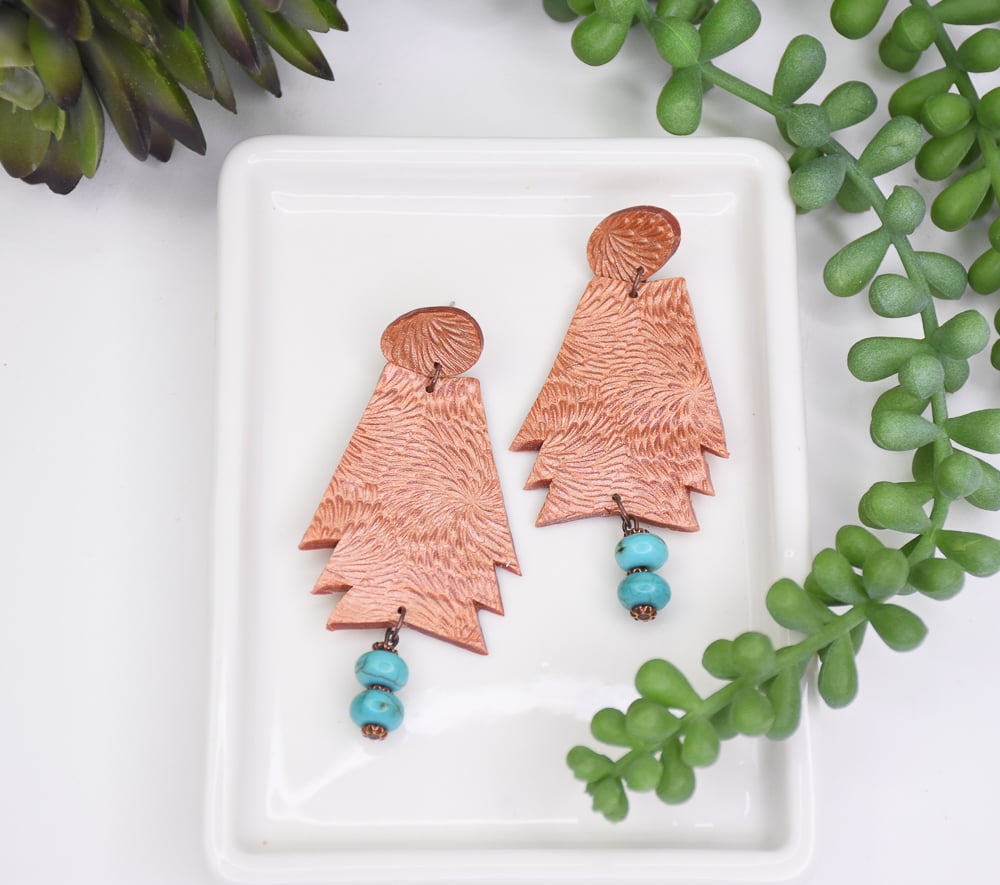
Sculpey Premo™ Copper Optical Illusion Earrings
Sculpey Premo™ Copper Optical Illusion Earrings
Designed by syndee holt
Read More
These cool earrings look like they have a textured pattern, but they are absolutely flat! We will be using a technique called "Sutton Slice” and a great texture sheet as shape templates from Cool Tools to create these amazing earrings.
TIME TO COMPLETION: 30 minutes to make and assemble/ 30 minutes to bake
Read Less
ADDITIONAL SUPPLIES
- Cool Tools Tools: Aztec Drop Jewelry Shape Template, Organic Shape 1 Jewelry Shape Template- Fireworks Fineline
- Exacto-type craft blade
- Gold or Antique Gold jump rings (2 or 4 if you add beads)
- Posts and backs (2)
- Optional: 4 beads and spacers and headpins (2)
- Jewelry pliers
- Brush for glaze
- Small spray bottle of water
- Couple sheets of plain paper
- Small smooth tile or sheet of smooth glass or plastic
Project Instructions
- Getting Started:
Start with clean hands, unwrap and knead clay until soft and smooth, or condition by running clay though a Pasta Machine. We recommend using a designated machine for clay purposes only. When working with multiple colors, clean hands with soap and water or baby wipes (we have found that baby wipes work best) before switching colors. Shape clay, pressing pieces firmly together. Wash hands after use.
- Baking (also called Curing):
Roll the conditioned sheet of clay out on a smooth surface like a tile to your desired thickness. Lightly spray the texture sheet with water and press into the sheet of clay. Remove the texture sheet and set aside.
DESIGNER TIP: I like to use a small block of wood to help me press the texture into the clay evenly.
DESIGNER TIP: I like to use a small block of wood to help me press the texture into the clay evenly.
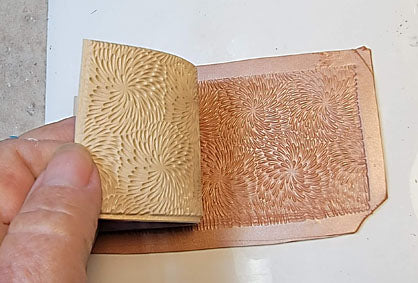
Use both hands on the long thin blade in the Sculpey Essential Tools kit to LIGHTLY shave off the very top portions of the texture. Go slow and just do a little bit at a time as shown!
Make sure to put those shaved bits safely out of the way so that they don’t get back onto your sheet of clay!
DESIGNER TIP: I like to curve my blade slightly.
Make sure to put those shaved bits safely out of the way so that they don’t get back onto your sheet of clay!
DESIGNER TIP: I like to curve my blade slightly.

Use the blade to trim to the edge of the texture so that you can slice off the surface of the entire texture on the edges as well!
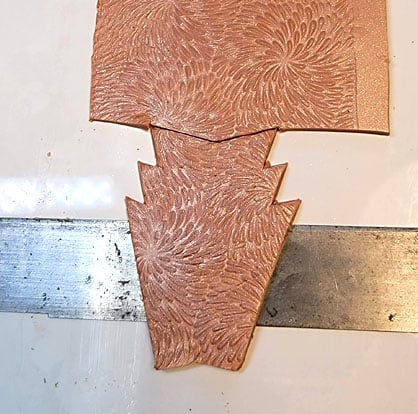
Once the slicing is completed, you can use the clay roller to gently roll over the surface of the clay to even out any slight unevenness.
Once the slicing is completed, you can use the clay roller to gently roll over the surface of the clay to even out any slight unevenness.

Position second from largest template shape and either your long thin blade or an Exacto knife to carefully cut out your shape.

Once the shape is cut out, slide your blade underneath the clay shape to help remove it from the smooth surface.
Repeat steps 5 and 6 for the second earring.
Use the small shape in the Organic Shape 1 template to create two shapes for the post at the top. (Remember to flip the template for the second one to create facing shapes!)
Repeat steps 5 and 6 for the second earring.
Use the small shape in the Organic Shape 1 template to create two shapes for the post at the top. (Remember to flip the template for the second one to create facing shapes!)
Use the needle tool to make your holes for assembly. Put a hole at the bottom as I’m doing in this photo ONLY if you are adding beads at the bottom.
Bake as directed in Step 1 above.
Bake as directed in Step 1 above.

Once the beads have baked and cooled, apply the Sculpey Gloss Glaze with your brush and allow to dry. The glaze will really bring out the patterning and enhance the 3D effect!

Here is my layout to assemble the earrings.

Here is a look at the assembled earrings. Next, I will glue the posts to the back of the top pieces.
It is amazing how the pattern still shows even though the clay is flat now. This is called “mica shift” and occurs in pearlized clays like this one.
It is amazing how the pattern still shows even though the clay is flat now. This is called “mica shift” and occurs in pearlized clays like this one.
