

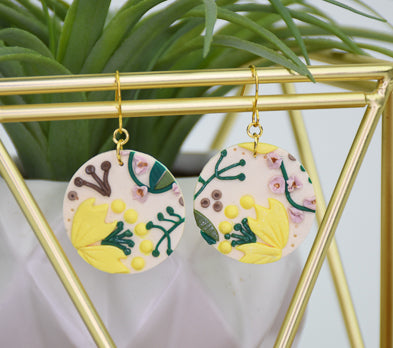
Sculpey Premo™ Butter Yellow Floral Vine Slab Earrings
Sculpey Premo™ Butter Yellow Floral Vine Slab Earrings
Designed by Cindi McGee
Read More
Slab building can look really complicated, but this project leads you step-by-step through the process to create this lovely little floral slab featuring a Sculpey Premo™ Butter Yellow background and soft spring colors.
Read Less
ADDITIONAL SUPPLIES
- Clay extruder and small multi-hole disc
- Fabric such as linen for texture
- Metallic Gold acrylic paint
- Gold toned findings - jump rings, earring wires, leaf charms (optional)
- Hand drill or Dremel to make holes for findings
- Jewelry pliers
Project Instructions
- Getting Started:
Start with clean hands, unwrap and knead clay until soft and smooth, or condition by running clay though a Pasta Machine. We recommend using a designated machine for clay purposes only. When working with multiple colors, clean hands with soap and water or baby wipes (we have found that baby wipes work best) before switching colors. Shape clay, pressing pieces firmly together. Wash hands after use.
- Baking:
Condition and roll Butter clay to desired thickness for slab. Mine was rolled to setting #2 on the pasta machine. (#1 is widest) Cut rectangle in desired slab size.

Place the clean fabric over the surface and press to transfer the fabric texture to the clay sheet.

Condition and roll Sunshine clay slightly thinner than Butter clay. I rolled mine to setting #3 on the clay machine.
Use drop shaped cutter from Mini Geometric set to cut 2 drops for every flower you wish to create.
Use drop shaped cutter from Mini Geometric set to cut 2 drops for every flower you wish to create.

Use the pointed end of the drop cutter to cut two “v” shaped notches in the rounded end of each yellow drop.

Use the small oval cutter from the Mini Geometric set to cut a small section from both sides of the pointed end and make the petals slightly smaller and slightly more curved on the sides.

To create the flowers, place two petals with the ends touching as shown for each flower.

Re-roll Sunshine clay to setting #1 (widest) and use smallest Etch ‘n Pearl tool to create pearls. Place a row of pearls in an upward arc over the tops of the petals as shown.

Roll Forest Green and Spanish Olive clay to setting #3. Use leaf pattern on Nature Texture Sheet to texture both sheets of clay.

Use “lemon” shaped cutter from Mini Geometric set to cut leaves from both sheets.

I wanted my leaves slightly smaller, so I used the same cutter to trim a bit off each leaf. This is optional.
Use the clay blade to cut each leaf in half lengthwise.
Use the clay blade to cut each leaf in half lengthwise.

Gather Forest Green and Spanish Olive scraps. Allowing the colors to marble somewhat, roll together into a cylinder to fit into extruder.

Use small multi-hole disc to extrude the green clay.
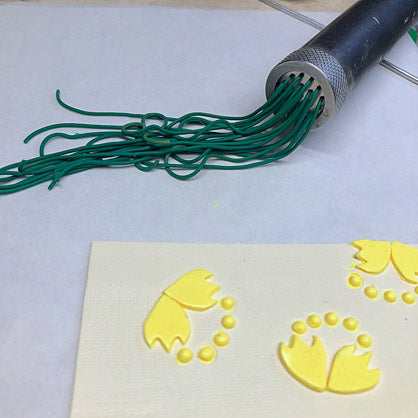
Cut short pieces of the extruded clay to fit from the center of each flower up to the yellow pearls as shown.
Place 3 in each flower with the ends together where the petals meet and extending outward at the top.
Make tiny balls from the green clay and add them to the top of each strand you just added to the flowers.
Place 3 in each flower with the ends together where the petals meet and extending outward at the top.
Make tiny balls from the green clay and add them to the top of each strand you just added to the flowers.

Add strands of the extruded clay where you would like the leafed vines to be.

Add the leaves to the vines as desired. I used half of each color for each finished leaf, leaving a small space between each color.

To create the clustered green berry areas, use your fingers to carefully roll and reduce the size of one of the extruded sections of clay. Then cut small pieces and arrange them to create the clusters.
Make tiny balls of the green clay and add them to the ends of each piece of the clusters for green berries.
Make tiny balls of the green clay and add them to the ends of each piece of the clusters for green berries.

Extrude Cowboy clay with same disc. To create the 3 “twig/berry” clusters, cut 3 small sections and arrange them as shown where you wish to add them.
Make tiny balls and add them to the ends of each “twig.”
Make tiny balls and add them to the ends of each “twig.”

To create the tiny pale pink flowers on the vine, I combined scraps of White, Cowboy, and added in Guava in small amounts until I achieved the shade I wanted.
I rolled it to create a sheet and then used my smallest Etch ‘n Pearl tool to create pearls.
Each pearl was flattened, then “crumpled” a bit and added to the vine.
I used the pointed end of the tool to push them in place.
I rolled it to create a sheet and then used my smallest Etch ‘n Pearl tool to create pearls.
Each pearl was flattened, then “crumpled” a bit and added to the vine.
I used the pointed end of the tool to push them in place.

To make the clusters of 3 “seeds,” I combined a small amount of the blended pink clay with more Cowboy.
Roll the blended color into a small strand and cut tiny equal sections.
Roll the sections into balls and use the tool to make an impression in the center of each. Add them where desired in clusters of 3, with single seeds here and there.
Roll the blended color into a small strand and cut tiny equal sections.
Roll the sections into balls and use the tool to make an impression in the center of each. Add them where desired in clusters of 3, with single seeds here and there.

Use pointed end of tool to make small impressions along the bottom edge of each of the yellow flowers.
I also used the tool to make 3 lines from the tip of each yellow flower petal as shown.
I also used the tool to make 3 lines from the tip of each yellow flower petal as shown.

Use the tip of the tool to add a tiny spot of metallic gold paint to the center of the pink flowers. I left some of my flowers with a more closed effect and did not add paint to those.

Use the round cutter to cut circles for the earrings. Bake according to manufacturer instructions. Let cool.

Make a hole for the jump ring in the top of each earring.

Add the leaf charms (if desired) to small jump rings.
Add slightly larger jump rings to the earrings.
Add a small jump ring to the earring wire.
Loop the jump ring through the larger ring attached to the earring.
Add the small jump ring with the charm to the front of the wire so it hangs in front of the earring.
Add slightly larger jump rings to the earrings.
Add a small jump ring to the earring wire.
Loop the jump ring through the larger ring attached to the earring.
Add the small jump ring with the charm to the front of the wire so it hangs in front of the earring.

- Choosing a selection results in a full page refresh.
- Opens in a new window.