

Sculpey III Sports Dad and Me Frame
Sculpey III Sports Dad and Me Frame
Read More
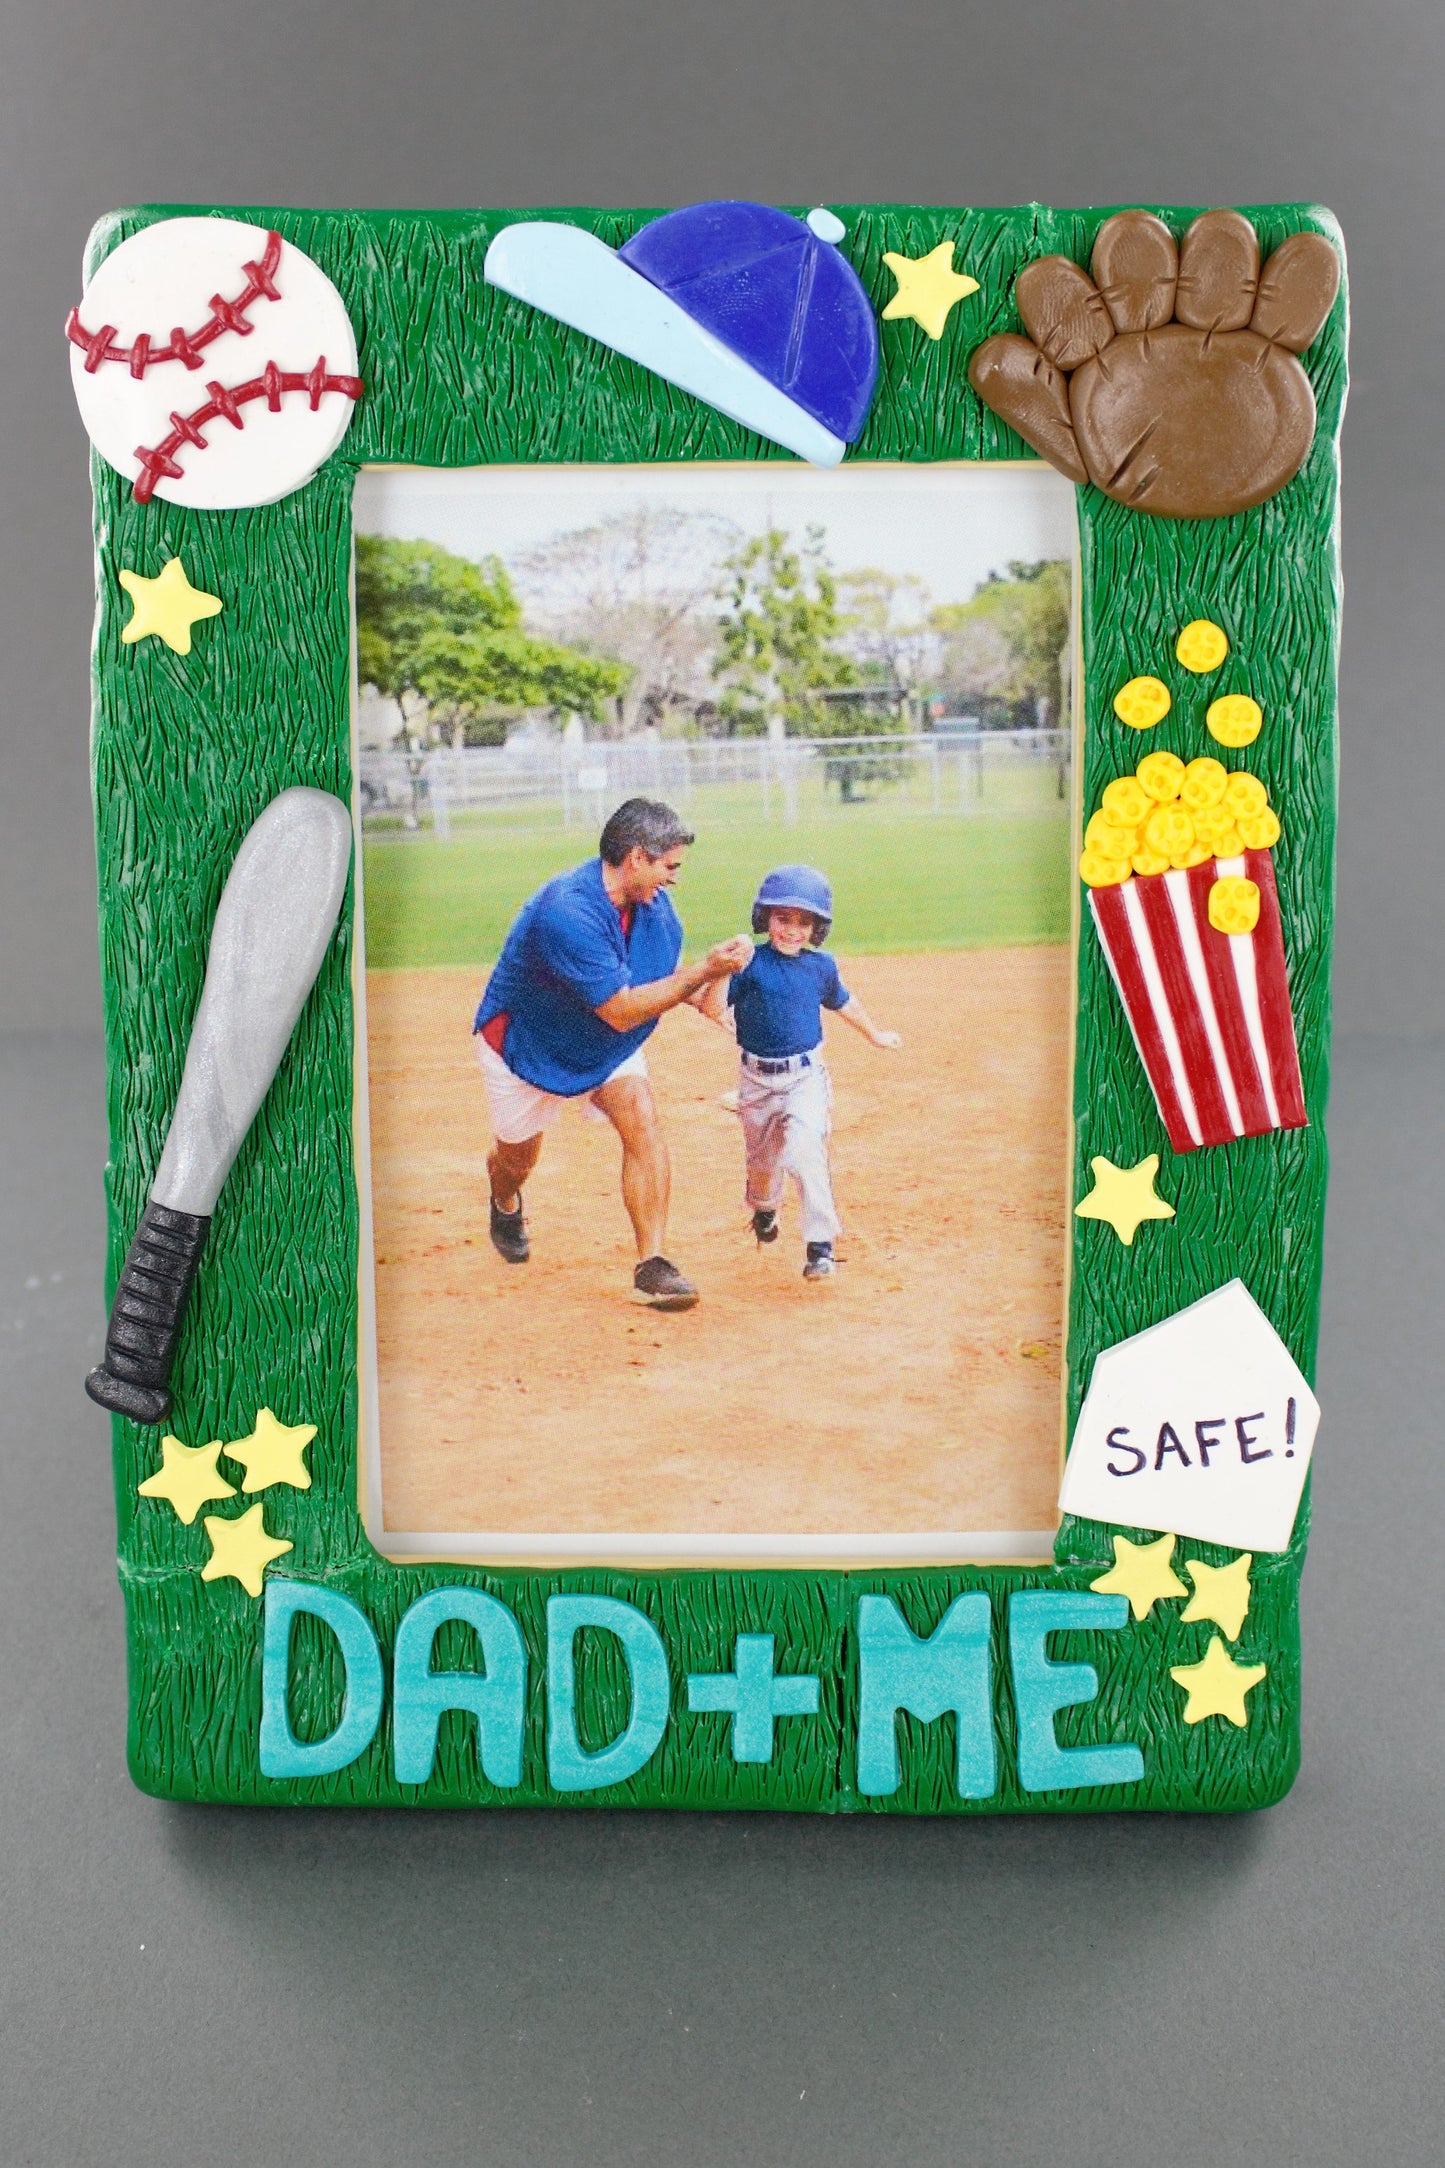
The family can make this great frame for Dad together and even add their team names!
Design by Megan Makes Art
Read Less
ADDITIONAL SUPPLIES
4x6 and wide wooden frame
Project Instructions
- Getting Started:
Start with clean hands, unwrap and knead clay until soft and smooth, or condition by running clay though a Pasta Machine. We recommend using a designated machine for clay purposes only. When working with multiple colors, clean hands with soap and water or baby wipes (we have found that baby wipes work best) before switching colors. Shape clay, pressing pieces firmly together. Wash hands after use.
- Baking:
Remove the backing of the frame, as well as the glass. (You will notice in photos that I forgot to do this for the first few steps!). Mix your 2oz Leaf Green with your 2oz Emerald green to create a grass-like color. Mix until you have created a solid, smooth color.

Using your mixed color, apply a thin rolling pin to it to form a large flat sheet of the clay. Use a Sculpey cutting tool to straighten out the edges. Create pieces a bit longer than the sides of your frame, and slightly wider so you can curve the pieces over the edges as well. Put the scraps to the side. You will need to collect the scraps and roll them out again to make all the side pieces.

Work on one side at a time. Apply Sculpey Bake & Bond adhesive to a side, and then put one clay sheet over it. Press down gently, and then press down around the outer edge to curve the sheet over it. As you’re working on each side, you will find that you may have to trim your sheets so they do not overlap.

Using your hands, push the sides of green together. Use your finger or a Sculpey blending tool to smooth all areas where the sheets come together, even over the sides. I can’t emphasize this blending enough – you do not want the areas where the sides meet to come apart or crack during baking. Then, wash your hands – you’re sure to have green all over them by this point!

Using a toothpick or Sculpey needle tool, score the green sheets all over (except on the outer side edges) to create a grass-like texture. This will take a while. You can skip this step if the color green is close enough to grass for you


Using half of a 2oz Teal Pearl, roll it out into a thin sheet. Take the letter cut-outs and press the letters making up the phrase “DAD + ME” into the clay.

Make sure you’ve washed your hands before touching the white. Using a quarter of a 2oz White, roll out a thin sheet. Use the Sculpey circle cutter of about one or 1.25 inch to create the baseball. Set aside your white circle. If you do not have a round cutter, use your hands to form a round circle.

Roll out a small string of Deep Red with your finger. It should be about 4 inches long. Cut it into thirds. On top of the white circle, use the 1/3 Red string to form a crescent shape on the bottom half, creating the thread of the ball. Repeat at the top with the next third of the Red strip.

Using the last third, roll it out a little thinner. Then cut it into small bits to create the stitches on the ball. Place them over the thread you’ve created. Wash your hands of the red that’s sure to be on your fingertips. Then, with clean hands, place the baseball onto the top left corner of the frame. Gently press down on the white portions of the baseball to attach to the frame.

HOME PLATE:Roll out your white into a thin sheet. Use a cutting tool, cut the white sheet. It should be an inch wide, and 1.25 inches long on both sides. Cut diagonally from halfway up one side to the middle of the top. Repeat on the other side. Then press home plate gently onto the bottom right side. Side note: After this is baked, you can take a permanent marker and write: “SAFE!” onto home plate if you’d like.

BAT:Roll a ½ inch ball out of the Silver clay. Roll it between your palms into a log, applying more pressure at one end than the other to create a cone. This should be about 2 inches long. Place the cone down, and press down upon it to flatten it.

Cut off the thin bottom tip of the cone so it’s straight across. Set it aside. Roll a slightly smaller ball with the Black clay than you did for the Silver. Roll a log with it between your palms. It should be about 1.25 inches long. Then cut off the tips of the tube on either side. Set them aside.

Flatten your black tube as you did the silver cone. Then attach the thin end of the flat silver cone with the black tube by pressing them together. Take the black tips you set aside and roll them up together. Press it as an oval against the bottom of the black handle you’ve created. Flatten.

Press the bat diagonally onto the left side of the frame. Then, use your toothpick or needle tool to create grooves in the Black handle of the bat.

GLOVE:With ¾ inch of your 2oz Hazelnut, roll a log. Split it in half. Roll one half into a ball, then flatten into an oval. Set aside for now.

With the second part of that tube, separate it into five small spheres. You may have some left over like I did. Take those spheres and roll them into short thick logs, then flatten. Attach 4 of the logs to the top of the oval for the fingers of the glove.

To add the thumb to the glove, pinch one end of the last flattened log and press it into the side of the glove. You pick which side, depending on which is your glove-hand!

Use the toothpick or needle tool to indent between the glove fingers to represent the stitches. Press the glove onto the upper right corner of the frame.

HATTaking a ¼ of your 2oz Blue, flatten, and roll flat with a small rolling pin – about the same thickness as your baseball. Use the same round cutter as well to cut out a circle. Then, cut that circle in half and discard one half of it. For now, set aside the half you’re keeping.

Using your Sky Blue, take part of it and roll a small ball – size pictured. Roll it between your palms into a log, applying more pressure at one end than the other to create a cone. Flatten the cone with your fingers, and it should be about 2 inches long.

Use the cutter tool to straighten the long sides of the flattened cone. Now you’ve created the bill of the hat. Then attach the cone to the straight part of your Blue half-circle by pressing them together.

Use the toothpick or needle tool to indent a triangle into the Blue hat, making the top of the triangle reach the middle top of the hat. Then, take a pinch of the Sky Blue and roll a very small ball between your fingertips. Then press it onto the top of the hat, at the top of the triangle you made. Lastly, gently press the hat onto the frame between the baseball and the glove.

POPCORNMaking sure your hands are clean, roll a ¾ inch white ball. From there, flatten it with the small rolling pin. Use the cutting tool to cut it into a rectangle, but make the top wider than the bottom so that it’s also somewhat triangular

Set this aside, and grab the Red! Take a small amount and roll out as flat as you can get. Then use the cutting tool to cut it down to the relative size of the white popcorn box you’ve begun. Use the cutting tool to cut thin strips.

With clean hands (because you know red stains hands!), place the red strips onto the white rectangle leaving some white in between. The strips should be slightly longer than the rectangle popcorn box you’ve made. With each one, begin at the bottom and press the red onto the bottom edge of the white. Then continue to press it down all the way up.

Cut off the excess red hanging off the edges of the white rectangle. Pick up the popcorn box you’ve made, and press it onto the frame, at an angle, between home plate and the glove.

With a small amount of Yellow, roll a bunch of very small balls to make the popcorn! Make about 18 balls. Begin to place and press them onto the frame, touching the top of the popcorn box. With each layer, use a toothpick or other dull pointer tool to make little indents on each piece for the texture of the popcorn. As you add layers, overlap pieces as well!

STARSTake one part Yellow and one part White, as pictured, and combine them to make a lighter yellow color. Once combined, roll out flat. Use a star cut-out to create five stars. If you don’t have room for all five, cut out as many as you can, then roll up and flatten the scraps to create however many more you need. Place the stars all around the frame in the places you’d like. See completed project photo for full view of suggested star placement.


Bake at 275 degrees Fahrenheit for 15 minutes. Once cooled, you may glaze it with Sculpey Satin or Gloss Glaze to finish it, using a soft, clean paintbrush. Wash paintbrush once finished, and allow the glaze to dry before handling the frame.
