

Sculpey® III Sitting Reindeer with Jingle Bells
Sculpey® III Sitting Reindeer with Jingle Bells
Read More
Helen Terlalis Dorn
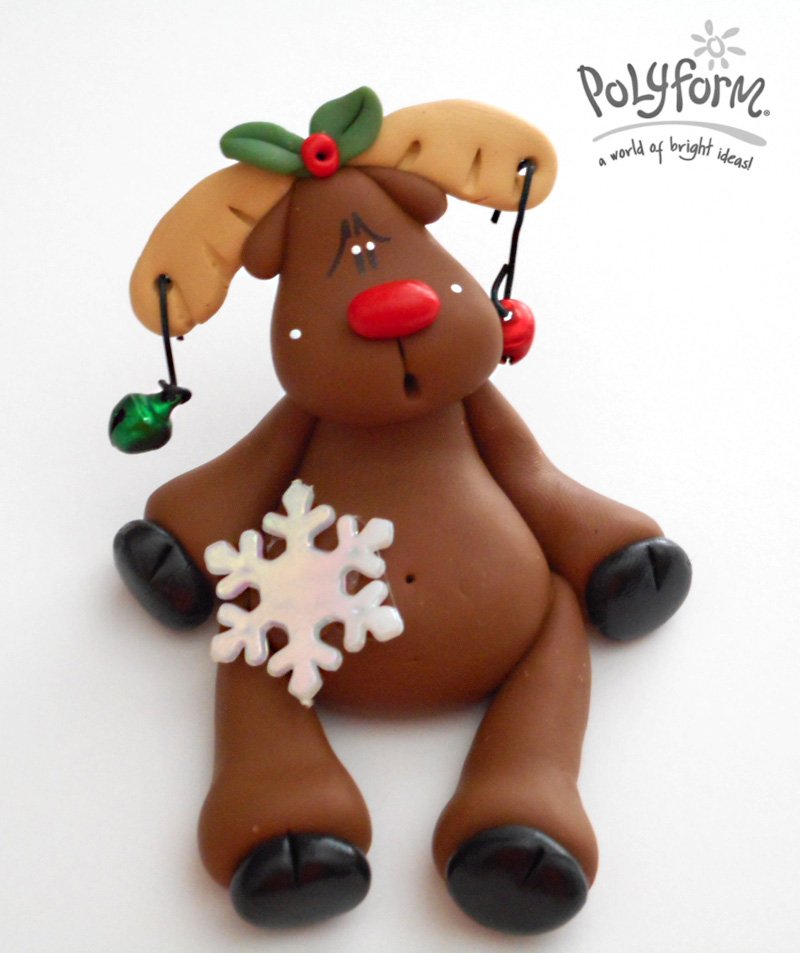
This guy is definitely in the holiday mood sporting jingle bells from his antlers! What a great decoration for your holiday table or an excellent gift idea!
Read Less
Helen Terlalis Dorn
This guy is definitely in the holiday mood sporting jingle bells from his antlers! What a great decoration for your holiday table or an excellent gift idea!
ADDITIONAL SUPPLIES
• Snow-Tex
• Jingle Bells (2)
• Acrylic Paint – white
• Black Wire
• Resin Snowflake Button (optional)
• Black Permanent Marker
• Chalk/Makeup
• Toothpick
• Craft glue|• Snow-Tex
• Jingle Bells (2)
• Acrylic Paint – white
• Black Wire
• Resin Snowflake Button (optional)
• Black Permanent Marker
• Chalk/Makeup
• Toothpick
• Craft glue
Project Instructions
Your Workspace:
Please make sure your work area is covered and you are not working on an unprotected surface. We recommend working on the Sculpey® Work ‘n Bake Clay Mat, wax paper, metal baking sheet, or disposable foil. Uncured clay may damage unprotected furniture or finished surfaces. Be sure to cover your crafting area appropriately.
Getting Started:
Start with clean hands, unwrap and knead clay until soft and smooth, or condition by running clay though a Pasta Machine. We recommend using a designated machine for clay purposes only. When working with multiple colors, clean hands with soap and water or baby wipes (we have found that baby wipes work best) before switching colors. Shape clay, pressing pieces firmly together. Wash hands after use.
Baking:
Begin by preheating oven to 275 °F (130 °C). After you are done creating; for best results bake clay on an oven-proof surface such metal, aluminum foil, an index card or the Sculpey® Clay Mat at 275°F (130 °C) for 15 minutes per ¼" (6 mm) thickness according to package directions. Oven safe glass or ceramic surfaces are also acceptable for baking; however please note that the baking times may take longer as the glass or ceramic surfaces take longer to heat up. For best baking results, use an oven thermometer. DO NOT USE MICROWAVE OVEN. DO NOT EXCEED THE ABOVE TEMPERATURE OR RECOMMENDED BAKING TIME.
Shape a 1 1/4” ball of Chocolate into a rounded triangle to make a torso and place on your work surface (this is your beginning piece to build from), add chalk to tummy area and poke hole for belly button. Insert a piece of toothpick into the triangle for head insertion later
Make two arms by shaping two 1/2” balls of Chocolate into a tapered log shape, press against the torso – shape as desired. Make two legs by shaping two ¾” balls of Chocolate into a tapered log shape and pressing them into the torso and shape as desired. Make 4 flattened Black balls and add them for hooves, make indent lines using needle tool or toothpick

Add head by rolling a 1” ball of Chocolate into a triangular shape. Add nose by shaping a 3/16” ball of Red Hot Red and make muzzle and mouth shapes using needle tool/toothpick. Make two small leaves by shaping a 1/4” ball of Leaf Green clay into a leaf shape, indent leaf lines. Create one tiny holly berry by shaping 1/8” ball of Red Hot Red and placing in front of the leaves. Shape two antlers using ½” ball of Tan and insert a hole in each for addition of wire and jingle bells after baking


Add pink chalk/makeup for the cheeks.
Add heart by making two small teardrops and pressing them into a heart shape, press into chest.

Bake as directed above in Step 1. When cooled/cured, add eyes and cheek highlights as desired with a permanent marker for the black of the eyes and white acrylic paint for the eye/cheek highlights. Thread bells onto thin black wire and add to the hole in the antlers. Add SnowTex as desired and let dry 24 hours. Glue snowflake to his tummy.


Your Workspace:
Please make sure your work area is covered and you are not working on an unprotected surface. We recommend working on the Sculpey® Work ‘n Bake Clay Mat, wax paper, metal baking sheet, or disposable foil. Uncured clay may damage unprotected furniture or finished surfaces. Be sure to cover your crafting area appropriately.
Getting Started:
Start with clean hands, unwrap and knead clay until soft and smooth, or condition by running clay though a Pasta Machine. We recommend using a designated machine for clay purposes only. When working with multiple colors, clean hands with soap and water or baby wipes (we have found that baby wipes work best) before switching colors. Shape clay, pressing pieces firmly together. Wash hands after use.
Baking:
Begin by preheating oven to 275 °F (130 °C). After you are done creating; for best results bake clay on an oven-proof surface such metal, aluminum foil, an index card or the Sculpey® Clay Mat at 275°F (130 °C) for 15 minutes per ¼" (6 mm) thickness according to package directions. Oven safe glass or ceramic surfaces are also acceptable for baking; however please note that the baking times may take longer as the glass or ceramic surfaces take longer to heat up. For best baking results, use an oven thermometer. DO NOT USE MICROWAVE OVEN. DO NOT EXCEED THE ABOVE TEMPERATURE OR RECOMMENDED BAKING TIME.
Please make sure your work area is covered and you are not working on an unprotected surface. We recommend working on the Sculpey® Work ‘n Bake Clay Mat, wax paper, metal baking sheet, or disposable foil. Uncured clay may damage unprotected furniture or finished surfaces. Be sure to cover your crafting area appropriately.
Getting Started:
Start with clean hands, unwrap and knead clay until soft and smooth, or condition by running clay though a Pasta Machine. We recommend using a designated machine for clay purposes only. When working with multiple colors, clean hands with soap and water or baby wipes (we have found that baby wipes work best) before switching colors. Shape clay, pressing pieces firmly together. Wash hands after use.
Baking:
Begin by preheating oven to 275 °F (130 °C). After you are done creating; for best results bake clay on an oven-proof surface such metal, aluminum foil, an index card or the Sculpey® Clay Mat at 275°F (130 °C) for 15 minutes per ¼" (6 mm) thickness according to package directions. Oven safe glass or ceramic surfaces are also acceptable for baking; however please note that the baking times may take longer as the glass or ceramic surfaces take longer to heat up. For best baking results, use an oven thermometer. DO NOT USE MICROWAVE OVEN. DO NOT EXCEED THE ABOVE TEMPERATURE OR RECOMMENDED BAKING TIME.
Shape a 1 1/4” ball of Chocolate into a rounded triangle to make a torso and place on your work surface (this is your beginning piece to build from), add chalk to tummy area and poke hole for belly button. Insert a piece of toothpick into the triangle for head insertion later
Make two arms by shaping two 1/2” balls of Chocolate into a tapered log shape, press against the torso – shape as desired. Make two legs by shaping two ¾” balls of Chocolate into a tapered log shape and pressing them into the torso and shape as desired. Make 4 flattened Black balls and add them for hooves, make indent lines using needle tool or toothpick
Add head by rolling a 1” ball of Chocolate into a triangular shape. Add nose by shaping a 3/16” ball of Red Hot Red and make muzzle and mouth shapes using needle tool/toothpick. Make two small leaves by shaping a 1/4” ball of Leaf Green clay into a leaf shape, indent leaf lines. Create one tiny holly berry by shaping 1/8” ball of Red Hot Red and placing in front of the leaves. Shape two antlers using ½” ball of Tan and insert a hole in each for addition of wire and jingle bells after baking
Add pink chalk/makeup for the cheeks.
Add heart by making two small teardrops and pressing them into a heart shape, press into chest.
Bake as directed above in Step 1. When cooled/cured, add eyes and cheek highlights as desired with a permanent marker for the black of the eyes and white acrylic paint for the eye/cheek highlights. Thread bells onto thin black wire and add to the hole in the antlers. Add SnowTex as desired and let dry 24 hours. Glue snowflake to his tummy.