Skip to product information
1 of 1

Sculpey III® Simple Earrings

Sculpey III® Simple Earrings

Designed by Amy Koranek
Read More
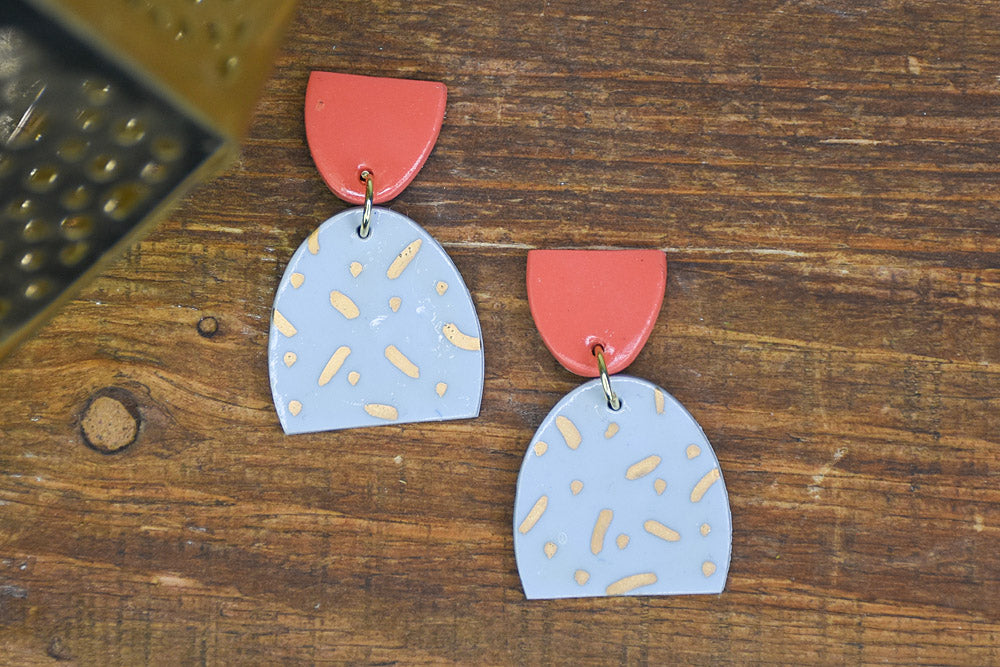
Wow! A dynamic color combination is the star of these quick and easy earrings that will become a staple in your jewelry wardrobe. COMPLETION TIME: 45 Minutes to make, bake, and assemble; plus air drying time for glaze, paint marker, and glue
Read Less
ADDITIONAL SUPPLIES
  • Paintbrush
  • Gold paint pen
  • 6 mm Gold toned jump rings (2)
  • Flat nose pliers
  • Ear posts with backs (2)
  • Silicone glue or instant drying glue
View full details
Project Instructions

Step 1

Getting Started:

Please make sure your work area is covered and you are not working on an unprotected surface. We recommend working on the Sculpey® Oven
Safe Work Mat, wax paper, metal baking sheet, or disposable foil. Uncured
clay may damage unprotected furniture or finished surfaces.
Be sure to
cover your crafting area appropriately.

Start with clean hands, unwrap and knead clay until soft and smooth, or condition by running clay though a Pasta Machine. We recommend using a designated machine for clay purposes only. When working with multiple colors, clean hands with soap and water or baby wipes (we have found that baby wipes work best) before switching colors. Shape clay, pressing pieces firmly together.  Wash hands
after use.

 Baking:

Begin by preheating oven to 275 °F (130 °C). After you are done creating; for best results bake clay on an oven-proof surface such as metal, aluminum foil, an index card or the Sculpey® Oven Safe Work Mat at 275°F (130 °C) for 15 minutes per ¼" (6 mm) of thickness according to package directions. Oven safe glass or ceramic
surfaces are also acceptable for baking; however please note that the baking
times may take longer as the glass or ceramic surfaces take longer to heat up. For
best baking results, use an oven thermometer. DO NOT USE MICROWAVE OVEN. DO NOT EXCEED THE ABOVE TEMPERATURE OR RECOMMENDED BAKING TIME.

Step 2

Sheet 1/4 bar Arctic Blue and Coral to a 1/8” thickness.

Cut out two 1.5” Arctic Blue ovals. Cut out two 1” Coral ovals.

Step 3

Remove an equal portion of each oval to make matching sets of the shapes shown.

Step 4

Line the parts up as shown and poke holes using the Blunt Point Tool for jump ring
assembly later.

Bake the pieces following the baking instructions for SculpeyIII®.

Allow to cool completely.

Step 5

Add a thin coat of Sculpey® Glossy Glaze with a paintbrush. Allow to dry completely.

Add swishes and dots with the gold paint marker. Allow to dry completely.

Step 6

Here is the layout for our earrings.

Step 7

Use flat nose pliers to open and close jump rings attaching tops to bottoms.

Step 8

Glue ear posts to the back of the Coral pieces and allow to dry completely before
handling.