

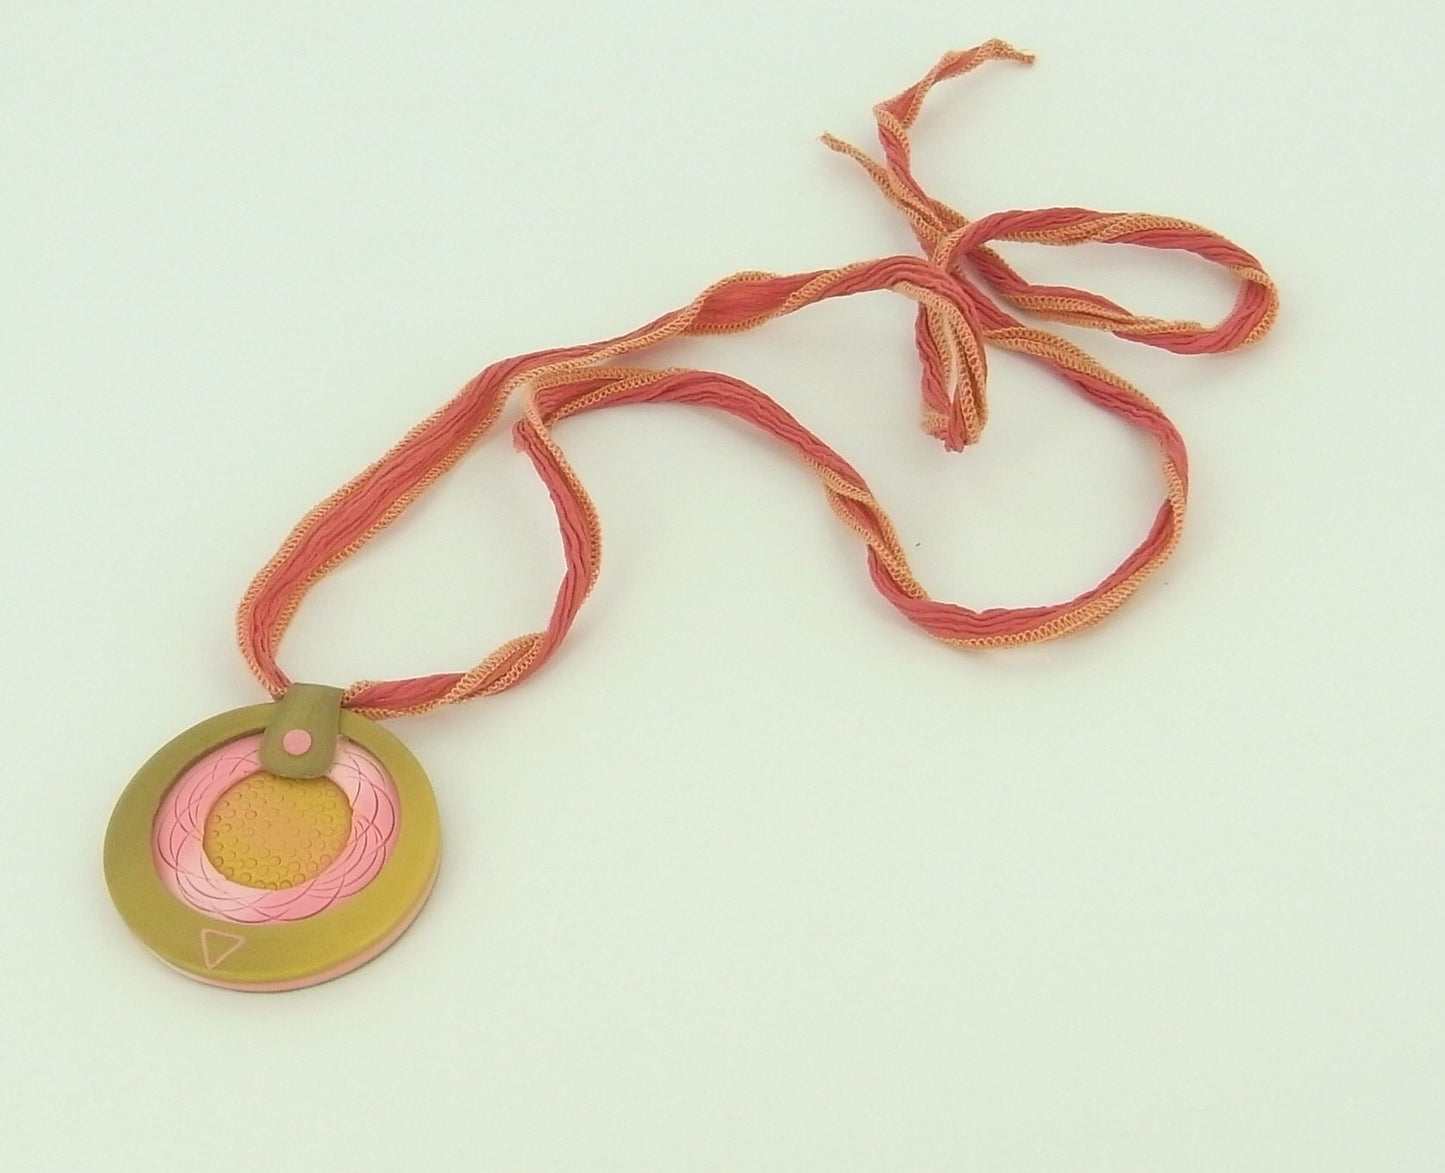
Sculpey® III Multi-Circle Focal Pendant
Sculpey® III Multi-Circle Focal Pendant
Read More
A different take on the well-known Skinner Blend results in subtle color shading on this layered focal bead.
Read Less
ADDITIONAL SUPPLIES
• Deli paper
• Small burnishing tool
• Kitchen wrap
• Soft cotton cloth
• Necklace cord|• Deli paper
• Small burnishing tool
• Kitchen wrap
• Soft cotton cloth
• Necklace cord
Project Instructions
Your Workspace:
Please make sure your work area is covered and you are not working on an unprotected surface. We recommend working on the Sculpey® Work ‘n Bake Clay Mat, wax paper, metal baking sheet, or disposable foil. Uncured clay may damage unprotected furniture or finished surfaces. Be sure to cover your crafting area appropriately.
Getting Started:
Start with clean hands, unwrap and knead clay until soft and smooth, or condition by running clay though a Pasta Machine. We recommend using a designated machine for clay purposes only. When working with multiple colors, clean hands with soap and water or baby wipes (we have found that baby wipes work best) before switching colors. Shape clay, pressing pieces firmly together. Wash hands after use.
Baking:
Begin by preheating oven to 275 °F (130 °C). After you are done creating; for best results bake clay on an oven-proof surface such metal, aluminum foil, an index card or the Sculpey® Clay Mat at 275°F (130 °C) for 15 minutes per ¼" (6 mm) thickness according to package directions. Oven safe glass or ceramic surfaces are also acceptable for baking; however please note that the baking times may take longer as the glass or ceramic surfaces take longer to heat up. For best baking results, use an oven thermometer. DO NOT USE MICROWAVE OVEN. DO NOT EXCEED THE ABOVE TEMPERATURE OR RECOMMENDED BAKING TIME.condition all clay by working small amounts in your hand until smooth and soft.
Creating the Skinny Stripe Blend:
Condition and roll out strips of the Dusty Rose and Buried Treasure colors on the #1 setting of the clay conditioning machine. Condition and roll out Ballerina and Jewelry Gold on the #1 setting, and cut 1/2” strips out. Overlay Ballerina on Dusty Rose and Jewelry Gold on Buried Treasure as shown here, and continue to fold and roll through the clay conditioning machine on the #1 setting until only the subtlest of shading remains.
Condition and roll out strips of the Dusty Rose and Buried Treasure colors on the #1 setting of the clay conditioning machine. Condition and roll out Ballerina and Jewelry Gold on the #1 setting, and cut 1/2” strips out. Overlay Ballerina on Dusty Rose and Jewelry Gold on Buried Treasure as shown here, and continue to fold and roll through the clay conditioning machine on the #1 setting until only the subtlest of shading remains.

Reverse Circle Cut-outs:
Position the .75” circle cutter over the center of the shaded Ballerina/Dusty Rose area and punch out a circle. Use the 1” cutter over the shaded Jewelry Gold/Buried Treasure and do the same. Please keep in mind that we will not be using the punched circles for anything – we will be using the sheets of clay they were punched from instead. With that in mind, use the .75” cutter to work your way around the cut-out circle on the Dusty Rose clay, impressing overlapping half-circles all around the opening. This is to create a texture in the Dusty Rose.
Position the .75” circle cutter over the center of the shaded Ballerina/Dusty Rose area and punch out a circle. Use the 1” cutter over the shaded Jewelry Gold/Buried Treasure and do the same. Please keep in mind that we will not be using the punched circles for anything – we will be using the sheets of clay they were punched from instead. With that in mind, use the .75” cutter to work your way around the cut-out circle on the Dusty Rose clay, impressing overlapping half-circles all around the opening. This is to create a texture in the Dusty Rose.

Create Another Skinny Blend:
Create a skinny blend of Ballerina over Jewelry Gold as shown below. Use the 1" circle cutter over the shaded area and punch out a circle. In this case, the 1” punched circle is actually what will be used. Roll out piece of Buried Treasure clay on a #2 setting, and add a texture to one side. We used the fishnet texture from the Edgy texture sheet. Place that face down on a piece of deli paper. Roll out leftover clay of any color on the thickest setting of the pasta machine, and use the .75” cutter to punch out a circle. Center the circle on the facedown textured clay and press lightly, especially around the edges. Take the punched out blended circle you just made and overlay it on the smaller circle, creating a domed effect.
Create a skinny blend of Ballerina over Jewelry Gold as shown below. Use the 1" circle cutter over the shaded area and punch out a circle. In this case, the 1” punched circle is actually what will be used. Roll out piece of Buried Treasure clay on a #2 setting, and add a texture to one side. We used the fishnet texture from the Edgy texture sheet. Place that face down on a piece of deli paper. Roll out leftover clay of any color on the thickest setting of the pasta machine, and use the .75” cutter to punch out a circle. Center the circle on the facedown textured clay and press lightly, especially around the edges. Take the punched out blended circle you just made and overlay it on the smaller circle, creating a domed effect.

Position the Dusty Rose cut out sheet over the domed circle and lightly press down. Position the Buried Treasure over the top of that, creating an additional level of layering. Before cutting out the finished bead, use a small burnishing tool to add a pattern. When ready to cut, place a piece of kitchen wrap over the clay and use the 2” circle cutter to punch out the design. Before placing in the oven, use a small cutter to create an indentation (in this case the triangle). Bake according to the directions above in Step 1. When cooled, use wet/dry sandpaper in 400/600/800 grits and soft cotton to smooth and polish.

Backfill and Add Bail:
Warm a bit of Ballerina clay in you fingers and rub gently over the indented area, The clay will fill in naturally and any residue left over will be sanded off. Make a clay bale using the Buried Treasure and a small circle of blush clay. Bake according to the directions above in Step 1 and allow to cool completely. String the bead with your chosen necklace cord.
Warm a bit of Ballerina clay in you fingers and rub gently over the indented area, The clay will fill in naturally and any residue left over will be sanded off. Make a clay bale using the Buried Treasure and a small circle of blush clay. Bake according to the directions above in Step 1 and allow to cool completely. String the bead with your chosen necklace cord.

Your Workspace:
Please make sure your work area is covered and you are not working on an unprotected surface. We recommend working on the Sculpey® Work ‘n Bake Clay Mat, wax paper, metal baking sheet, or disposable foil. Uncured clay may damage unprotected furniture or finished surfaces. Be sure to cover your crafting area appropriately.
Getting Started:
Start with clean hands, unwrap and knead clay until soft and smooth, or condition by running clay though a Pasta Machine. We recommend using a designated machine for clay purposes only. When working with multiple colors, clean hands with soap and water or baby wipes (we have found that baby wipes work best) before switching colors. Shape clay, pressing pieces firmly together. Wash hands after use.
Baking:
Begin by preheating oven to 275 °F (130 °C). After you are done creating; for best results bake clay on an oven-proof surface such metal, aluminum foil, an index card or the Sculpey® Clay Mat at 275°F (130 °C) for 15 minutes per ¼" (6 mm) thickness according to package directions. Oven safe glass or ceramic surfaces are also acceptable for baking; however please note that the baking times may take longer as the glass or ceramic surfaces take longer to heat up. For best baking results, use an oven thermometer. DO NOT USE MICROWAVE OVEN. DO NOT EXCEED THE ABOVE TEMPERATURE OR RECOMMENDED BAKING TIME.condition all clay by working small amounts in your hand until smooth and soft.
Please make sure your work area is covered and you are not working on an unprotected surface. We recommend working on the Sculpey® Work ‘n Bake Clay Mat, wax paper, metal baking sheet, or disposable foil. Uncured clay may damage unprotected furniture or finished surfaces. Be sure to cover your crafting area appropriately.
Getting Started:
Start with clean hands, unwrap and knead clay until soft and smooth, or condition by running clay though a Pasta Machine. We recommend using a designated machine for clay purposes only. When working with multiple colors, clean hands with soap and water or baby wipes (we have found that baby wipes work best) before switching colors. Shape clay, pressing pieces firmly together. Wash hands after use.
Baking:
Begin by preheating oven to 275 °F (130 °C). After you are done creating; for best results bake clay on an oven-proof surface such metal, aluminum foil, an index card or the Sculpey® Clay Mat at 275°F (130 °C) for 15 minutes per ¼" (6 mm) thickness according to package directions. Oven safe glass or ceramic surfaces are also acceptable for baking; however please note that the baking times may take longer as the glass or ceramic surfaces take longer to heat up. For best baking results, use an oven thermometer. DO NOT USE MICROWAVE OVEN. DO NOT EXCEED THE ABOVE TEMPERATURE OR RECOMMENDED BAKING TIME.condition all clay by working small amounts in your hand until smooth and soft.
Creating the Skinny Stripe Blend:
Condition and roll out strips of the Dusty Rose and Buried Treasure colors on the #1 setting of the clay conditioning machine. Condition and roll out Ballerina and Jewelry Gold on the #1 setting, and cut 1/2” strips out. Overlay Ballerina on Dusty Rose and Jewelry Gold on Buried Treasure as shown here, and continue to fold and roll through the clay conditioning machine on the #1 setting until only the subtlest of shading remains.
Condition and roll out strips of the Dusty Rose and Buried Treasure colors on the #1 setting of the clay conditioning machine. Condition and roll out Ballerina and Jewelry Gold on the #1 setting, and cut 1/2” strips out. Overlay Ballerina on Dusty Rose and Jewelry Gold on Buried Treasure as shown here, and continue to fold and roll through the clay conditioning machine on the #1 setting until only the subtlest of shading remains.
Reverse Circle Cut-outs:
Position the .75” circle cutter over the center of the shaded Ballerina/Dusty Rose area and punch out a circle. Use the 1” cutter over the shaded Jewelry Gold/Buried Treasure and do the same. Please keep in mind that we will not be using the punched circles for anything – we will be using the sheets of clay they were punched from instead. With that in mind, use the .75” cutter to work your way around the cut-out circle on the Dusty Rose clay, impressing overlapping half-circles all around the opening. This is to create a texture in the Dusty Rose.
Position the .75” circle cutter over the center of the shaded Ballerina/Dusty Rose area and punch out a circle. Use the 1” cutter over the shaded Jewelry Gold/Buried Treasure and do the same. Please keep in mind that we will not be using the punched circles for anything – we will be using the sheets of clay they were punched from instead. With that in mind, use the .75” cutter to work your way around the cut-out circle on the Dusty Rose clay, impressing overlapping half-circles all around the opening. This is to create a texture in the Dusty Rose.
Create Another Skinny Blend:
Create a skinny blend of Ballerina over Jewelry Gold as shown below. Use the 1" circle cutter over the shaded area and punch out a circle. In this case, the 1” punched circle is actually what will be used. Roll out piece of Buried Treasure clay on a #2 setting, and add a texture to one side. We used the fishnet texture from the Edgy texture sheet. Place that face down on a piece of deli paper. Roll out leftover clay of any color on the thickest setting of the pasta machine, and use the .75” cutter to punch out a circle. Center the circle on the facedown textured clay and press lightly, especially around the edges. Take the punched out blended circle you just made and overlay it on the smaller circle, creating a domed effect.
Create a skinny blend of Ballerina over Jewelry Gold as shown below. Use the 1" circle cutter over the shaded area and punch out a circle. In this case, the 1” punched circle is actually what will be used. Roll out piece of Buried Treasure clay on a #2 setting, and add a texture to one side. We used the fishnet texture from the Edgy texture sheet. Place that face down on a piece of deli paper. Roll out leftover clay of any color on the thickest setting of the pasta machine, and use the .75” cutter to punch out a circle. Center the circle on the facedown textured clay and press lightly, especially around the edges. Take the punched out blended circle you just made and overlay it on the smaller circle, creating a domed effect.
Position the Dusty Rose cut out sheet over the domed circle and lightly press down. Position the Buried Treasure over the top of that, creating an additional level of layering. Before cutting out the finished bead, use a small burnishing tool to add a pattern. When ready to cut, place a piece of kitchen wrap over the clay and use the 2” circle cutter to punch out the design. Before placing in the oven, use a small cutter to create an indentation (in this case the triangle). Bake according to the directions above in Step 1. When cooled, use wet/dry sandpaper in 400/600/800 grits and soft cotton to smooth and polish.
Backfill and Add Bail:
Warm a bit of Ballerina clay in you fingers and rub gently over the indented area, The clay will fill in naturally and any residue left over will be sanded off. Make a clay bale using the Buried Treasure and a small circle of blush clay. Bake according to the directions above in Step 1 and allow to cool completely. String the bead with your chosen necklace cord.
Warm a bit of Ballerina clay in you fingers and rub gently over the indented area, The clay will fill in naturally and any residue left over will be sanded off. Make a clay bale using the Buried Treasure and a small circle of blush clay. Bake according to the directions above in Step 1 and allow to cool completely. String the bead with your chosen necklace cord.