

Sculpey III Mini Taco Rings
Sculpey III Mini Taco Rings
Read More
These cute, colorful rings with be a hit with your friends!
Design by Mouse House
Read Less
ADDITIONAL SUPPLIES
● Medium grit sandpaper block
● Wire screen or plastic canvas (see step 3)
● Round clay cutter
● Aluminum foil
● Wooden crafts sticks, toothpicks
● Small bowl
● Artist chalk pastels
● Parchment paper
● White sand, optional
● Blunt-end tool
Project Instructions
- Getting Started:
Start with clean hands, unwrap and knead clay until soft and smooth, or condition by running clay though a Pasta Machine. We recommend using a designated machine for clay purposes only. When working with multiple colors, clean hands with soap and water or baby wipes (we have found that baby wipes work best) before switching colors. Shape clay, pressing pieces firmly together. Wash hands after use.
- Baking:
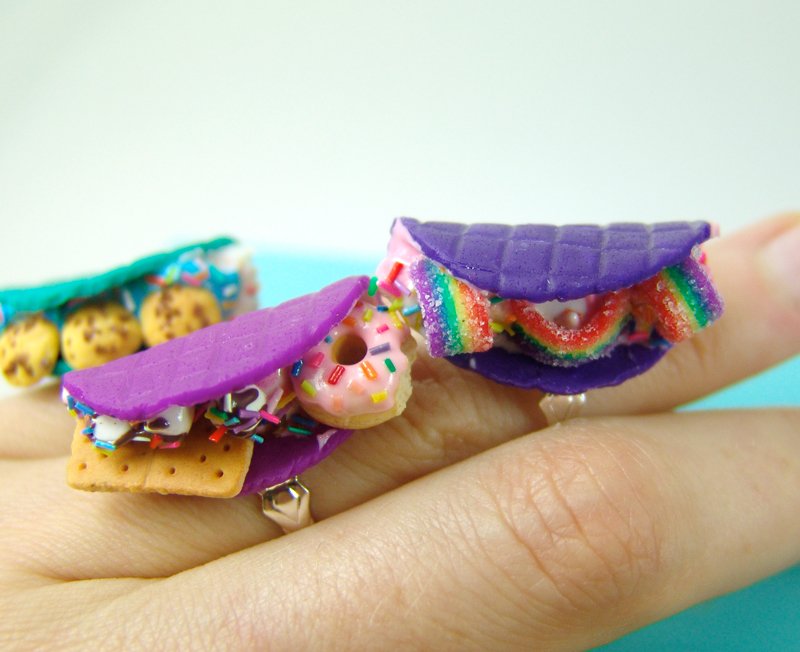
1.Start by making the taco shells, which can be any color(s) you like. Here, I’m making purple (Sculpey III in Purple), violet (Sculpey III in Violet), and teal (one part Sculpey III in Granny Smith to three parts Sculpey III in Turquoise). Regardless of the color you choose, mix one part colored clay with two parts translucent clay, kneading thoroughly to combine.

Roll the clay into a thin sheet, roughly 1/16” thick. Press against a piece of medium grit sandpaper to add some initial texture.

3.To create the waffled texture, there are a number of options, including store-bought molds and texture sheets. Two inexpensive tools are window screen (you can find smaller pieces sold as patches at most hardware stores) and plastic embroidery grid (you can usually find small squares at fabric stores). The screen is best for smaller scale projects, like dollhouse food, while the embroidery canvas is suitable for larger pieces, like statement rings or charms. Press the texture tool against the clay to create the waffle pattern. I like to use a rolling pin to evenly press the screen or plastic canvas into the clay.

4.Use a circle cutter to cut out a circle of this patterned clay. For dollhouse tacos, a circle of roughly ⅝” diameter is best, and I use the wide end of a metal pastry tip for this, as it’s difficult to find clay cutters of this size. For jewelry pieces, you can use any size circle you like, depending on how large you want the finished taco to be. A diameter of ¾” to 1” works well for most jewelry pieces.

The edge of the circle will be very clean and straight, which looks unnatural. Add more texture by crumpling up a piece of aluminum foil and pressing the irregular surface of the crumpled clay along the circle’s edge

The edge of the circle will be very clean and straight, which looks unnatural. Add more texture by crumpling up a piece of aluminum foil and pressing the irregular surface of the crumpled clay along the circle’s edge. Bake the shells in a 275℉ preheated oven on a clay baking tile for seven minutes and let cool.

Meanwhile, prepare the fillings. You can make any manner of fillings you like in a rainbow of colors, but the basic idea is to create the ice cream, which will fill the base of the taco, then add your candies, cookies, etc. on top, using the ice cream to anchor them in place. For the ice cream:
a.First create a white base cream that you can then tint any color(s) you choose. Chop white solid clay (I prefer Sculpey Original, as it has a softer, easily mixable texture) into small chunks and add them to a bowl with roughly an equal amount of Translucent Liquid Sculpey. b.Smear and mash the solid and liquid clays together with a wooden craft stick to form a smooth paste, adding additional liquid clay if necessary.c.Divide this batch of white cream into smaller portions for each color of ice cream you wish to make. Rather than using separate bowls to mix up each color, a square of parchment paper will do just fine. d.Use a razor blade to grate pigment from a stick of chalk pastel into the cream, stirring with a toothpick to combine. You can add multiple chalk colors to create blended shades, and add additional liquid clay as needed if the mixture becomes too thick. Repeat until you’ve created the desired colors of ice cream.
a.First create a white base cream that you can then tint any color(s) you choose. Chop white solid clay (I prefer Sculpey Original, as it has a softer, easily mixable texture) into small chunks and add them to a bowl with roughly an equal amount of Translucent Liquid Sculpey. b.Smear and mash the solid and liquid clays together with a wooden craft stick to form a smooth paste, adding additional liquid clay if necessary.c.Divide this batch of white cream into smaller portions for each color of ice cream you wish to make. Rather than using separate bowls to mix up each color, a square of parchment paper will do just fine. d.Use a razor blade to grate pigment from a stick of chalk pastel into the cream, stirring with a toothpick to combine. You can add multiple chalk colors to create blended shades, and add additional liquid clay as needed if the mixture becomes too thick. Repeat until you’ve created the desired colors of ice cream.

You can also add “mix ins” to your ice cream, and one of the easiest ways to do this is to simply tease crumbs of different colored clays into the cream with a needle tool. Stir gently with a toothpick (don’t overmix, or you’ll get a smeared mess of color).


Spread the ice cream into one of your taco shells with a toothpick. Now for the fun part: adding toppings...

To make rainbow sprinkles:a.Roll out very thin snakes of different colored clays and bake in a 275℉ preheated oven for five minutes. Be sure to bake on a ceramic tile, as placing these thin pieces of clay directly on a metal baking sheet will cause them to burn. b.Once cool, slice the snakes into shorter lengths to create the sprinkles.

To make rainbow candy belts:a.Roll out a thin sheet (about 1/16” thick) of clay in each of the rainbow colors, and cut out rectangles measuring ¼” by 2” for each color. b.Stack them on top of each other in rainbow order, then use your fingers to start elongating the stack by gently pinching the stack, starting in the middle and working your way out to the ends. Continue making the stack longer and thinner until you’re happy with the size, then slice off pieces in the appropriate length and thickness for your taco. c.If you like, you can add a thin coating of Translucent Liquid Sculpey to the surface of the rainbow with a toothpick and sprinkle white sand onto the clay to mimic the appearance of sugar. Place the rainbows on your taco.


13.To make chocolate chunk cookies: a.First prepare the cookie clay by mixing one part Premo Sculpey in Ecru with three parts Premo Sculpey in White. Mix one part of this pale ecru with two parts translucent.b.Roll the clay out into tiny balls, one per cookie, and use your finger to flatten them into a dome shape. c.Use the aluminum foil from step 5 to press texture onto the cookie, then use a dry paint brush to dust grated chalk pastel in ecru and burnt sienna onto the clay (a little pigment goes a long way, so use a light hand).d.Roll Premo Sculpey in Burnt Umber into a sheet about 1/16” thick.Bake in a 275℉ preheated oven for five minutes. When cool, chop the clay into chocolate chunks and press them into your cookie, then add the cookies to your taco.


14.To make s’mores:a.First make the graham cracker by mixing one part Premo Sculpey in Ecru with three parts Premo Sculpey in White. Mix one part of this pale ecru with two parts translucent. Roll the clay into a sheet slightly thinner than 1/16”, press against a medium grit sandpaper block to add texture, and cut out a small rectangle, ⅝” by ⅜”. b.Use a needle tool to tease the sides of the cracker into crumbs (place the clay in the freezer for ten minutes first if it’s too soft). Use the dull side of a blade to lightly press a line down the middle of the cracker (don’t press too hard!), then place the cracker on top of the sandpaper block and pierce it with a needle to create the pattern of holes. c.Use a dry paint brush to dust grated chalk pastel in ecru and burnt sienna on the surface of the clay. d.Bake in a 275℉ preheated oven for five minutes and let cool. e.Make marshmallows by mixing equal parts Premo Sculpey in White and translucent clay and rolling into a snake. Cut off shorter pieces, and use your finger to soften the cut edges, making them more rounded and marshmallow like. Add to your tacos.f.Fill the bottom of the taco with ice cream, then create chocolate chunks (see step 13d) and sprinkle on top. g.You can also mix up a batch of ice cream tinted with chocolate colored pastels, and thin it to a runnier consistency with additional liquid clay. Drizzle this chocolate syrup on the taco fillings.


To make donuts:a.Make the donut clay by mixing one part Premo Sculpey in Ecru with three parts Premo Sculpey in White. Mix one part of this pale ecru with two parts translucent.b.Roll the clay into balls, then use a blunt-end tool to spear a ball in the center. Press the ball further down on the tool to widen the hole, then slide it off. With the donut on your work surface, flatten it slightly with your finger. c.Use a dry paint brush to dust grated chalk pastel in ecru and burnt sienna on the surface of the clay.d.Optional: Use a metal pastry tip to cut out bite marks, then use a needle tool to tease the exposed area into crumbs.e.Mix up a small batch of pink ice cream (see step 8; tint the white base mix with pink chalk pastel), adding additional liquid clay to create a runnier consistency.f.Use a toothpick to add the pink glaze to the donut, then add rainbow sprinkles (see step 11). Note: An alternative to the handmade sprinkles are store-bought glass microbeads, which can be found at most well-stocked craft stores and online. Sprinkle a pinch on the glazed donut before baking. g.Bake the donut in a 275℉ preheated oven for seven minutes, then add to your taco.


Bake your filled tacos in a 275℉ preheated oven for twelve minutes and let cool. Finish by brushing the ice cream with glossy polymer clay varnish, along with any other fillings that would be glossy in real life.
The possibilities for these colorful tacos are endless, and you can mix and match different ice cream colors with any number of cute toppings. Try doing an image search for “ice cream toppings” or “cupcake toppings” for inspiration.

Jewelry making tips:
- Choosing a selection results in a full page refresh.
- Opens in a new window.