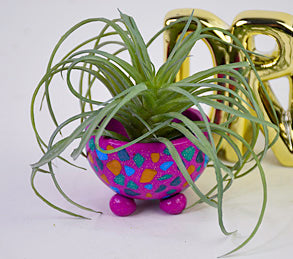
Sculpey III® Glam Succulent Planter
Sculpey III® Glam Succulent Planter
Designed by Phoebe Doehring
Read More
Succulents for home decoration are a lasting trend and a great way to present a gift is in a unique, hand-made planter like the one in this project.
TIME TO COMPLETION: 30 minutes create time/ 30 minutes bake time
Read Less
ADDITIONAL SUPPLIES
- Clay dedicated knife
- Bakeable Glass form ( to shape the dish)
- 400 Grit Wet/ Dry Sandpaper
- Paintbrush

Project Instructions
- Getting Started:
Start with clean hands, unwrap and knead clay until soft and smooth, or condition by running clay though a Pasta Machine. We recommend using a designated machine for clay purposes only. When working with multiple colors, clean hands with soap and water or baby wipes (we have found that baby wipes work best) before switching colors. Shape clay, pressing pieces firmly together. Wash hands after use.
- Baking:
Condition 1/2 block of Violet Glitter clay and roll into a ball.
Create a small pinch pot with your fingers. Press the pot onto your glass form. (dish, glass ball, etc.)
Smooth as much as possible with your fingers. Trim uneven edges with your clay knife. Set aside.
Create a small pinch pot with your fingers. Press the pot onto your glass form. (dish, glass ball, etc.)
Smooth as much as possible with your fingers. Trim uneven edges with your clay knife. Set aside.


Flatten a 1” ball size of each of the following colors and then through the clay machine on the #4 setting: Jewelry Gold, Turquoise Glitter, Navy Pearl, Blue Glitter.
Cut little pieces from these sheets in different sizes and shapes. Sizes should range no larger than 1/4”.
Press the pieces onto your clay pot leaving a bit of space between each. This is so that when they are flattened they will not bleed into each other. You want to be able to see Violet Glitter between each shape. Alternate colors so it is pleasing to the eye. Cover the entire pot

Use your acrylic roller and roll along the pot until all the pieces are flattened and have become one with the pot. You can also gently roll the sides of the pot on your table surface to help with this.
Bake in your oven at 275 degrees for 15 minutes. Allow to cool. Remove the pot from your glass dish or glass orb.
Bake in your oven at 275 degrees for 15 minutes. Allow to cool. Remove the pot from your glass dish or glass orb.

Run the pot under water and sand the sides with Wet/Dry sandpaper to make the pot extra smooth. Dry the pot completely.

Roll four equal sized 1/2” balls for the little feet for your pot.
Press the pot on top of the balls so that they are equally distributed under the pot. Remove pot.
Bake the balls in your oven at 275 degrees for 15 minutes.
Once cooled add a drop of super glue on each an attach them to the bottom of your little planter. Allow to dry completely.
Optional: Brush on one coat of Sculpey Gloss Glaze onto your planter. Allow to dry completely. (The baked clay is already waterproof, the glaze is just to make it glossy looking)


