

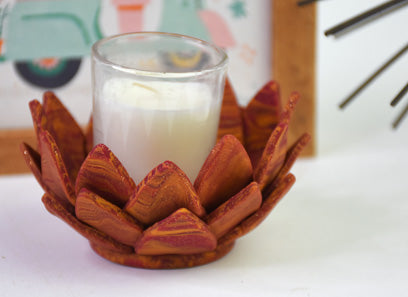
Sculpey III® Garnet Glitter Glam Votive
Sculpey III® Garnet Glitter Glam Votive
Designed by Amy Koranek
Read More
Read Less
Create a sophisticated votive holder in about an hour using Garnet Glitter and Gold.
COMPLETION TIME: 60 Minutes to make and bake
ADDITIONAL SUPPLIES
- Deli paper or scrap paper
- Glass votive
- Small juice glass with the same or slightly larger diameter as your glass votive
- OPTIONAL: Clay Conditioning Machine (also called a pasta machine)
Project Instructions
- Getting Started:
Start with clean hands, unwrap and knead clay until soft and smooth, or condition by running clay though a Pasta Machine. We recommend using a designated machine for clay purposes only. When working with multiple colors, clean hands with soap and water or baby wipes (we have found that baby wipes work best) before switching colors. Shape clay, pressing pieces firmly together. Wash hands after use.
- Baking:
From one 2 ounce bar of Garnet Glitter, form a thick log.
Roll 1 ounce (1/2 bar) of Gold into ropes. Border the log with the Gold ropes leaving spaces between them.
Roll 1 ounce (1/2 bar) of Gold into ropes. Border the log with the Gold ropes leaving spaces between them.

Roll 1 ounce (1/2 bar) of Garnet Glitter into a rope and fill the spaces in between the Gold ropes with Garnet Glitter ropes.

Roll the thick log on the work surface to smooth it.
Twist the log to make twisted stripes.
Twist the log to make twisted stripes.

Roll the rope to about 12” long, fold it in half and then in half again.

Roll and twist the rope once more to create lots of small twisted stripes.

Fold the rope in half and in half again. When you fold like this, it helps the clay to create lots and lots of random skinny twisted stripes.

Roll again to smooth, but this time keep pressing from both ends of the rope with the palms of your hands to thicken it back into a short log. Make sure the very ends stay twisted.

Slice the log in half lengthwise with a Clay Blade. This way we can produce two sheets of super striped material and none is lost on the back sides.

Roll the half logs by pressing through the pasta machine on the thickest setting or by hand rolling to a thickness of 1/8” thick.

Drag your fingertip from one side the sheet to the other across the stripes. This will drag the colors randomly through each other. Drag one way and then the other to create a lovely bargello pattern. Repeat for the second sheet.

For the first row of petals, cut out six of the largest teardrop shapes.
Lay these out in a radiating pattern on a piece of paper. The paper keeps the clay from sticking to your work surface so that you can lift the entire design when you are ready to.
Lay these out in a radiating pattern on a piece of paper. The paper keeps the clay from sticking to your work surface so that you can lift the entire design when you are ready to.

Cut another group of six of the largest teardrops. Place these on top of the first row and make sure they connect well to each other.

We will use the small juice glass as a form for our votive. We want to bake the votive upside down because gravity during baking will help the petals to go the direction that we want them to go. If we bake the votive right side up, gravity will pull the petals down during baking because the clay will get softer before it cures. Place your juice glass upside-down in front of you. Carefully lift the first two rows of petals on the paper and transfer them from the paper to the bottom of the juice glass.
Carefully drape the petals around the bottom edge of the juice glass as shown. Make sure these first 2 rings of petals are stuck well to the glass.
Carefully drape the petals around the bottom edge of the juice glass as shown. Make sure these first 2 rings of petals are stuck well to the glass.

Next, cut a set of six petals using the second largest teardrop cutter. Arrange these on top of the two large rows of petals as shown. Make sure they connect well to the previous row.

Repeat Step 15 with one more row of petals using the second largest cutter.

Use the scraps of marbled clays to form a thick patty about 1/4” thick. Cut out a circle using the 2” circle cutter. Cut the center out of it using the 1.25” circle cutter.

Place the thick ring on top of the rows of petals forming a base. Remember we are working upside down still so your base is really on the top. Make sure the ring base is really stuck well to the petals. Carefully turn the glass right-side-up just to make sure the ring base has a really flat level bottom.
Turn the juice glass upside-down again.
Bake the votive on the juice glass upside-down following the baking instructions for Sculpey III®.
Turn the juice glass upside-down again.
Bake the votive on the juice glass upside-down following the baking instructions for Sculpey III®.

Allow to cool completely before carefully removing it from the juice glass. Fill with a glass votive. It is important to use candles with a glass holder so that the clay is not directly exposed to flame.

- Choosing a selection results in a full page refresh.
- Opens in a new window.