

Sculpey® III Fan Pendant
Sculpey® III Fan Pendant
Read More
Bold colors and a delicate pattern crate this beautiful pendant that is modern yet reminiscent of a Japanese fan.
Read Less
ADDITIONAL SUPPLIES
Craft Knife, 4mm Hot Fix Nail Head, cutter, Scissors, Paper Towel, Cord or chain of your choice|Craft Knife, 4mm Hot Fix Nail Head, cutter, Scissors, Paper Towel, Cord or chain of your choice
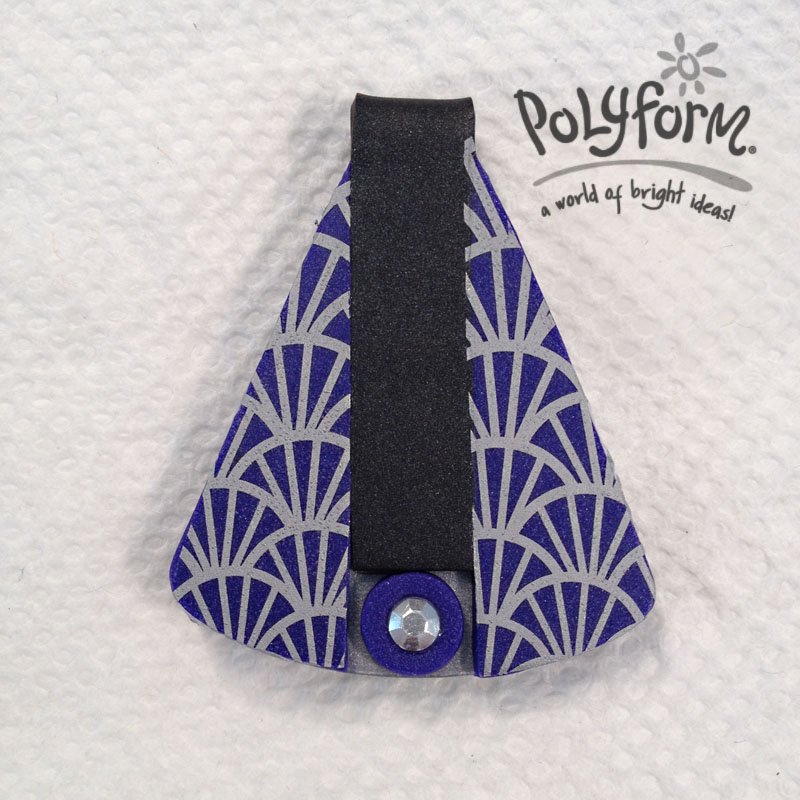
Project Instructions
Getting Started Do not use unbaked clay on unprotected furniture or finished surfaces. Start with clean hands and work surface area. Good work surfaces include wax paper, metal baking sheet, or disposable foil. Knead clay until soft and smooth. For best results, clean your hands in between colors. Shape clay, pressing pieces together firmly. Bake on oven-proof glass or metal surface at 275°F (130°C) for 30 minutes per ¼" (6 mm) thickness. For best baking results, use an oven thermometer. DO NOT USE MICROWAVE OVEN. DO NOT EXCEED THE ABOVE TEMPERATURE OR RECOMMENDED BAKING TIME. Wash hands after use. Baking should be completed by an adult. Begin by preheating oven to 275°F (130 °C). Test temperature with oven thermometer for perfectly cured clay. For best results, condition all clay by running it through the clay dedicated pasta machine several passes on the widest setting. Fold the clay in half after each pass and insert the fold side into the rollers first.
Condition and roll out a sheet of Silver clay on the #1 setting of the Clay Conditioning Machine. Using the Sculpey® Design It Templates- Jewelry Shapes place the shield shaped template directly onto the surface of the clay and use the craft knife to cut out the shape. Note, you can also use the frame of the template if it is easier to use than the cut out shape. Bake the piece for 15 minutes and let cool completely.

To make the frosty black color on this project mix Black and Silver in a ratio of 4-Black to 1-Silver. The little bit of Silver in the Black creates a subtle sheen. Once you have the colors mixed completely roll out a narrow strip on a medium/thin setting on the Clay Conditioning Machine. The strip should be at least ¾” wide by 3” long. Note: This strip is going to not only run down the center of the pendant it is going to form the bail at the top for your chain or cord to go through, so you want to have enough length to do this. Pick up the shield template you used in step 1 and gently press the top edge into the clay. This mark acts as a guide so you can cut a strip of the black to the correct width. Once you have the mark on the clay cut the strip.

Once you have the strip cut trim one end square and lay it onto the base piece you cut out in Step 1. Place the trimmed end about 5/16” up from the bottom of the base piece and so it is centered. Run the rest of the strip up the center of the base piece and gently smooth it down as you go. Once you get to the top of the base piece hold the Etch n’ Pearl tool along the top in a place where the diameter of the Etch n’ Pearl tool is a little bigger than the chain or cord you plan on using. While holding the Etch n’ Pearl tool in place fold the strip of clay over onto the back of the base piece. Gently press the strip onto the back and then slide the Etch n’ Pearl tool back out. Use your fingers to push the strip of clay onto the back of the base so it makes good contact. Use the Sculpey® Super Slicer blade to trim the excess away. Bake for 15 minutes and let cool completely.

To make the “blueberry” color for this step you need to mix the following ratios: 1 part Silver, 1 part Blue, and 3 parts Purple. Once you have your color mixed thoroughly roll out a sheet on the same medium/thin setting you used in Step 3, it should be at least 2” square. Cut a straight edge on the sheet of clay, lift the sheet, and butt the edge of the “blueberry” sheet against the strip of black down the middle. Turn the piece over and use the craft knife to trim the excess clay from the edge of the base piece. Repeat this process on the other side of the strip of black.

Use the 3/8” cutter to cut a small circle out of a left over piece of the “blueberry” sheet from Step 4. Add a tiny dab of Translucent Liquid Sculpey to the back of the circle and place it onto the pendant at the bottom of the trimmed end of the black strip. Position the 4mm hot fix nail head on the center of the circle of clay and gently press it into the surface a little bit. Note: Try to maintain level pressure so the nail head doesn’t push in at an angle.

Take the Sculpey® Clay Decal Kit and cut out two pieces of the decal that match the shape of the two “blueberry” pieces on the sides of the pendant. Note: Placing the template you used in Step 1 on the decal surface and tracing it lightly with a pencil is very helpful. This way you get the matching curve to cut along. You can cut out the full shape and then cut a strip out of the middle that matches the width of the black strip on the pendant. Once you have the pieces cut out soak them in water for 30 seconds, slide the decal off of the paper-backing, and place onto the clay. Use a paper towel to dab away the water and then use the squeegee that is included in the Sculpey® Clay Decal Kit to smooth the decal down and remove air bubbles. Use the paper towel once more to dab away any extra water that might have come out while using the squeegee. Bake for 30 minutes and let cool completely. Slide the pendant onto your cord or chain and you’re done.
