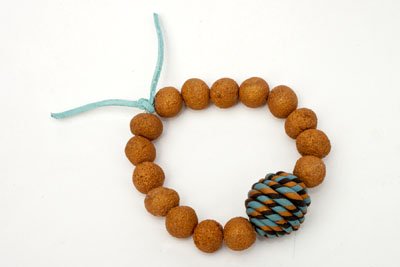
Sculpey® III Coiled Bead Bracelet
Sculpey® III Coiled Bead Bracelet
Read More
This simple to make beautiful accessory will become a staple in your jewelry rotation. It’s so easy to make you can make several to match all of your favorite fashion looks.
Read Less
ADDITIONAL SUPPLIES
• Small bowl of table salt
• 12 inch piece of 1mm beading elastic
• Small piece of color coordinated suede (optional)|• Small bowl of table salt
• 12 inch piece of 1mm beading elastic
• Small piece of color coordinated suede (optional)

Project Instructions
Do not use unbaked clay on unprotected furniture or finished surfaces. Start with clean hands and work surface area. Good work surfaces include wax paper, metal baking sheet, or disposable foil. Knead clay until soft and smooth. For best results, clean your hands in between colors. Shape clay, pressing pieces together firmly. Bake on metal surface, such as a craft dedicated baking sheet at 275 °F (130 °C) for 15 minutes per 1/4" (6 mm). For best baking results, use an oven thermometer. DO NOT USE MICROWAVE OVEN. DO NOT EXCEED THE ABOVE TEMPERATURE OR RECOMMENDED BAKING TIME. Wash hands after use. Baking should be completed by an adult.

Cut 4 twigs 2 ¾” long, these will be the deer's legs. Find 2 small branch like twigs and cut them about 2" long, these will be for the deer's antlers. (I used my bridal wreath bush, but any bush will work).

Cut a 1/2" piece out of the Hazelnut clay for the ears and tail.

Condition the clay and make a 3" cylinder.

Bend up with your thumb and index finger to make a neck.

Shape head. Round shoulders and rear, make an indent around the stomach.

With the blunt point tool, make some separation for where the legs will go. Round and smooth.

Using blunt point tool, poke 4 holes for twig legs making sure to go straight in.

Add a few drops of Bake & Bond in each hole.

Stick a twig in each hole.

Make sure the deer will stand, you might have to cut the twigs with pruners to make it level.

With the small piece of the Hazelnut clay from step 2, condition and sculpt 2 ears and 1 tail. Cut 2 pieces of small wire 1/4" long.

Insert wire into ears and add Bake & Bond.

Using your blunt point tool, make holes for twig antlers. Attach and smooth ears & tail.

Insert twig antlers. Add Black glass seed beads for eyes.

With the needle tool, add detail lines and nose. Bake as directed above. Allow to cool thoroughly.

Using a dry paint brush and ivory acrylic paint, paint the spots, muzzle, eyes, ears, and tail.

Paint nose black. You might have to touch up the eyes.

Spray with Krylon matte finish. Paint with wood sheen, making sure to get into all crevices.

Remove excess wood sheen with paper towels and cotton swabs.

Do not use unbaked clay on unprotected furniture or finished surfaces. Start with clean hands and work surface area. Good work surfaces include wax paper, metal baking sheet, or disposable foil. Knead clay until soft and smooth. For best results, clean your hands in between colors. Shape clay, pressing pieces together firmly. Bake on metal surface, such as a craft dedicated baking sheet at 275 °F (130 °C) for 15 minutes per 1/4" (6 mm). For best baking results, use an oven thermometer. DO NOT USE MICROWAVE OVEN. DO NOT EXCEED THE ABOVE TEMPERATURE OR RECOMMENDED BAKING TIME. Wash hands after use. Baking should be completed by an adult.

Cut 4 twigs 2 ¾” long, these will be the deer's legs. Find 2 small branch like twigs and cut them about 2" long, these will be for the deer's antlers. (I used my bridal wreath bush, but any bush will work).

Cut a 1/2" piece out of the Hazelnut clay for the ears and tail.

Condition the clay and make a 3" cylinder.

Bend up with your thumb and index finger to make a neck.

Shape head. Round shoulders and rear, make an indent around the stomach.

With the blunt point tool, make some separation for where the legs will go. Round and smooth.

Using blunt point tool, poke 4 holes for twig legs making sure to go straight in.

Add a few drops of Bake & Bond in each hole.

Stick a twig in each hole.

Make sure the deer will stand, you might have to cut the twigs with pruners to make it level.

With the small piece of the Hazelnut clay from step 2, condition and sculpt 2 ears and 1 tail. Cut 2 pieces of small wire 1/4" long.

Insert wire into ears and add Bake & Bond.

Using your blunt point tool, make holes for twig antlers. Attach and smooth ears & tail.

Insert twig antlers. Add Black glass seed beads for eyes.

With the needle tool, add detail lines and nose. Bake as directed above. Allow to cool thoroughly.

Using a dry paint brush and ivory acrylic paint, paint the spots, muzzle, eyes, ears, and tail.

Paint nose black. You might have to touch up the eyes.

Spray with Krylon matte finish. Paint with wood sheen, making sure to get into all crevices.

Remove excess wood sheen with paper towels and cotton swabs.


