

Sculpey III Billowing Technique Utensil Holders
Sculpey III Billowing Technique Utensil Holders
Read More
Tutorial By Iris Mishly
http://www.polypediaonlineexpress.com
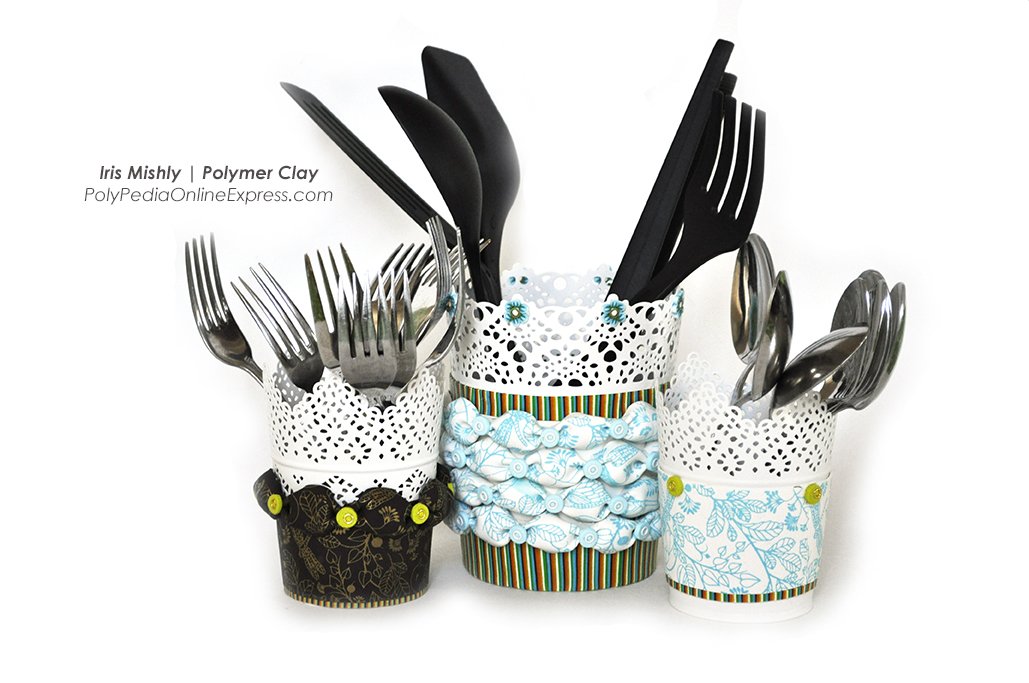
Any person who adores textile or the look of folded fabric will enjoy the “billowing” effect appears over polymer clay. The technique is also known by cake decorating designers as “French Contour”. This fun technique is very easy, yet produces an incredibly sophisticated look. The puffy, “airy” look of the fabric will get people asking how you accomplished this realistic effect.
In this guide I will demonstrate how to achieve the billowing technique using silk-screened polymer clay sheets to create a fun utensil holder. This method of work can be adapted to any surface of your choice – smaller projects or even jewelry.
The beautiful end results have unlimited options and alternatives for your future polymer clay designed “fabric sheets” – millefiori, stamping, mokume gane and many more.
For the project we will need a ready-made stripes sheet made of millefiori stripes cane. The stripes sheet is very common in my designs both as a decorative border and as part of my projects. You can find a free video demonstrating the technique here –https://www.youtube.com/watch?v=vKUYRKfgj60
The tutorial is written with an assumption that you are already familiar with the basic techniques (such as conditioning clay.)
This class contains a lot of information. I recommend reading all of it, at least once before you start making your wonderful work ☺
LETS BEGIN!
Read Less
ADDITIONAL SUPPLIES
small metal eyelets, acrylic paint in color of your choice, white printer paper, parchment/deli paper, small round 1mm cutter, Oven proof base vessel – I’ve used IKEA lace plant pot, small basin of water to wash silkscreen, scissors,|small metal eyelets, acrylic paint in color of your choice, white printer paper, parchment/deli paper, small round 1mm cutter, Oven proof base vessel – I’ve used IKEA lace plant pot, small basin of water to wash silkscreen, scissors,
Project Instructions
Getting Started Polymer clay may stain. CLAY MAY DAMAGE UNPROTECTED FURNITURE OR FINISHED SURFACES. DO NOT USE polymer clay on unprotected surfaces. We recommend working on the Sculpey clay mat, wax paper, metal baking sheet, or disposable foil. Start with clean hands and work surface area. Knead clay until soft and smooth. For best results, clean your hands in between colors. Shape clay, pressing pieces together firmly. Bake on oven-proof glass or metal surface at 275°F (130 °C) for 15 minutes per ¼" (6 mm) thickness. For best baking results, use an oven thermometer. DO NOT USE MICROWAVE OVEN. DO NOT EXCEED THE ABOVE TEMPERATURE OR RECOMMENDED BAKING TIME. Wash hands after use. Baking should be completed by an adult. Begin by preheating oven to 275 °F (130 °C). Test temperature with oven thermometer for perfectly cured clay. For best results, condition all clay by running it through the Clay Conditioning Machine for several passes on the widest setting. Fold the clay in half after each pass and insert the fold side into the rollers first.
Creating the silk screens sheets.Since the sheets needs drying time we will start creating them first, and then, move on to the base form of the utensil holder.Start by conditioning and rolling your clay into a medium-thin setting. The setting can be your final sheets thickness or one setting thicker.I rolled my sheets into setting #5 in my atlas pasta machine. After the fabric sheets were dry I rolled them once more to setting #6. Use a test sheet to check your “billowed” beads thickness. In addition, assure your fabric clay sheets wouldn’t wrinkle or tear in a thinner setting. It would be sad to ruin your silk screen sheets on a thin setting after you worked so hard.
Cut the White Sculpey III into slices, condition as directed above. Roll out on the #5 setting on the Sculpey Clay Conditioning Machine (see note above on sheet thicknesses)

Place your sheets on deli/parchment paper. This should be their drying surface after they are silk-screened with acrylic paint. Make sure there are no air pockets and the sheet is smooth and clean.

Choose your silk screen sheet. Your silk screen has 2 sides, glossy and non-glossy. Place the glossy side on your clay sheet. Attach well and assure there are no air pockets or spaces between the screen and the sheet. Prepare a bowl of water to clean your stamped screen from the acrylic paint afterwards. Prepare your squeegee (comes inside Sculpey Silk-Screen Kit). If you do not have this tool you can use an old credit card.

I’m using green and blue paints for my sheets. Shake your paint well before applying on the screen. Press the paint bottle and “draw” a line of paint on the top part of the screen. Keep the lid open; we will add paint leftovers back to the bottle.

Go over the paint with the squeegee in a single or several swoops until the screen is covered.


Place excess paint back into the bottle.

Wipe the squeegee with paper towel or baby wipes. Peel the screen gently off the clay and you’ll see the beautiful design.

Place your screen in the water until you’re ready to clean it. It can wait for several minutes. Once the screen is cleaned and dried completely, repeat these steps above with the second color of paint.
Let the silkscreened sheets dry completely (time depending on the weather). Prepare as many sheets as you think you’ll need depending on your pot/project size. It is better to have extras in case of mistakes or smudged paint areas. I prepared ~8 sheets (more than I actually needed).
While the clay sheets are drying we will work on the pot clay base. It is recommended to place a thin sheet of clay on the pot for better bonding between the raw clays. If you place your billowed beads on the metal pot, they might fall off during and after baking. Measure the pot width to cover with clay and condition the required clay. Prepare a paper template in the required width. My sheet was rolled to setting # 5 on my machine. If you can work thinner than that you can do that. We need a thin layer to adhere the beads to.

Place the paper strap on the clay and cut accordingly. Cut a straight cut on one edge.

Spread Sculpey Bake n' Bond on your pot/holder for better bonding. Do not “flood” the pot with liquid, just a small bit in several spots. Wrap the prepared sheet of clay around the pot, overlapping the ends. Press your fingernail in the join to mark it. Roll back the clay and trim to the mark on the joint.


Heal the joint by pressing the two edges together gently as shown.

Press bottom edges towards the bottom. Place your Super Slicer blade horizontally and cut off the excess clay.

After your silk-screened sheets are completely dry (I’ve waited 12 hours in a cold day), rolled it once on a single thinner setting in your pasta machine. My sheets were setting #5, they were rolled to setting # 6 after the paint had dried thoroughly. If your sheets are thin enough, leave them as they are.

Trim the edges to make them even. Measure your billowed bead size. Mine was 4 cm / 2.5 cm (1.5 inch / 1 inch). You can make them smaller or larger depending on your design or project size.

Cut your rectangles.

Start by holding a rectangle. The folding is done on the shorter edge.

Start folding to create the letter “M”/. Fold one side, then the other side


The billowed bead tends to be puffy on the wrong side (white and not screened). Use your finger to reverse the effect so the puffy bead area will be on the stamped side. Pinch on the edge.


Repeat the process on 2nd side, creating the “M” shape.

Pinch and arrange your bead.

Use a ball tool if you have one, to enhance the puffy effect.

Trim the edges of each billowed bead. This is recommended so that every pair of beads will connect nicely one next to the other.

Place a thin layer of Sculpey Bake n'Bond on your pot raw clay base. Do not put too much liquid clay to prevent the beads from slipping down. ** Note – at this point you may want to place your top stripes sheet. I forgot to do it and did it later. Carefully place one of the beads onto the white base. Press carefully into place. Pressure is applied mostly on side edges, not on the puffy part.

Start placing your beads one next to the other, alternating places (below each pair on the top row place a single bead)

Striped sheet:Just before placing the last bottom row of beads I have added a stripes sheet. Cut the necessary width and length to cover the whole pot around.

Place the sheet, pressing gently to adhere without air bubbles.

Cut bottom excess.

Place bottom row of billowed beads.

(This is where I’m adding the top stripes sheet, it is recommended to do it previously). Place it below the top row.

Center dots: These center-circled elements will add beauty to the fabric look and the eyelet will give it a nice folded appearance. Use a small round cutter (or other) to cut your center dots.Sheet thickness is setting # 2 (should match your eyelet thickness). Press each eyelet into the circle.

Secure the center dots to the beads with liquid polymer clay. Press gently but firmly onto the pot between each 2 beads.

Bake the pot as directed above with parchment paper and tape wrapping the tool. This will secure the beads you might not attached strong enough and prevent them from falling while curing.


Getting Started Polymer clay may stain. CLAY MAY DAMAGE UNPROTECTED FURNITURE OR FINISHED SURFACES. DO NOT USE polymer clay on unprotected surfaces. We recommend working on the Sculpey clay mat, wax paper, metal baking sheet, or disposable foil. Start with clean hands and work surface area. Knead clay until soft and smooth. For best results, clean your hands in between colors. Shape clay, pressing pieces together firmly. Bake on oven-proof glass or metal surface at 275°F (130 °C) for 15 minutes per ¼" (6 mm) thickness. For best baking results, use an oven thermometer. DO NOT USE MICROWAVE OVEN. DO NOT EXCEED THE ABOVE TEMPERATURE OR RECOMMENDED BAKING TIME. Wash hands after use. Baking should be completed by an adult. Begin by preheating oven to 275 °F (130 °C). Test temperature with oven thermometer for perfectly cured clay. For best results, condition all clay by running it through the Clay Conditioning Machine for several passes on the widest setting. Fold the clay in half after each pass and insert the fold side into the rollers first.
Creating the silk screens sheets.Since the sheets needs drying time we will start creating them first, and then, move on to the base form of the utensil holder.Start by conditioning and rolling your clay into a medium-thin setting. The setting can be your final sheets thickness or one setting thicker.I rolled my sheets into setting #5 in my atlas pasta machine. After the fabric sheets were dry I rolled them once more to setting #6. Use a test sheet to check your “billowed” beads thickness. In addition, assure your fabric clay sheets wouldn’t wrinkle or tear in a thinner setting. It would be sad to ruin your silk screen sheets on a thin setting after you worked so hard.
Cut the White Sculpey III into slices, condition as directed above. Roll out on the #5 setting on the Sculpey Clay Conditioning Machine (see note above on sheet thicknesses)
Place your sheets on deli/parchment paper. This should be their drying surface after they are silk-screened with acrylic paint. Make sure there are no air pockets and the sheet is smooth and clean.
Choose your silk screen sheet. Your silk screen has 2 sides, glossy and non-glossy. Place the glossy side on your clay sheet. Attach well and assure there are no air pockets or spaces between the screen and the sheet. Prepare a bowl of water to clean your stamped screen from the acrylic paint afterwards. Prepare your squeegee (comes inside Sculpey Silk-Screen Kit). If you do not have this tool you can use an old credit card.
I’m using green and blue paints for my sheets. Shake your paint well before applying on the screen. Press the paint bottle and “draw” a line of paint on the top part of the screen. Keep the lid open; we will add paint leftovers back to the bottle.
Go over the paint with the squeegee in a single or several swoops until the screen is covered.
Place excess paint back into the bottle.
Wipe the squeegee with paper towel or baby wipes. Peel the screen gently off the clay and you’ll see the beautiful design.
Place your screen in the water until you’re ready to clean it. It can wait for several minutes. Once the screen is cleaned and dried completely, repeat these steps above with the second color of paint.
Let the silkscreened sheets dry completely (time depending on the weather). Prepare as many sheets as you think you’ll need depending on your pot/project size. It is better to have extras in case of mistakes or smudged paint areas. I prepared ~8 sheets (more than I actually needed).
While the clay sheets are drying we will work on the pot clay base. It is recommended to place a thin sheet of clay on the pot for better bonding between the raw clays. If you place your billowed beads on the metal pot, they might fall off during and after baking. Measure the pot width to cover with clay and condition the required clay. Prepare a paper template in the required width. My sheet was rolled to setting # 5 on my machine. If you can work thinner than that you can do that. We need a thin layer to adhere the beads to.
Place the paper strap on the clay and cut accordingly. Cut a straight cut on one edge.
Spread Sculpey Bake n' Bond on your pot/holder for better bonding. Do not “flood” the pot with liquid, just a small bit in several spots. Wrap the prepared sheet of clay around the pot, overlapping the ends. Press your fingernail in the join to mark it. Roll back the clay and trim to the mark on the joint.
Heal the joint by pressing the two edges together gently as shown.
Press bottom edges towards the bottom. Place your Super Slicer blade horizontally and cut off the excess clay.
After your silk-screened sheets are completely dry (I’ve waited 12 hours in a cold day), rolled it once on a single thinner setting in your pasta machine. My sheets were setting #5, they were rolled to setting # 6 after the paint had dried thoroughly. If your sheets are thin enough, leave them as they are.
Trim the edges to make them even. Measure your billowed bead size. Mine was 4 cm / 2.5 cm (1.5 inch / 1 inch). You can make them smaller or larger depending on your design or project size.
Cut your rectangles.
Start by holding a rectangle. The folding is done on the shorter edge.
Start folding to create the letter “M”/. Fold one side, then the other side
The billowed bead tends to be puffy on the wrong side (white and not screened). Use your finger to reverse the effect so the puffy bead area will be on the stamped side. Pinch on the edge.
Repeat the process on 2nd side, creating the “M” shape.
Pinch and arrange your bead.
Use a ball tool if you have one, to enhance the puffy effect.
Trim the edges of each billowed bead. This is recommended so that every pair of beads will connect nicely one next to the other.
Place a thin layer of Sculpey Bake n'Bond on your pot raw clay base. Do not put too much liquid clay to prevent the beads from slipping down. ** Note – at this point you may want to place your top stripes sheet. I forgot to do it and did it later. Carefully place one of the beads onto the white base. Press carefully into place. Pressure is applied mostly on side edges, not on the puffy part.
Start placing your beads one next to the other, alternating places (below each pair on the top row place a single bead)
Striped sheet:Just before placing the last bottom row of beads I have added a stripes sheet. Cut the necessary width and length to cover the whole pot around.
Place the sheet, pressing gently to adhere without air bubbles.
Cut bottom excess.
Place bottom row of billowed beads.
(This is where I’m adding the top stripes sheet, it is recommended to do it previously). Place it below the top row.
Center dots: These center-circled elements will add beauty to the fabric look and the eyelet will give it a nice folded appearance. Use a small round cutter (or other) to cut your center dots.Sheet thickness is setting # 2 (should match your eyelet thickness). Press each eyelet into the circle.
Secure the center dots to the beads with liquid polymer clay. Press gently but firmly onto the pot between each 2 beads.
Bake the pot as directed above with parchment paper and tape wrapping the tool. This will secure the beads you might not attached strong enough and prevent them from falling while curing.