

Sculpey III® and Liquid Sculpey® Pink Lemonade Cupcake
Sculpey III® and Liquid Sculpey® Pink Lemonade Cupcake
Designed by Caroline Aguanno
Read More
Read Less
Sculpey III® and Liquid Sculpey® team up to help create this darling little cupcake to hang on your purse or backpack.
Time to create 30 minutes
Time to bake 18 minutes
ADDITIONAL SUPPLIES
- Toothbrush
- Pastel Chalks
- Paint brush
- Small ball stylus tool
- Piping tip Wilton #18
- Piping disposable bag
- Cupcake mold – the one used here was bought from Etsy shop CrunchySushiDay
- 2” Eye pin
- Needle Nose Pliers
- 5 mm Jump ring

Project Instructions
- Getting Started:
Start with clean hands, unwrap and knead clay until soft and smooth, or condition by running clay though a Pasta Machine. We recommend using a designated machine for clay purposes only. When working with multiple colors, clean hands with soap and water or baby wipes (we have found that baby wipes work best) before switching colors. Shape clay, pressing pieces firmly together. Wash hands after use.
- Baking:
Marble pink yellow and white clay for the base of the cupcake and push into the cupcake mold.>


Mix together tan, yellow and white to make the cupcake color.

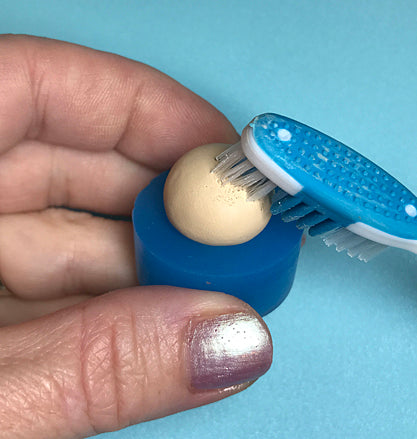
Roll into a ball and shape on your cupcake mold and add texture using a toothbrush .
Using chalk pastels you can shade the cupcake to your liking.


Create two holes for the eyes with your dotting tool and use two small black balls for the eyes. Roll out a thin log of black clay and shape the eyebrows and mouth.


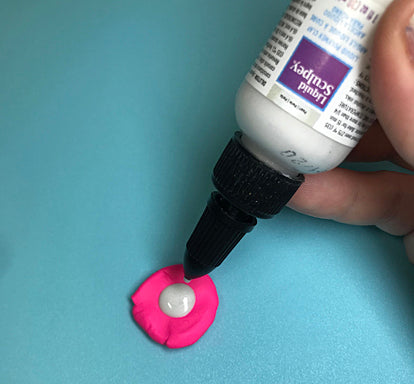
For the frosting, use pink clay and pearl liquid Sculpey along with a couple of drops of clay softener. I used gloves to mix as this part can get messy! Repeat this step using yellow clay.

Add both colors to your piping tip and plastic bag, just as you would with real frosting. Pipe the mixture on top of your cupcake!


Add the eye pin and bake according to instructions.

After its cooled, pop your cupcake out of the mold and remove the eye pin, you’re going to add it back in through the bottom so it’s nice and secure. Create a loop at the top using your needle nose tool and add a jump ring. Now you can turn this cutie into a lovely charm for a necklace or keychain!
