


Sculpey® Bake Shop Sea Life Bank
Sculpey® Bake Shop Sea Life Bank
Designed by Amy Koranek
Read More
Read Less
Decorate a simple wooden bank with a sea full of colorful creatures using Sculpey® Bake Shop!
COMPLETION TIME: 60 Minutes to paint and make your sea life creatures. Each time the mold is filled will require 15 minutes of baking time. The glue should be allowed to dry on one side of the box before adding pieces to the next side.ADDITIONAL SUPPLIES
- Small wooden bank
- Blue acrylic paint
- Paintbrush
- Black permanent marker
- White craft glue

Project Instructions
Getting Started:
Please make sure your work area is covered and you are not working on an unprotected surface. We recommend working on the Sculpey® Oven Safe Work Mat, wax paper, metal baking sheet, or disposable foil. Uncured clay may damage unprotected furniture or finished surfaces. Be sure to cover your crafting area appropriately.
Start with clean hands, unwrap and knead clay until soft and smooth, or condition by running clay though a Pasta Machine. We recommend using a designated machine for clay purposes only. When working with multiple colors, clean hands with soap and water or baby wipes (we have found that baby wipes work best) before switching colors. Shape clay, pressing pieces firmly together. Wash hands after use.
Baking:
Begin by preheating oven to 275 °F (130 °C). After you are done creating; for best results bake clay on an oven-proof surface such metal, aluminum foil, an index card or the Sculpey® Oven Safe Work Mat at 275°F (130 °C) for 15 minutes per 1/4" (6 mm) thickness according to package directions. Oven safe glass or ceramic surfaces are also acceptable for baking; however please note that the baking times may take longer as the glass or ceramic surfaces take longer to heat up. For best baking results, use an oven thermometer. DO NOT USE MICROWAVE OVEN. DO NOT EXCEED THE ABOVE TEMPERATURE OR RECOMMENDED BAKING TIME. BAKING SHOULD BE DONE BY AN ADULT.
Marbling colors together is a fun way to make colorful sea creatures to decorate your bank. The Sea Life oven safe mold makes it easy. You can make several different blends of marbled clays and place them in the mold at the same time, then bake all at once.
To create a marbled piece of clay, start with several small balls of colors. In this example there is Purple, White, Blue, and Green. Push the balls together.
To create a marbled piece of clay, start with several small balls of colors. In this example there is Purple, White, Blue, and Green. Push the balls together.

Partially knead the colors together with your fingertips.

Break off pieces from the marbled clay ball and press them into the mold. Just keep pushing pieces into the shape until it is full.

Use the knife included in the Bake Shop Multi Pack to shave away excess clay if the shape is over filled.

Fill up as many areas of the mold as you want. Then bake the mold following the baking instructions for Bake Shop above.
While the pieces are baking in the oven, you can paint your wooden box with acrylic paint. Allow the paint to dry completely before gluing on the sea creatures.
While the pieces are baking in the oven, you can paint your wooden box with acrylic paint. Allow the paint to dry completely before gluing on the sea creatures.

When the mold is completely cool, you can easily remove the shapes by gently bending the mold.

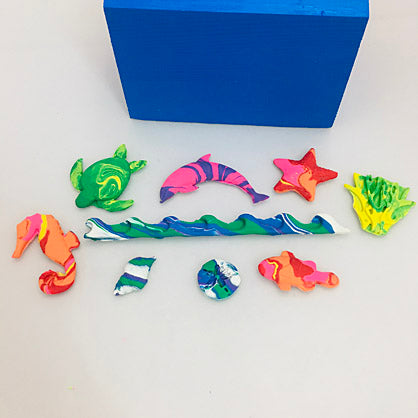
Here’s a collection of shapes that I made using different blends of clays. They are ready to be glued onto the bank using white craft glue.
Use a black permanent marker to add details such as eyes to the sea creatures.
Use a black permanent marker to add details such as eyes to the sea creatures.
Glue the pieces to the bank one side at a time and allow each side to dry before turning the box to a new side.

- Choosing a selection results in a full page refresh.
- Opens in a new window.