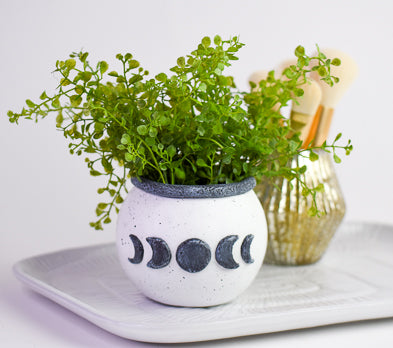

Sculpey Air-Dry™ Moon Phases Planter
Sculpey Air-Dry™ Moon Phases Planter
Designed by Linda Hollander
Read More
Create a conversation piece for your home using Sculpey Air-Dry™ and a small fish bowl.
TIME TO COMPLETION: 45 minutes not including time for clay to dry
Clay Tips from the designer:
Read Less
Clay Tips from the designer:
- Use water on fingertips to help smooth clay as needed.
- Use a hard surface such as a large tile or piece of glass to roll out clay.
- When rolling clay sheets, use the Super Slicer to lift the sheet and turn over after each roll to prevent the clay from sticking to your work surface.
- Lightly sand dried clay to smooth out imperfections.
ADDITIONAL SUPPLIES
- DecoArt Multi-Purpose Sealer; Matte Varnish
- DecoArt Americana Acrylic Paint: Lamp Black, Snow White
- Paint brushes: flat/shader; small round, stiff brush such as an old toothbrush
- Sponge backed sanding block: medium/fine grit
- Wooden skewers (optional)
- Surface of choice (4” fishbowl from a craft store was used here)

Project Instructions
- Getting Started:
Start with clean hands, unwrap and knead clay until soft and smooth. Wash hands after use. Wrap any extra clay in then wrapper and then put in an air tight container.
Use the clay blade to cut off a piece of clay off the brick then roll into a ball. Use the clay roller to roll a sheet using skewers to keep even thickness.

Use clay blade to trim the sheet to fit your bowl. Apply the clay to the side of the bowl and press out air bubbles. Use the clay blade to remove excess clay and to create a straight vertical edge. Repeat with additional clay sheets until completely covered. Use finger pressure and the acrylic roller to smooth seams. Let dry then sand to smooth.

Roll a 2” ball of clay then roll inot a snake. Wet the top rim of the bowl and carefully apply the snake. Cut excess clay then use finger pressure and/or a wet paintbrush to smooth the seam. Texture the wet clay with the toothbrush (optional). Let dry.

Roll a sheet of clay for the moon phases. Cut five circles using the circle cutter that best fits your bowl.

Use the same cutter to remove clay from five circles to recreate the moon phases.
Smooth the edges with light finger presure and/or a damp brush. Use water to wet the area of the bowl that you want to decorate with the moon phases. Carefully place the full moon in the center. Use light finger pressure to adhere it. Repeat with the rest of the moon phases using the picture as a guide. Lightly texture the moon phases with the toothbrush (optional). Let dry.
Smooth the edges with light finger presure and/or a damp brush. Use water to wet the area of the bowl that you want to decorate with the moon phases. Carefully place the full moon in the center. Use light finger pressure to adhere it. Repeat with the rest of the moon phases using the picture as a guide. Lightly texture the moon phases with the toothbrush (optional). Let dry.

Apply a coat of Multi-Purpose Sealer to all clay areas. Let dry then apply 2 coats of Snow White. When dry apply matte varnish to the white areas. Paint the black areas (rim and moons) with Lamp Black. Use a clean wet brush to quickly lift any unwanted paint from the white areas. Pick up a small amount of Snow White on a brush and offload excess onto a paper towel. Drybrush the black areas to reveal the texture.
Apply a coat of varnish to all areas.
Thin Lamp Black with water to the consistency of heavy cream. Load the toothbrush then use your thumb or a tool to pull back the bristles and spatter or flyspeck the white areas. Tip: Offload some of the paint onto scrap until the spatters are a pleasing size. Its best to spatter outside or in a cardboard box to prevent unwanted spatters in your home.
Allow the paint to completely dry before moving to its new starring role in your home!

- Choosing a selection results in a full page refresh.
- Opens in a new window.