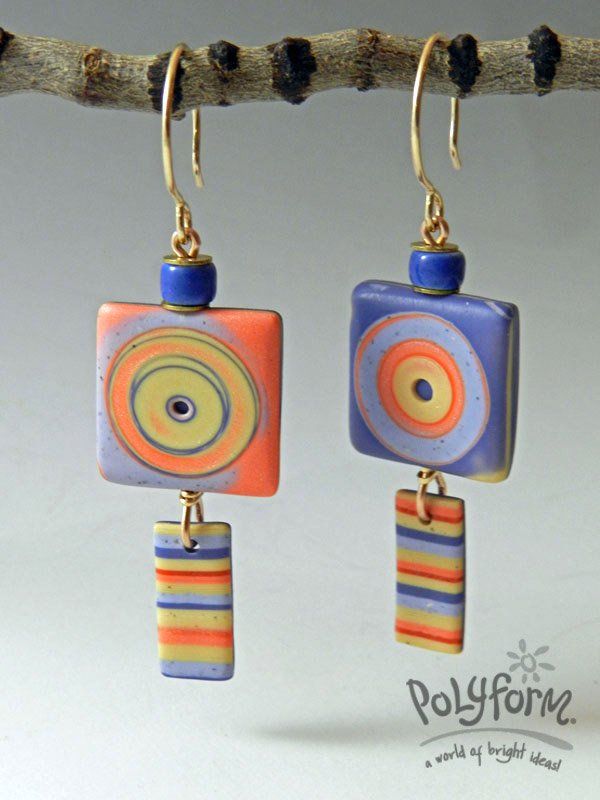
premo! Stripes and Squares
premo! Stripes and Squares
Read More
Pops of color and striped dangles give these earrings a lighthearted sense of movement and playfulness!
Designed By Julie Picarello
Read Less
ADDITIONAL SUPPLIES
Round Nose pliers, ,Spacers, Washers, Beads- coordinating colors, Kemper small cutters, tissue blade, delis paper|Round Nose pliers, ,Spacers, Washers, Beads- coordinating colors, Kemper small cutters, tissue blade, delis paper

Project Instructions
Getting Started:Polymer clay may stain. CLAY MAY DAMAGE UNPROTECTED FURNITURE OR FINISHED SURFACES. DO NOT USE polymer clay on unprotected surfaces. We recommend working on plain paper, wax paper, metal baking sheet, or disposable foil. Start with clean hands and work surface area. Knead clay until soft and smooth. For best results, clean your hands in between colors. Shape clay, pressing pieces together firmly. Bake on oven-proof glass or metal surface at 275 °F (130 °C) for 30 minutes per ¼" (6 mm) thickness. For best baking results, use an oven thermometer. DO NOT USE MICROWAVE OVEN. DO NOT EXCEED THE ABOVE TEMPERATURE OR RECOMMENDED BAKING TIME. Wash hands after use. Baking should be completed by an adult. Begin by preheating oven to 275 °F (130 °C). Test temperature with oven thermometer for perfectly cured clay. For best results, condition all clay by running it through the clay dedicated pasta machine several passes on the widest setting. Fold the clay in half after each pass and insert the fold side into the rollers first.
Mixing Colors Shimmering Sunset = 1 pt. Sunset Pearl, 1 pt. 18k GoldFaded Sunset = 1 pt. Sunset Pearl, 2 pts. EcruOld Ivory = 1 pt. Ecru, 1 pt. PearlFaded Periwinkle = 1 pt. Periwinkle, 1 pt. Gray Granite, 1 pt. White After mixing all the colors, sheet the Old Ivory, Periwinkle and Faded Periwinkle colors on the thickest setting of the clay conditioning machine, trim to approximately 2” wide and 3-4” long, and set aside. Roll the Faded Sunset on the second thickest setting, and Shimmering Sunset on a thin setting. Set them on top of each other and run together through the clay conditioning machine on the thickest setting to create a two-color strip, and trim to size. Do the same thing with orange/light orange, so that you end up with four strips of clay: Multi-Purple, Multi-Orange, Olive and Ivory. Cut the strips in half so that you have two squares of each color.

Building a Color Stack, for stripes roll out a medium thin layer of clay and arrange the slices on top so that the edges align. Layer gently to adhere the slices, then run through the clay conditioning machine on a medium thick setting. Trim the edges and set aside. FOR CIRCLES, Stack the Periwinkle and Faded Periwinkle squares and run through the clay conditioning machine on the thickest setting. Do the same with the Sunset and Ivory squares. Set one two-color strip on top of the other and run through the clay conditioning machine on the thickest setting, creating a single long, multi-colored strip.Cut this long strip in half and align one of the cut pieces on top of the other; layer lightly together. Cut and align the pieces on top of each other one last time, so that each individual color is represented four times in the final stack. Trim all edges

Imprinting & Slicing, layer the color stack to the tile work surface and ensure it has adhered firmly. Spritz the stack with water prior to imprinting. Push your circle tubes tools firmly into the clay but not so hard that the pattern is distorted, and keep in mind that designs can always be re-imprinted in between slices. Hold a clean tissue blade in both hands parallel to the work surface, and position the cutting edge just below the top of the stack. Begin slicing from back to front of the stack, maintaining the parallel orientation of the blade to the clay. As each slice is removed, place it gently on a piece of deli paper. Strive to keep each slice consistent in height - neither paper thin nor super thick.

Build the Bead, choose two of the circle patterns to form into earring squares and loosely trim them. Rather than look for two that are very similar, look for two that have very different color combinations. The common pattern (circles within circles) is the unifying element, rather than an identical color scheme. To add thickness to the bead and ensure it can be drilled, place the trimmed piece on top of textured backing clay. Gently pick them up and look at the thickness; if it appears too thin, increase the thickness of the backing clay until satisfied. Use the Sculpey Design It Templates Jewelry shapes (rectangular template) to align your edges. Trim both edges in one direction, rotate the template placement 90 degrees, and complete the cuts on the other two edges. After cuts are complete, place a thin piece of deli paper on top of the square and gently press all four sides downward. This will result in smooth, rounded edges. To create the striped dangles, you can use a longer template to cut out a striped piece that can be trimmed down to the proportion desired. When finished, bake according to the directions above and allow to cool completely. When cooled, smooth with 400/600/800 grit wet/dry sandpaper and polish with a soft piece of cotton or on a bench lathe.


Drill and Wire, drill side-to-side through the square beads, and from top-to-bottom on the dangles. When drilling the dangles, make sure that you use a bit size larger than the actual wire size to ensure there is room for the dangle to move; you don’t want it too tight. Use round-nose pliers to form eye pins (I like 19g wire for this). Select spacers, washers, beads etc. that complement your palette and slide the wire through the bead. Create a loop at the bottom to catch the circle and wrap, trim and file the metal for smoothness as needed.


