

premo! Silk Screen Cuff Bracelet
premo! Silk Screen Cuff Bracelet
Read More
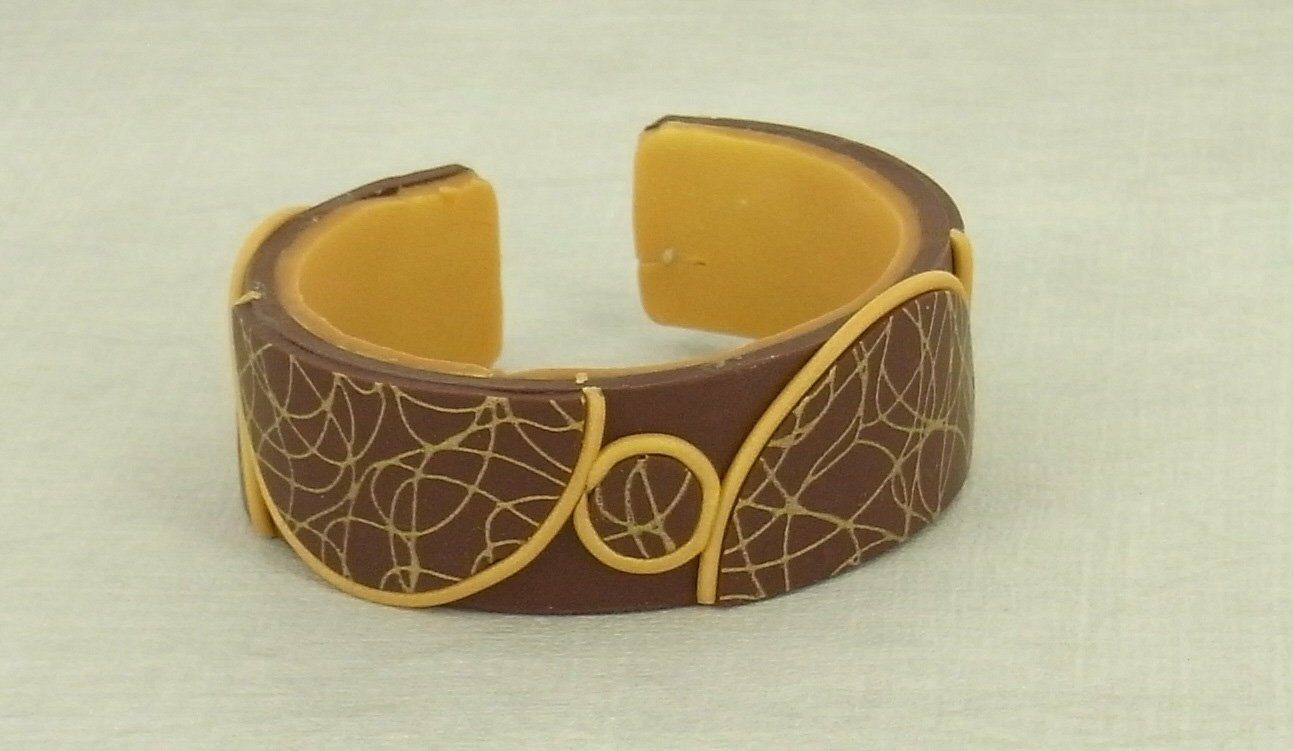
The combination of gold paint and Burnt Umber clay add a warm richness to this easy to make cuff bracelet.
Read Less
ADDITIONAL SUPPLIES
• Small Flat Paint Brush
• Shallow tray filled with room temperature water|• Small Flat Paint Brush
• Shallow tray filled with room temperature water
Project Instructions
Getting Started Polymer clay may stain. CLAY MAY DAMAGE UNPROTECTED FURNITURE OR FINISHED SURFACES. DO NOT USE polymer clay on unprotected surfaces. We recommend working on the Sculpey clay mat, wax paper, metal baking sheet, or disposable foil. Start with clean hands and work surface area. Knead clay until soft and smooth. For best results, clean your hands in between colors. Shape clay, pressing pieces together firmly. Bake on oven-proof glass or metal surface at 275°F (130 °C) for 30 minutes per ¼" (6 mm) thickness. For best baking results, use an oven thermometer. DO NOT USE MICROWAVE OVEN. DO NOT EXCEED THE ABOVE TEMPERATURE OR RECOMMENDED BAKING TIME. Wash hands after use. Baking should be completed by an adult.Begin by preheating oven to 275 °F (130 °C). Test temperature with oven thermometer for perfectly cured clay. For best results, condition all clay by running it through the Clay Conditioning Machine for several passes on the widest setting. Fold the clay in half after each pass and insert the fold side into the rollers first.
Condition the Burnt Umber clay and roll a long strip on a #2 setting. Stretch the Cuff Bracelet form open until you have it to the shape you need with a little bit of extra gap. Wrap the strip of Burnt Umber around the outside of the Cuff Bracelet form and use your Super Slicer blade to trim the clay way from the edges of the form; set the excess clay to the side. Bake the clay on the form for 15 minutes, let cool, and remove clay from form.
Roll out the Burnt Umber clay into a sheet on a #3 setting. Using your Super Slicer, cut three squares that are about 1-3/4”. Screen each square with the Scribbles pattern silk screen using the gold paint. Be sure to immediately place the screen into the tray of water then rinse and dry between each use. Let the paint dry for a couple of minutes.
Once the paint has dried cut a 1-1/2” circle out of the screened pattern on two of the squares and a 3/8” circle on the third. Set the 3/8” circle to the side for later.
Cut each of the 1-1/2” circles in half so you have four half circles. Pick up one of the half circles and rub a thin layer of Bake n’ Bond on the back. Place the half circle onto the outside of the cuff so that the straight line of the half circle is lined up with the edge of the cuff and is about ¼” in from the end. Using the same method add a half circle to the other end of the bracelet but so the rounded side of the half circle is pointing in the opposite direction; meaning that on one end the rounded part is pointing up and on the other end it is pointing down.

Load some of the 18K Gold clay into the barrel of the extruder and insert the die with the tiny holes. Extrude the clay so you have multiple thin strands that are at least 3” long. Pick up one of the strands and add it to the cuff around the edge of the half circle on one end so you have a thin border of gold around the circle; trim the excess strand so it is flush with the edge of the cuff. Repeat this on the other end of the cuff. Bake for 15 minutes and let cool completely.

Pick up a strand of the extruded 18K Gold clay and position it so that at about 1/3 in from one end it is up against the gold strand bordering one of the half circles you added in Step 5. Gently press the stand down only in the place where the two strands meet; leave the rest of the strand loose so you can wrap it around the next circle you will be adding. Add a thin layer of Bake n’ Bond to the back of one of the two remaining half circles and place it so that it has the round side of the half circle pointed in the opposite direction of the one you are nesting it up against. Wrap the strand around the edge of the newly added half circle and trim the excess off. Repeat this process on the other side of the cuff. Bake for 15 minutes and let cool completely.
Retrieve the 3/8” circle you cut out in Step 4 and pick up a strand of the 18K Gold clay. Wrap the strand around the outside of the circle. Where the strand overlaps use the Super Slicer blade to cut through the overlapped section of strand at an angle. Remove the trimmed end of strand, match up the cut ends, and blend the seam. Gently lift the circle off of your work surface and add a thin layer of Bake n’ Bond to the back. Add this circle to the cuff in the middle right between where the second set of half circles was placed. Bake for 15 minutes and let cool.
Remove the multiple small holes die from the extruder, load more of the 18K Gold clay, and insert the die with the narrow rectangle or “slot” die. Extrude a long ribbon of clay; enough to wrap the entire outside edge of the cuff with. Rub a thin layer of Bake n’ Bond around the outside edge of the cuff. Place one end of the ribbon of clay in the center of one end of the cuff make sure the edge of the ribbon is flush with the outside edge of the cuff. Add the ribbon of clay all the way around the edge of the cuff making sure you keep it flush with the outside edge of the cuff. Once you get all of the way around overlap the ribbon a little over where you started. Cut through both layers of the ribbon, remove the excess, and blend the seam. Bake for 15 minutes and let cool completely.
