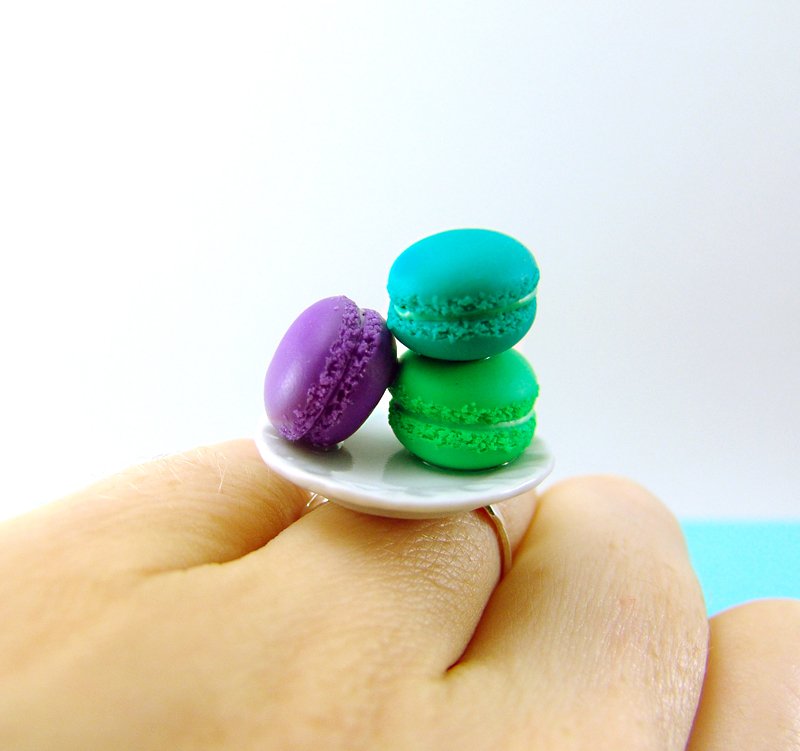
Premo Mini Macaroon Ring
Premo Mini Macaroon Ring
Read More
Finally! A way to enjoy your macaroons without worrying about the calories! You can also decorate your macaroons with glitter, small sequins, or other adornments. Let your imagination run wild!
Design by Mo Mouse House
Read Less
ADDITIONAL SUPPLIES
Needle tool; Small bowl, wooden craft stick, and toothpicks for mixing frosting; Artist chalk pastels, optional; Razor blade, optional; Parchment paper, optional; Ceramic baking tile; Small paint brush; Ring blank with flat pad; Two-part epoxy or E-6000 adhesive; Dollhouse miniature plate, optional

Project Instructions
Your workspace: Please make sure your work area is covered and you are not working on an unprotected surface. We recommend working on the Sculpey® Work ‘n Bake Clay Mat, wax paper, metal baking sheet, or disposable foil. Uncured clay may damage unprotected furniture or finished surfaces. Be sure to cover your crafting area appropriately.Getting Started:Start with clean hands, unwrap and knead clay until soft and smooth, or condition by running clay though a Pasta Machine. We recommend using a designated machine for clay purposes only. When working with multiple colors, clean hands with soap and water or baby wipe before switching colors.Shape clay, pressing pieces firmly together. Wash hands after use. Baking:Begin by preheating oven to 275 °F (130 °C). After you are done creating; for best results bake clay on an oven-proof surface such metal, aluminum foil, an index card or the Sculpey® Clay Mat at 275°F (130 °C) for 30 minutes per ¼" (6 mm) thickness according to package directions. Oven safe glass or ceramic surfaces are also acceptable for baking; however please note that the baking times may take longer as the glass or ceramic surfaces take longer to heat up. For best baking results, use an oven thermometer. DO NOT USE MICROWAVE OVEN. DO NOT EXCEED THE ABOVE TEMPERATURE OR RECOMMENDED BAKING TIME.
Prepare the clay colors for the macaroons. For the lighter green shade, combine one part White with three parts Green and three parts Wasabi. For the medium green shade, combine one part Cobalt Blue with three parts Green and three parts Turquoise. For the purple, combine one part Purple with two parts Wisteria. 2.For each batch of colored clay, mix two parts colored clay with one part Translucent.

Roll two equal-sized balls from each color. The size will depend on the size of your ring blank; you need to make sure your macarons are big enough to cover the flat pad on the ring. A good rule of thumb is to make the clay balls the same diameter as the ring pad. For example, the ring blank used in this project has a pad measuring ⅜” in diameter, and the clay balls measure the same.

Press each ball against the work surface with your finger, shaping it into a flattened dome. You might need to slide a blade between the clay and the surface to free it.

Set the dome on its edge and roll with gentle pressure, going all the way around the dome. Your goal is to create a shape like a domed roof sitting on straight “walls.” The straight-sided walls you’re creating in this step gives you a flat surface to add texture to in the next step.

Use a needle tool to carefully tease the surface of the clay into crumbs, working all around the perimeter of the dome on the flattened surface you’ve just created. Repeat this process for all of the cookie halves.

Now it’s time to make the frosting. Mix one part White clay with roughly two parts Translucent Liquid Sculpey in a small bowl. Use a wooden craft stick to smear and mash the solid and liquid clays together until they form a smooth, frosting-like paste. Add more liquid clay if the mixture is too thick

You can use the frosting as is, or you can tint it any color you choose. To tint the frosting, first separate out smaller batches from the bowl of white frosting and place each batch on a piece of parchment paper. With a razor blade, grate artist chalk pastel in the color(s) of your choice into the frosting. Start with a small pinch, stir the chalk into the clay with a toothpick, and add more chalk if necessary to adjust the color. If the mixture becomes too dry, add a little more liquid clay.

Spread a small amount of frosting on one of your macaroon halves and place the other half on top, pressing gently to sandwich them together. Place on a ceramic baking tile. Repeat with the other two macaroons


Bake as directed above. After the macaroons have baked and cooled, use a small paint brush to add Sculpey Satin Glaze to the frosting only, leaving the cookies unvarnished.
Decide how you want to arrange your macaroons, perhaps all three stacked on top of each other or arranged on a dollhouse plate as shown here. Just make sure the final arrangement is comfortable when sitting on your finger. Glue the macaroons together and to the plate, if using. Glue the macaroons or the plate onto the ring pad. You can use a piece of raw clay to anchor the ring to your work surface, making it easier to prop the macaroons on top while the glue is drying.


