Skip to product information
1 of 1

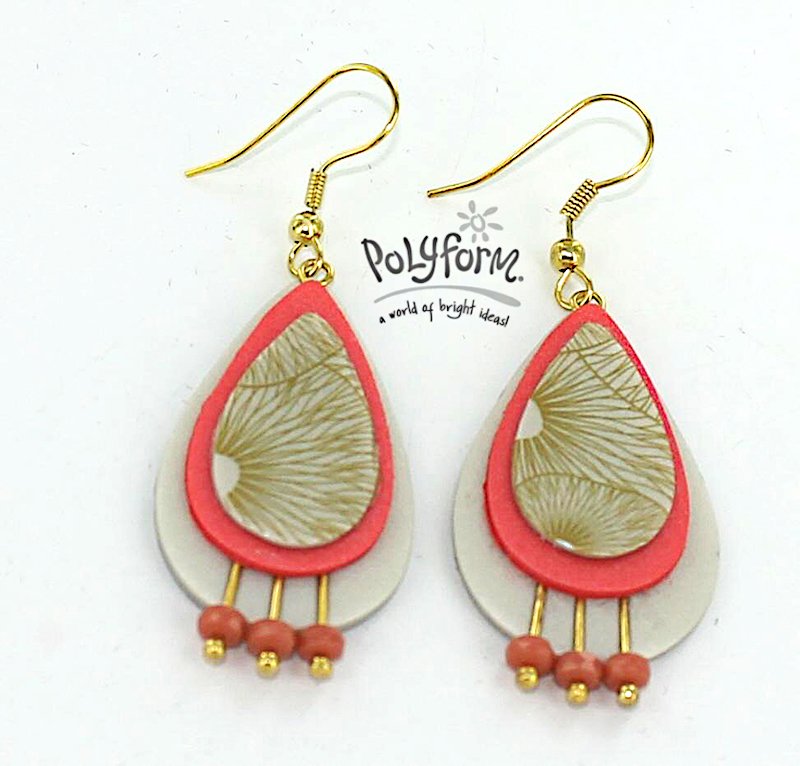
premo! Accents Summer Earrings

premo! Accents Summer Earrings

Read More
These earrings are the perfect accessory for a sundress and pair of strappy sandals.  Next stop?  A stroll on the beach at sunset.
Read Less
ADDITIONAL SUPPLIES

Small Scissors, Small Chain Nose Pliers, Small Wire Cutters, Paper Towel,Small rondelle beads, about 3mm x 4mm in a pink/orange tone – 6pcs, Gold Tone Ear-Wires – 2pcs, Gold Tone Ball-End Headpins – at least 1” long – 6pcs, Gold Tone Eye-Pins at least 1” long – 2pcs, Sharpened Pencil, Small Shallow Tray
Spray bottle filled with water|Small Scissors, Small Chain Nose Pliers, Small Wire Cutters, Paper Towel,Small rondelle beads, about 3mm x 4mm in a pink/orange tone – 6pcs, Gold Tone Ear-Wires – 2pcs, Gold Tone Ball-End Headpins – at least 1” long – 6pcs, Gold Tone Eye-Pins at least 1” long – 2pcs, Sharpened Pencil, Small Shallow Tray
Spray bottle filled with water
View full details
Project Instructions
Getting Started Do not use unbaked clay on unprotected furniture or finished surfaces. Start with clean hands and work surface area. Good work surfaces include wax paper, metal baking sheet, or disposable foil. Knead clay until soft and smooth. For best results, clean your hands in between colors. Shape clay, pressing pieces together firmly. Bake on oven-proof glass or metal surface at 275°F (130°C) for 30 minutes per ¼" (6 mm) thickness. For best baking results, use an oven thermometer. DO NOT USE MICROWAVE OVEN. DO NOT EXCEED THE ABOVE TEMPERATURE OR RECOMMENDED BAKING TIME. Wash hands after use. Baking should be completed by an adult. Begin by preheating oven to 275°F (130 °C). Test temperature with oven thermometer for perfectly cured clay. For best results, condition all clay by running it through the clay dedicated pasta machine several passes on the widest setting. Fold the clay in half after each pass and insert the fold side into the rollers first.
Condition and roll out a sheet of Pearl clay on a medium setting of the Clay Conditioning Machine. Using the Sculpey Graduated Metal Teardrop Cutters cut out a teardrop using the cutter that is 1-1/2” inches long. Pick up one of the eye-pins and trim it so you have ½” length of stem past the bottom of the eye. Use the chain nose pliers to bend a small curve on the trimmed end of the stem. Position the eye-pin at the point of the teardrop so the bottom of the eye is just a tiny bit down onto the point of the clay. Note: The loop that makes the eye has a small gap where it meets the stem; getting that gap filled will help prevent it from coming off of the ear wires. Use the acrylic roller to gently press the eye-pin into the clay so it is level with the surface of the clay.
Pick up one of the headpins and trim it to 1” long. Slide one of the beads onto the headpin and use the chain nose pliers to bend a small curve on the trimmed end of the headpin. Position this piece so the stem of the headpin is running up the middle and so the bead is up against the bottom edge of the clay. Use the acrylic roller to gently press the headpin into the clay so it is level with the surface of the clay.
Trim two of the headpins to a length of ¾”. Slide a bead onto each headpin and use the chain nose pliers to bend a small curve on the trimmed end of the headpin. Position one headpins on each side of the one added in Step 2. Just as you did previously, position them so the beads are up against the edge of the clay and also touching the center bead. Use the acrylic roller to gently press the headpin into the clay so it is level with the surface of the clay.
Once you have the eye-pin and headpins with beads in place dab a small amount of Bake N’ Bond over the bent ends of the stems.
Condition and roll out a medium/thin sheet of the Sunset Pearl. Cut out a teardrop using the cutter that is 1-1/4” inches long. Place this piece on top of the assembly you made in Steps 1-4. Position it so that the points of the base teardrop and the one you are adding now are lined up. Gently roll the Sunset Pearl teardrop down so the two layers of clay are making good contact and also so that the stems of the eye-pin and headpins are firmly sandwiched.
Condition and roll out a sheet of Pearl on the same setting you used in Step 5. Cut out a teardrop using the cutter that is 1” inch long. Rub a thin layer of the Bake N’ Bond on the back surface of the teardrop and place it on top of the Sunset Pearl piece so that it is centered and firmly in place. DO NOT BAKE.
Important Note: Decals can only be adhered to raw clay, in addition they can only be baked once. This is why the decals need to be added as the last step. An easy way to get the correct shape cut out of the decal sheet is to trace around the cutter from Step 6. Position the cutter over the area of pattern you wish to use and trace around the outside of the cutter. When you cut out the piece make sure you cut a little bit inside the line. Note: You can also trace the inside of the cutter but once you cut the piece out you have to make sure that any remaining pencil marks get wiped off. Pencil marks still on the decal will bake onto the decal during the curing process. Once you have the decal piece cut out place it into the shallow tray with the decal facing up. Spray with water and let it soak in the water for 30 seconds. Once you have soaked the decal in the water carefully slide it off of the paper backing. Line up one edge of the decal with a matching edge of the Pearl clay teardrop and slowly smooth it into place, be sure to avoid air bubbles and creases. Once the decal is covering the clay: dab the water off with a paper towel, use the squeegee from the kit to smooth it down the rest of the way, and dab with the paper towel once more to be sure all of the water has been removed. If the decal is a little large and you have some hanging over the edge of the small Pearl teardrop you can use scissors to trim off the excess. Note: A small pair of cuticle scissors works very well for this. Bake according to the directions above and let cool completely
Repeat Steps 1 through 8 for the second earring. Once they are both baked and cooled completely attach the ear wires and you’re all finished.