

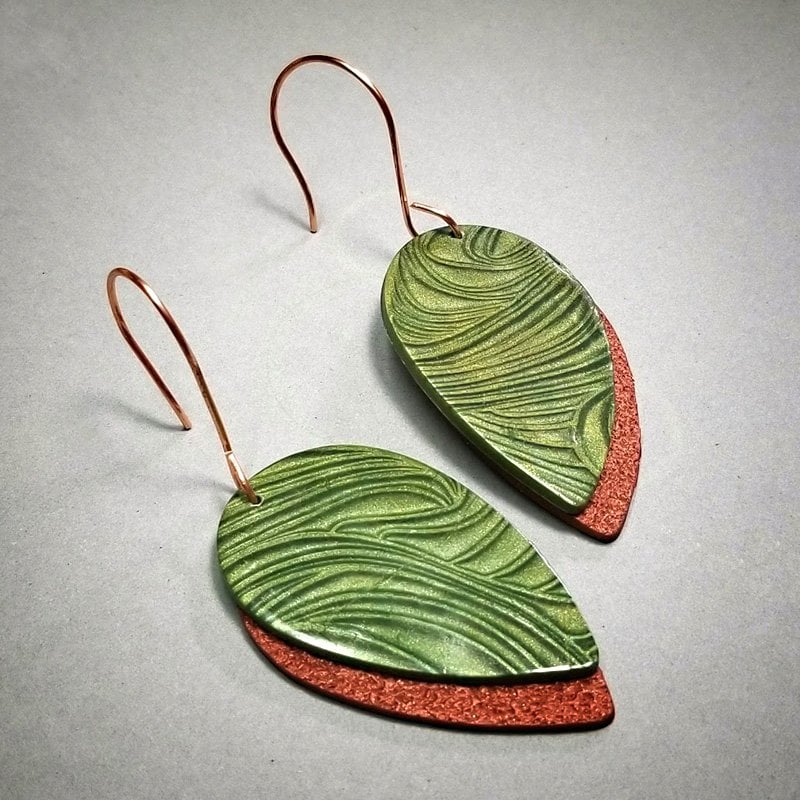
Premo Accents Mica Shift Earrings
Premo Accents Mica Shift Earrings
Read More
I know what you are going to say, “Oh, I’ve seen that technique before and it looks hard!” Would it help if I told you that this is the FIRST time I’ve done a Mica Shift when I wasn’t just messing around with a piece of scrap? How about if I also told you that “patience” is never used to describe me?
Design by syndee holt
Read Less
ADDITIONAL SUPPLIES
Deep stamp (mine is Judikins Folded Meringue background stamp from lindasartspot.com)
Project Instructions
- Getting Started:
Start with clean hands, unwrap and knead clay until soft and smooth, or condition by running clay though a Pasta Machine. We recommend using a designated machine for clay purposes only. When working with multiple colors, clean hands with soap and water or baby wipes (we have found that baby wipes work best) before switching colors. Shape clay, pressing pieces firmly together. Wash hands after use.
- Baking:
I’m really into using mixed colors right now, so I mixed Peacock Pearl and Gold 1:1 to create this luscious metallic green. Mica shift will work with ANY of the Premo Accents Metallics! Once I had the clay mixed, I sheeted it on the #2 (next widest) setting on the Clay Conditioning Machine. I split the sheet into 2 pieces and I lightly sprayed my stamp with water to help the clay release (yes, I’ve been known to dribble water from my water glass on a stamp when I couldn’t find my mini spray bottle!). Since this is a large stamp, I prefer to put the sheet of clay on a sheet of paper, spray the stamp and place in position on the clay. Then I put the whole thing on the concrete floor of my studio and I step on it – from all 4 sides. The result? Perfect deep (DEEP from all that weight on it!) texture! I repeated this process with the second piece of clay.

I placed the stamped piece of clay onto a small, smooth tile and pressed it lightly into place. Then I began carefully slicing off the top surfaces of the stamped image. TIP: I used the 1000 grit sandpaper to clean some of the “gunk” from my blade before I started this. I also slightly bend the blade while I slice! Also, if you think that you have started to cut too deep, back the blade out and press the area down lightly with your finger. It was actually a LOT easier than I thought!

Once I was satisfied that I had trimmed off all the upper portions of the stamped clay away and revealed the Mica Shift magic, I CAREFULLY used my acrylic roller to help smooth out the surface of the clay.

I decided to use the largest of the teardrop cutters for this project, so I “hoovered” it over the entire sheet to find the Perfect Spot to cut! I repeated this process for the second earring.

I wanted to make a second layer of the shape to help ground the mica shift portion. I sheeted out some Black Premo on the #3 setting and then textured it with a small piece of Safety Tred (lightly sprayed with water). And then I used the same cutter to cut out two pieces. As you can see from the final shot, I AM FICKLE and changed instead to a textured sheet of Premo Accents Bronze!

I used a needle tool to place a hole in the top of the mica shift pieces, based on where I thought I would want my backing piece. Then I baked the pieces separately- I did not keep them stacked together. Why? First, because I wanted both the mica shift and the backing to be absolutely flat. If I baked them stacked together, the hanging edge of the mica shift layer could slump slightly in the oven. Also, I didn’t know if I wanted the black backing or the Bronze yet… Bake according to the information in Step 1.

Once the clays were baked and cooled, I used the 1000 grit sand paper to lightly sand the surfaces of the mica shift pieces (really, just about a minute each-you know, that “patience thing”) and then I added a DILUTED coat of the Gloss Glaze by dipping my brush into water first and then dipping just the tip of the brush into the glaze. (A diluted glaze will not show brush marks or finger prints. Gloss Glaze is like turning on the disco ball for the metallics!) I did FINALLY decide on the Bronze backer pieces and I glued them together (remember to reverse which side the backer goes on!). Finally, I added the ear wires and my FIRST Mica Shift earrings were done!
