

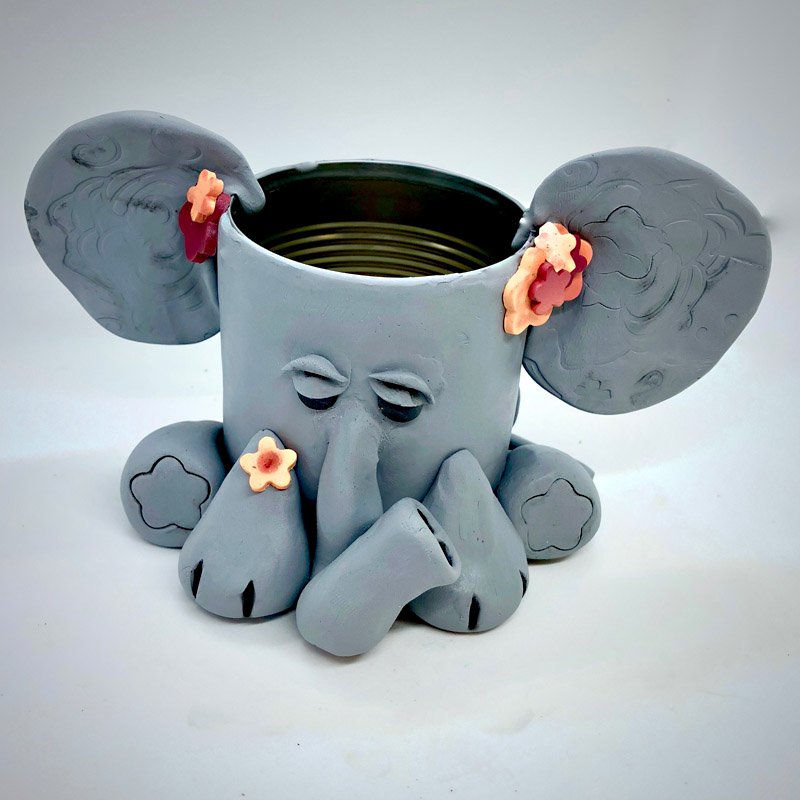
Original Sculpey Grey Elephant Planter
Original Sculpey Grey Elephant Planter
Read More
This cool little elephant will look great with your favorite plant in it!
Read Less
ADDITIONAL SUPPLIES
medium sized tin can
Project Instructions
- Getting Started:
Start with clean hands, unwrap and knead clay until soft and smooth, or condition by running clay though a Pasta Machine. We recommend using a designated machine for clay purposes only. When working with multiple colors, clean hands with soap and water or baby wipes (we have found that baby wipes work best) before switching colors. Shape clay, pressing pieces firmly together. Wash hands after use.
- Baking:
Take about 1/2 the block of clay and fully work and condition it using a pasta machine.This clay is very soft so it shouldn’t take very long
Cover your can in a thin layer of TLS or Bake and Bond. Completely wrap your can in clay. Leave enough clay at the bottom so that you can cover the bottom of the tin in clay aswell.

You will need the LARGEST round cutter from the round Sculpey cutter set.Roll your clay on the 2nd largest setting of your pasta machine. Cut TWO rounds for every limb of your elephant. You will need 8 total rounds.

Take 2 rounds and roll them into a ball and then into a teardrop. This will give you ONE leg. Repeat three more times. Attach the legs as shown.

Add some black clay for eyes and place on some small eyelids as will using tiny pieces of the gray clay

Make a long snake to form your trunk and attach it to the center of the “face” of your elephant. Use the medium ball tool from the “Style and Detail” tool set to form his nostrils. Bend and pose the trunk as you see fit

Again cut 4 more rounds of clay from your sheet, rolled at the 2nd thickest setting of your pasta machine. Take the two rounds and roll them together to form a ball and then flatten to form a pancake. Repeat for the remaining two. Place the two rounds on your choice of a Sculpey Texture mat. Press gently to add a nice textured background. Don’t press too deeply, you just want a hint of something going on.

Add the ears onto the top and side of your elephant. I made mine “hug” the side of the jar for added stability.

Add any chalk powders or other details you’d like. Bake for ONE HOUR at 275 degrees. After baking, fill your elephant planter with some dirt, add a plant of your choice and watch it grow. Be careful not to overwater your plant!
