


Liquid Sculpey® Snowflake Window Cling
Liquid Sculpey® Snowflake Window Cling
Designed by Amy Koranek
Read More
Spend a fun afternoon creating snowflake clings for your windows using Liquid Sculpey® and your favorite snowflake patterns.
TIME TO COMPLETION: 30 minutes including baking
Read Less
ADDITIONAL SUPPLIES
- Clean and clear piece of glass
- Snowflake drawing or template - you can find lots of free patterns of snowflakes on the internet

Project Instructions
- Getting Started with Liquid Sculpey®:
- Getting Started with Liquid Sculpey®:
- Baking:
- It is important to use oven thermometer when you bake the liquids so that you can ensure your oven is at the correct temperature.
- Do not microwave the liquids. They must be baked in a Preheated oven at 275 ºF (130 ºC) for liquid colors and 300 ºF (149 ºC) for Clear – Do not exceed baking temperatures.
- If your piece is less than 1/4” bake for 15 minutes. For thicker pieces that are 1/4” or above bake for 30 minutes.
- If your liquid project has become yellowed or discolored in the oven, when you remake it, tent it by placing either – folding an index card in half and placing your project under it or by using aluminum foil over your project.
Place a piece of clean clear glass over a snowflake drawing or template. In order to make a window cling that will stick to glass, the snowflake must be created and baked on a piece of glass.

My template has large dots in it. Do the large dots first. If the tip of the Liquid Sculpey (LS) makes a little drip, make sure it drips into the dot.

Trace the center circle next.

Connect the circle to the dots with thick lines. If the tip of the LS drips at the end of the line, make sure it drips either in the dot or back into the line.

Trace all the short lines going in one direction

Trace all the remaining short lines.

Bake the snowflake on the glass. When the snowflake is completely cool, carefully peel it from the glass and place on a clean window or mirror.
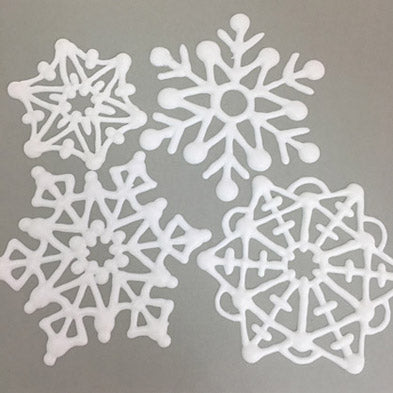
The other styles of snowflakes shown in this photo were made from the exact same template. I added embellishments to some areas to make them look different from each other
The other styles of snowflakes shown in this photo were made from the exact same template. I added embellishments to some areas to make them look different from each other

- Choosing a selection results in a full page refresh.
- Opens in a new window.