

Liquid Sculpey Mirror Greeting
Liquid Sculpey Mirror Greeting
Read More
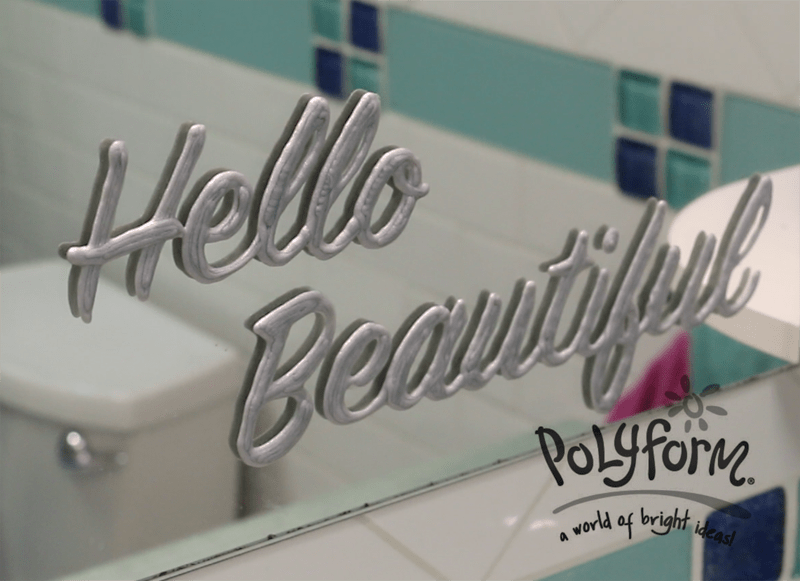
Be greeted with a "Hello Beautiful" every morning! Liquid Bakeable Sculpey makes creating your own mirror/ window clings easy and fun!
Read Less
ADDITIONAL SUPPLIES
Smooth glass large enough to accommodate your longest word, Printed greeting in your choice of font and size, craft spatula|Smooth glass large enough to accommodate your longest word, Printed greeting in your choice of font and size, craft spatula
Project Instructions
Getting started:
Please make sure your work area is covered and you are not working on an unprotected surface. We recommend working on the Sculpey® Work ‘n Bake Clay Mat, wax paper, metal baking sheet, or disposable foil. Uncured Liquid Bakable Medium may damage unprotected furniture or finished surfaces. Be sure to cover your crafting area appropriately.
-Gently stir the bottle of liquid bakeable medium.
-Wash hands after use (we have found that baby wipes work best)
Baking:
-It is important to use oven thermometer when you bake the liquids so that you can ensure your oven is at the correct temperature.
-Do not microwave the liquids. They must be baked in a Preheated oven at 300 ºF (149 ºC) for liquid colors and 325 ºF (163 ºC) for Clear – Do not exceed baking temperatures.
-If you are using the liquids as a glaze or in thin pieces less than ¼ inch bake for 15 minutes. For thicker pieces that are ¼ or above bake for 30 minutes.
-If you are baking on a ceramic tile then you will also need to bake at 30 minutes since it will take longer for the tile to heat up. This will ensure the proper fusing of the liquid material.
-When baking these liquids you may experience some vapors or a slight odor. This is not harmful and will not affect your creation.
-If your liquid project has become yellowed or discolored in the oven, when you remake it, tent it by placing either – folding an index card in half and placing your project under it or by using aluminum foil over your project.
The consistency of Liquid Sculpey can change over time becoming thicker with age. Thicker Liquid Sculpey will be preferred for this project so that it holds its shape better and doesn’t spread out distorting the shape of the letters. Test your Liquid Sculpey before using on your lettering project. Squirt a letter out on a baking surface and see how long it takes for it to level or spread on it’s own. If the test holds it’s shape for several minutes, this would be desirable for the project.

Decide what message you would like to make and what font you would like to use. For my message, I chose the words, “Hello Beautiful” which will be displayed on a bathroom mirror. I chose a font from my computer that is a script because the letters are hooked together making it easier to apply to the mirror. I also chose the script lettering because it is thick enough for me to follow with the liquid - a thinner script might be more difficult to trace and show mistakes more clearly.

If choosing a very large or long word, you can print the letters out on separate sheets of paper, trim them out, and then tape them back together closely as shown in the word, “Welcome”.

Place the printed words under a smooth piece of glass that does not have any insignias, scratches, or texture. The glass I am using is textured on the bottom, but the top side where I will apply the liquid is completely smooth. In the video and the photo, I have already completed the word “Hello” and baked it. If your words will be applied to the mirror separately, it doesn’t matter how they are arranged on your glass work surface.

Squeeze excess air from the liquid bottle. Start on a thick area of your first letter. Outline the letter with a thin line on both the outside and the inside edges.

Fill in the thick parts of the letter neatly with more liquid. Because Liquid Sculpey Silver has mica in it which leaves little trails which show up more when it’s baked, it’s important that you fill in the letters very neatly.
Continue tracing and filling in all the letters of the word. Bake the word at 275 for 15- 30 minutes as directed on the glass sheet.

Allow the lettering to cool completely and then carefully remove by peeling with your fingernails or scraping off the glass with a craft spatula. Be careful not to slice into your letters while removing.

When Liquid Sculpey is baked on a smooth non-porous surface, it takes on a very flat smooth back. That is why it is excellent for creating a cling that will stick to another smooth non porous surface.

You can use the knife blade in the 5 in 1 tool to clean up or trim any little areas that might not be perfect from the baked Liquid Sculpey.

Place the message on a mirror or window as you desire. Make sure all the letters come into contact with the glass. You can remove and reposition the letters as necessary. As long as they are clean on the back and the glass is clean they will make good contact and stay as long as you wish.

Getting started:
Please make sure your work area is covered and you are not working on an unprotected surface. We recommend working on the Sculpey® Work ‘n Bake Clay Mat, wax paper, metal baking sheet, or disposable foil. Uncured Liquid Bakable Medium may damage unprotected furniture or finished surfaces. Be sure to cover your crafting area appropriately.
-Gently stir the bottle of liquid bakeable medium.
-Wash hands after use (we have found that baby wipes work best)
Baking:
-It is important to use oven thermometer when you bake the liquids so that you can ensure your oven is at the correct temperature.
-Do not microwave the liquids. They must be baked in a Preheated oven at 300 ºF (149 ºC) for liquid colors and 325 ºF (163 ºC) for Clear – Do not exceed baking temperatures.
-If you are using the liquids as a glaze or in thin pieces less than ¼ inch bake for 15 minutes. For thicker pieces that are ¼ or above bake for 30 minutes.
-If you are baking on a ceramic tile then you will also need to bake at 30 minutes since it will take longer for the tile to heat up. This will ensure the proper fusing of the liquid material.
-When baking these liquids you may experience some vapors or a slight odor. This is not harmful and will not affect your creation.
-If your liquid project has become yellowed or discolored in the oven, when you remake it, tent it by placing either – folding an index card in half and placing your project under it or by using aluminum foil over your project.
Please make sure your work area is covered and you are not working on an unprotected surface. We recommend working on the Sculpey® Work ‘n Bake Clay Mat, wax paper, metal baking sheet, or disposable foil. Uncured Liquid Bakable Medium may damage unprotected furniture or finished surfaces. Be sure to cover your crafting area appropriately.
-Gently stir the bottle of liquid bakeable medium.
-Wash hands after use (we have found that baby wipes work best)
Baking:
-It is important to use oven thermometer when you bake the liquids so that you can ensure your oven is at the correct temperature.
-Do not microwave the liquids. They must be baked in a Preheated oven at 300 ºF (149 ºC) for liquid colors and 325 ºF (163 ºC) for Clear – Do not exceed baking temperatures.
-If you are using the liquids as a glaze or in thin pieces less than ¼ inch bake for 15 minutes. For thicker pieces that are ¼ or above bake for 30 minutes.
-If you are baking on a ceramic tile then you will also need to bake at 30 minutes since it will take longer for the tile to heat up. This will ensure the proper fusing of the liquid material.
-When baking these liquids you may experience some vapors or a slight odor. This is not harmful and will not affect your creation.
-If your liquid project has become yellowed or discolored in the oven, when you remake it, tent it by placing either – folding an index card in half and placing your project under it or by using aluminum foil over your project.
The consistency of Liquid Sculpey can change over time becoming thicker with age. Thicker Liquid Sculpey will be preferred for this project so that it holds its shape better and doesn’t spread out distorting the shape of the letters. Test your Liquid Sculpey before using on your lettering project. Squirt a letter out on a baking surface and see how long it takes for it to level or spread on it’s own. If the test holds it’s shape for several minutes, this would be desirable for the project.
Decide what message you would like to make and what font you would like to use. For my message, I chose the words, “Hello Beautiful” which will be displayed on a bathroom mirror. I chose a font from my computer that is a script because the letters are hooked together making it easier to apply to the mirror. I also chose the script lettering because it is thick enough for me to follow with the liquid - a thinner script might be more difficult to trace and show mistakes more clearly.
If choosing a very large or long word, you can print the letters out on separate sheets of paper, trim them out, and then tape them back together closely as shown in the word, “Welcome”.
Place the printed words under a smooth piece of glass that does not have any insignias, scratches, or texture. The glass I am using is textured on the bottom, but the top side where I will apply the liquid is completely smooth. In the video and the photo, I have already completed the word “Hello” and baked it. If your words will be applied to the mirror separately, it doesn’t matter how they are arranged on your glass work surface.
Squeeze excess air from the liquid bottle. Start on a thick area of your first letter. Outline the letter with a thin line on both the outside and the inside edges.
Fill in the thick parts of the letter neatly with more liquid. Because Liquid Sculpey Silver has mica in it which leaves little trails which show up more when it’s baked, it’s important that you fill in the letters very neatly.
Continue tracing and filling in all the letters of the word. Bake the word at 275 for 15- 30 minutes as directed on the glass sheet.
Allow the lettering to cool completely and then carefully remove by peeling with your fingernails or scraping off the glass with a craft spatula. Be careful not to slice into your letters while removing.
When Liquid Sculpey is baked on a smooth non-porous surface, it takes on a very flat smooth back. That is why it is excellent for creating a cling that will stick to another smooth non porous surface.
You can use the knife blade in the 5 in 1 tool to clean up or trim any little areas that might not be perfect from the baked Liquid Sculpey.
Place the message on a mirror or window as you desire. Make sure all the letters come into contact with the glass. You can remove and reposition the letters as necessary. As long as they are clean on the back and the glass is clean they will make good contact and stay as long as you wish.