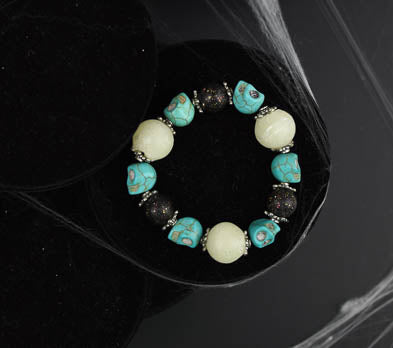


Liquid Sculpey® Glowing Beads Bracelet
Liquid Sculpey® Glowing Beads Bracelet
Designed by Amy Koranek
Read More
Liquid Sculpey® Glow teams up with Liquid Sculpey® Classic Black and bead resin molds to create this one of a kind bracelet. Add glitter and sparklies for an even cooler effect!
TIME TO COMPLETE:
90 Minutes to make, bake, and assemble
Read Less
ADDITIONAL SUPPLIES
- Paper towel
- Color Pour Resign Round Bead Mold - large and small
- Silver shredded foil glitter
- Gold chunky glitter
- 8” Beadalon elastic cord needle
- .5 or .8 Elasticity bead cord in black ( 20”)
- Turquoise skull beads (6)
- Silver tone bead caps (12)
- Scissors

Project Instructions
Liquid Bakeable Medium:
Please make sure your work area is covered and you are not working on an unprotected surface. We recommend working on the Sculpey® Oven Safe Work Mat, wax paper, metal baking sheet, or disposable foil. Uncured Liquid Bakable Medium may damage unprotected furniture or finished surfaces. Be sure to cover your crafting area appropriately.
Getting Started:
- Gently stir the bottle of liquid bakeable medium. Thin with Sculpey® Liquid Clay Softener as needed. - Wash hands after use (we have found that baby wipes work best). Baking:
- It is important to use an oven thermometer when you bake the liquids so that you can ensure your oven is at the correct temperature. - Do not microwave the liquids. They must be baked in a preheated oven at 275 ºF (149 ºC) for liquid colors and 300 ºF (163 ºC) for Clear. Do not exceed baking temperatures.
- If you are using the liquids as a glaze or in thin pieces less than 1/4”, bake for 15 minutes. For thicker pieces that are 1/4” or above, bake for 30 minutes.
- If you are baking on a ceramic tile, then you will also need to bake at 30 minutes since it will take longer for the tile to heat up. This will ensure the proper fusing of the liquid material. - When baking these liquids you may experience some vapors or a slight odor. This is not harmful and will not affect your creation.
- If your liquid project has become yellowed or discolored in the oven, when you remake it, tent it by placing either folding an index card in half and placing your project under it; or by using aluminum foil over your project.
For the black sparkly beads, fill the small bead mold with Black Liquid Sculpey® (LS). Fill, but not all the way to the top, leaving room to stir in the glitter. The finished bracelet only used three of the black beads instead of six.

Sprinkle the gold chunky glitter onto the openings of the mold. Move as much of the glitter into the openings with the Knife Tool. Stir the glitter into the Black LS. Then backfill with more Black LS. Stir again and wipe tools clean with paper towel.

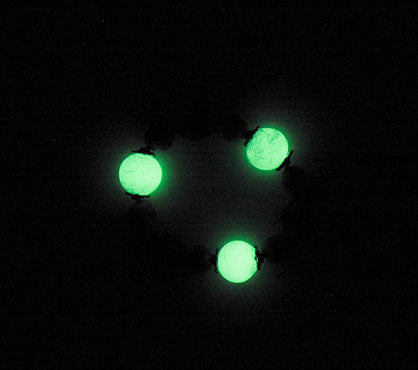
For the glow sparkly beads, fill the large bead mold with Glow Liquid Sculpey® (LS). Fill but not all the way to the top leaving room to stir in the glitter. The finished bracelet only used three of the glow beads instead of six.

Sprinkle the silver shredded glitter onto the openings of the mold. Move as much of the glitter into the openings with the Knife Tool. Stir the glitter into the Glow LS with the Blunt Point Tool. Wipe tools clean with paper towel.

Then backfill with more Glow LS. Stir again and wipe tools clean with paper towel. Bake both molds following the baking instructions for Liquid Sculpey®. Allow to cool completely before de-molding.

To de-mold the beads, this type of mold works best if you turn it inside out. The beads will most likely have a little stem on them that can be removed.

You can remove the little stem by carefully slicing it off with the Clay Blade

To assemble my bracelet, I’m using the 8” Beadalon elastic cord needle. It makes it easy to slide all the beads onto the needle, auditioning your design as you go. Place all the beads on the needle. Make sure the very first bead is one of the molded LS beads and not one of the skulls or bead caps. The LS bead will have a large enough hole that you can later hide the knot inside of so it’s important for an LS bead to be on the end.

Double a 20” strand of Elasticity or another of your favorite .5-.8 sized stretchy bead corn. Place the loop on the little hook at the end of the needle.

Pull the beads over the hook and onto the doubled cord.

Remove the cord from the needle and gather all the tails in your fingers.

Tie an overhand knot securing the beads tightly into place.

Trim the tails of the cords and pull the knot into one of the clay beads.
