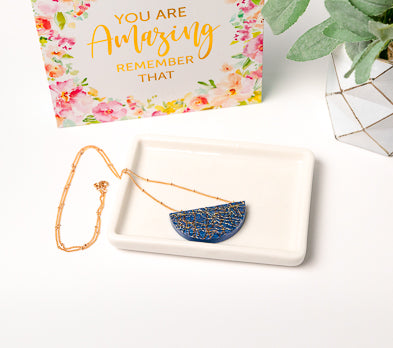


Liquid Sculpey® Glass Paper Necklace
Liquid Sculpey® Glass Paper Necklace
Designed by Amy Koranek
Read More
Read Less
The nail art industry has lots of cool finishes that can be easily applied to the surface of molded Liquid Sculpey®. This project includes a product called Glass Paper which makes a unique and complicated looking finish which is super easy to achieve.
TIME TO COMPLETE:60 Minutes to make, bake, and assemble
ADDITIONAL SUPPLIES
- Paper towel
- Silicone mixing cup
- Glass paper in gold and copper
- Nail art glue - air drying
- Paintbrush
- Small sharp scissors
- Gold tone double connectors (2)
- Gold tone chain with clasp
- Flat nose pliers

Project Instructions
Getting started:
Please make sure your work area is covered and you are not working on an unprotected surface. We recommend working on the Sculpey® Oven Safe Work Mat, wax paper, metal baking sheet, or disposable foil. Uncured Liquid Polymer Clay may damage unprotected furniture or finished surfaces. Be sure to cover your crafting area appropriately.
Stir Liquid Sculpey® completely. Thin with Sculpey® Clay Softener & Thinner as needed. Wash hands after use (we have found that baby wipes work best).
Baking: It is important to use an oven thermometer when you bake the liquids so that you can ensure your oven is at the correct temperature. Do not microwave the liquids. They must be baked in a Preheated oven at 275 ºF (130 ºC) for liquid colors and 300 ºF (149 ºC) for Clear – Do not exceed baking temperatures. If you are using the liquids as a glaze or in thin pieces less than ¼ inch bake for 15 minutes. For thicker pieces that are ¼ or above bake for 30 minutes. If you are baking on a ceramic tile then you will also need to bake at 30 minutes since it will take longer for the tile to heat up. This will ensure the proper fusing of the liquid material. When baking these liquids you may experience some vapors or a slight odor. This is not harmful and will not affect your creation.
Place enough Navy Metallic Liquid Sculpey® (LS) in a silicone cup to fill the half round pendant shape. If you want to check how much liquid this will take, you can make a good guess by using this method: Fill the desired shape with water. Pour the water from the shape into a silicone cup. You can either mark the side of the cup with the amount of fluid that is there, or simply remember about how much fluid the shape held - like 1/2 of the cup or 2/3 of the cup, etc. Pour the water out of the cup and make sure both the cup and the mold are completely dry before proceeding. Placing the cup and the mold in a preheated oven can quickly steam off any remaining moisture.
Once you have Navy Metallic in the silicone cup, add a nickel sized amount of Sculpey® Clay Softener and Thinner to the LS.
Mix the LS and the Thinner really well. The LS should be runny when allowed to drip from your stirring tool. Making the LS thin is a good method to insure that the LS is filling every bit of area in a deep mold like this one.

Flex the silicone cup to have a little spout. Pour the LS into the half round shape in the 3D Jewelry Mold.

Fill the mold to level. Tap the mold on your work surface to remove air bubbles.

You can also pull the sides of the mold apart and when you release the mold, this action will push up air bubbles. Repeat several times until you see no more bubbles.

Use the flat trowel tool to squeegee off any excess LS that might be above level.

Dangle two double connectors from one of the metal rods included with the 3D Jewelry Mold.

Dip the dangling connectors into the LS. Double check that the connectors are sitting down into the liquid and that they are evenly positioned in the liquid. You can adjust their position with the tip of a tool if needed.
Bake the mold following the baking instructions for Liquid Sculpey®. Allow the mold to cool completely before handling.
Bake the mold following the baking instructions for Liquid Sculpey®. Allow the mold to cool completely before handling.

Once the mold is cool, gently flex it to release the molded piece. If the piece is really difficult to remove, you can flex the mold to create a space between the mold and the baked piece. Drip a drop of the thinner into this area. Use a long thin tool to run the thinner around the edges of the molded piece. Then the piece should slide right out. If you used thinner to remove the baked piece, you should wipe it off with paper towel before proceeding with the project.

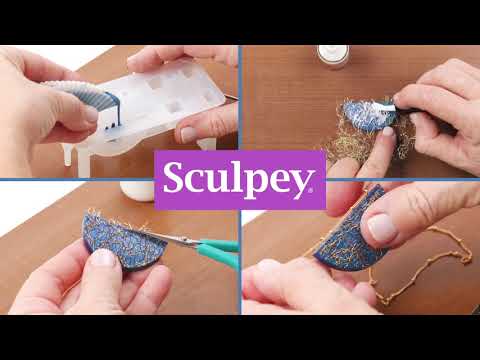
Paint a thin layer of nail art air drying glue on the front surface of the molded shape. Allow the glue to dry completely.

Add a layer of the glass paper nail art product and make sure it sticks to the dried glue. Trim the excess glass paper away with scissors.

Add another layer of nail art air drying glue over the top of the glass paper. Allow this layer to dry.

Add another layer of the glass paper.

Make sure the glass paper is stuck down well and trim the excess with sharp scissors.

Paint on a thin layer of Sculpey Glossy Glaze to the front of the project.

Allow the Glossy Glaze to dry completely before handling, then add the necklace chain.

- Choosing a selection results in a full page refresh.
- Opens in a new window.