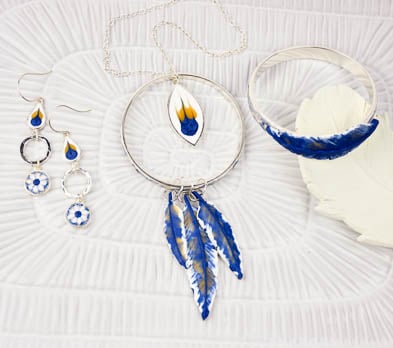

Liquid Sculpey® Dreamcatcher Jewelry Set
Liquid Sculpey® Dreamcatcher Jewelry Set
Designed by Sherri Thompson
Read More
This project is a fun way to incorporate Liquid Sculpey® clay, bezels, and Sculpey Tools™ molds to create a bohemian chic Dreamcatcher Jewelry Set.
TIME TO COMPLETION: Apx 60 minutes
Read Less
ADDITIONAL SUPPLIES
- Nunn Design Bezels (Sm Teardrops, Small Circles, 2 Bracelet Bezels, Marquee Bezels)
- Nunn Design Textured Oval Jump Rings (4)
- Nunn Design Circle Rings (2)
- Nunn Design Finished Chain and Earring Hooks
- Extra Jump Rings (7)
- Needle Tool
- Small Paintbrush
- Jewelry Pliers
- Pin Vise
- 800 grit Wet Dry Sandpaper
- 2 part epoxy Glue
- Toothpick or Popsicle Sticks
- Mini Wood Carver (Optional)
- Ruler
- Painters Tape
- OPTIONAL: Pasta machine

Project Instructions
- Getting Started with Liquid Sculpey®:
- Getting Started with Liquid Sculpey®:
- Baking:
- It is important to use oven thermometer when you bake the liquids so that you can ensure your oven is at the correct temperature.
- Do not microwave the liquids. They must be baked in a Preheated oven at 275 ºF (130 ºC) for liquid colors and 300 ºF (149 ºC) for Clear – Do not exceed baking temperatures.
- If your piece is less than 1/4” bake for 15 minutes. For thicker pieces that are 1/4” or above bake for 30 minutes.
- If your liquid project has become yellowed or discolored in the oven, when you remake it, tent it by placing either – folding an index card in half and placing your project under it or by using aluminum foil over your project.
Fill the spine of the feathers in the Boho Chic mold with a small amount of
Navy Metallic Liquid Sculpey. Use a needle tool to remove any air bubbles in the mold.

Use a paintbrush to spread the Liquid Clay towards the edges of all the
feathers. Don't go all the way to the edge so the other colors will show.

Add a line of Amber Translucent Liquid Clay on top of the Navy Metallic. Leave
as is, or use the paintbrush or needle tool to spread around.

Fill molds with White Liquid Clay. Tap mold on flat surface a couple times to
remove air bubbles. Lightly brush a lighter over mold to further remove bubbles. Cure for 40 minutes. Let
cool. Repeat steps again with the larger feather, so you'll end up with two large feathers.

Prepare a thin strip of White Premo clay. This was #3 on my Atlas Pasta
Machine. Cut a roughly 8 inch strip.

Use your bracelet bezels to measure the thickness needed for each bracelet.
Use a ruler to cut the strips to fill your bezel. Apply a small amount of Oven Bake Adhesive to the bezel
and spread. Carefully add strip to bezel. Smooth down to remove air bubbles. Cut at seams and smooth.

Spray lace mold with water. Carefully roll bracelet bezel onto mold, pushing
down to impress pattern. Cure for 30 minutes and let cool.

Use a small circle cutter to cut circles of White Premo to fill circle bezel.

Spray Mandala mold with water. Press your round bezel onto the mold to create
imprint. Cure for 20 minutes. Let cool.

Apply a thin layer of Amber Translucent Liquid Clay to all cured clay. Cure
again for 15 minutes and let cool. (Ignore teardrop and marquee bezels in photo, those will be filled with
liquid clay)

Apply a thin layer of Navy Metallic liquid clay onto raised parts of the cured
bezels. Add a drop of Navy Metallic into center of small circle bezels. Add white to circle bezels for
detail, if desired. See photo in step 19. Cure for 15 minutes and let cool.

Fill marquee and teardrop bezels with White Liquid Clay. Leave a little room
for the other colors. Add a drop of Amber Translucent Liquid Clay off center. Add a drop of Navy Metallic
Liquid Clay off set from the Amber Translucent.

Use a needle tool to drag a line through the drops to create design.

Use sandpaper smooth any sharp edges on the feathers. Carefully use a micro
Carver to carve trenches in the back of one of the large feathers. Add some Oven Bake Adhesive to the
feather. You can add the feather without the trenches, but the trenches give the feather a little tooth to
grip the bracelet better. You could also use an craft blade to cut some texture.

Add feather to thicker bracelet bezel. Use painter's tape to hold in place.
Cure for 15 minutes and let cool. If the feather cracks, fill with more liquid clay to cracks and cure
again.

Use a pin vise to carefully drill a hole into the three other feathers.
Putting the feather on the edge of a tile can be helpful.

Mix a small amount of 2 part epoxy and apply a small amount into each circle
bezel for your earrings. Add your clay pieces and press. Let sit 24 hrs to fully cure.

Lay out your earring design and assemble with the textured oval jump rings.
Add earring hooks.

Layout your necklace design and assemble with the other jump rings. Add to
chain.

- Choosing a selection results in a full page refresh.
- Opens in a new window.