

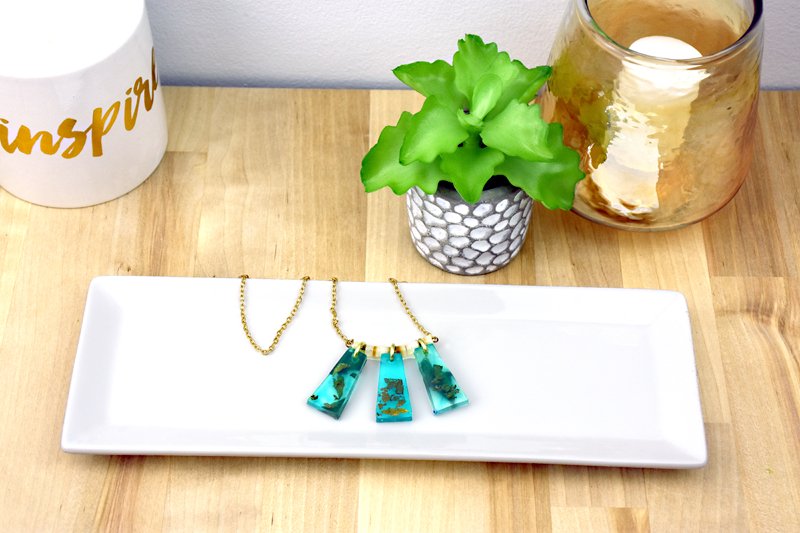
Liquid Sculpey Aqua Gold Liquid Necklace
Liquid Sculpey Aqua Gold Liquid Necklace
Read More
Liquid Sculpey and the Sculpey Silicone Jewelry Mold give you the perfect opportunity to create unique jewelry that matches your personal style
Design by Amy Koranek
Read Less
ADDITIONAL SUPPLIES
Aquamarine alcohol ink
Project Instructions
Getting Started:Do not use unbaked clay on unprotected furniture or finished surfaces. Start with clean hands and work surface area. Good work surfaces include wax paper, metal baking sheet, or disposable foil. Stir Liquid Sculpey® completely. Thin with Sculpey® Liquid Clay Softener as needed. Bake on oven-proof glass or metal surface at 275 degrees F (130 degrees C) for 20 minutes. For best baking results, use an oven thermometer. DO NOT USE MICROWAVE OVEN. DO NOT EXCEED THE ABOVE TEMPERATURE OR RECOMMENDED BAKING TIME. Wash hands after use. Baking should be done by an adult.Begin by preheating oven to degrees 275 degrees F (130 degrees C). Test temperature with oven thermometer for perfectly cured clay. Designer’s Note - For molds like these I find a Cold Cure method works really well. Preheat the oven to 275 degrees F. If using more than one color of liquid, make sure the liquids are comparable in thickness and thin with Sculpey® Liquid Clay Softener as needed. Always stir the liquids completely, especially when mixing softener or tints into them. Fill the mold as desired and gently tap the mold on a flat smooth surface to release air bubbles. Place the filled silicone mold on top of a wet cloth and bake for 20 minutes. Baking at this low temperature and on a wet cloth will bake the pieces slowly which keeps air bubbles from forming. Once the piece is set, it can be baked again at the higher temperature of 325 degrees if necessary without bubbles forming.
Place a miniature paper baking cup in a mini muffin pan. The muffin pan just helps to support the paper liner. Stir Clear Liquid Sculpey® (LS) completely to make sure there are not lumps in it. Fill the paper liner half way with Clear LS. Add one drop of the alcohol ink to the Clear LS. The more lightly the Clear LS is tinted, the more clear it will appear when it is cured.

Stir the ink completely into the Clear LS with a flat tool.

Place a very thin layer of the tinted Clear LS into the bottom of the Jewelry Mold quad shape. With tweezers carefully place some pieces of composite gold leaf on top of the Clear LS. Bake the mold following the Designer’s Note above for a Cold Cure.

When the mold is completely cool, back fill on top of the first layer with more tinted Clear LS. [

Add more pieces of gold composite leaf with tweezers. Bake again using the Cold Cure method.

Continue layering Clear tinted LS and pieces of gold leaf and baking between each layer until the mold is completely full. The last layer should just be tinted Clear LS and no leaf. Bake one final time using the Cold Cure method. After the piece is set, preheat the oven to 325F and bake the piece again in the mold for 15 minutes or until the piece goes clear. You may also clear the piece in the mold with a heat gun. Turn the heat gun on “hi” and hold it 4”-6” away from the piece. You will be able to see the piece go clear as it heats up. Allow the piece to cool completely. Remove it from the mold by flexing the mold gently. Flip the piece over and place it back in the mold. Heat the other side to clear it as well.

Follow all these steps to make two more pieces. When they are completely finished, attach a jump ring to each one through the hole. String a 2” eye pin through the spacer beads and through the jump rings as shown. Use the round nose pliers to curl an eye in the other end of the eye pin holding the beads in place.

Cut the 20” necklace in half. Attach the necklace pieces to either side of the pendant piece with jump rings.

