

Liquid Bakeable Sculpey -Dragon Eyes
Liquid Bakeable Sculpey -Dragon Eyes
Read More
Create one of a kind Dragon Eyes with New Liquid Bakeable Sculpey Clear
Read Less
ADDITIONAL SUPPLIES
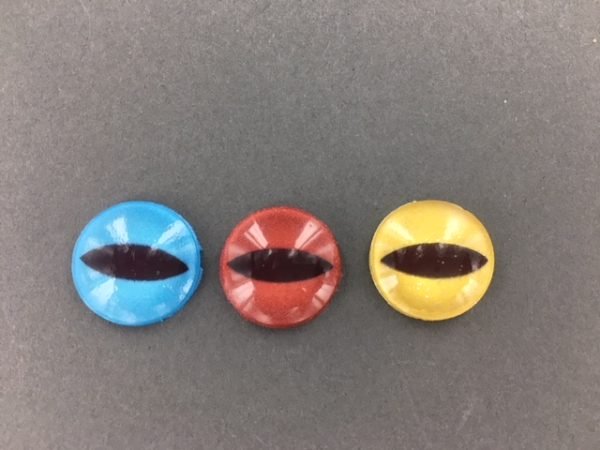
Pearl Ex Powder in Blue Russet and Super Copper - The other eye colors in the photo were made using Pearl Ex Brilliant Gold and True Blue Thin plastic card, something like a used gift card, which can be used as a “squeegee”
Craft Knife
Jewelry Stencil – “Pod” shapes – graduated sizes – This is for the pupils
Small Tweezers
Smooth Ceramic Tile
Shallow Metal Baking Dish
Small Plastic Mixing Cup
Toothpick – Bare wood, not colored
Embossing Heat Gun (scrap booking use)
Project Instructions
Your workspace:
Please make sure your work area is covered and you are not working on an unprotected surface. We recommend working on the Sculpey® Work ‘n Bake Clay Mat, wax paper, metal baking sheet, or disposable foil. Uncured clay may damage unprotected furniture or finished surfaces. Be sure to cover your crafting area appropriately.
Getting Started:
Start with clean hands, unwrap and knead clay until soft and smooth, or condition by running clay though a Pasta Machine. We recommend using a designated machine for clay purposes only. When working with multiple colors, clean hands with soap and water or baby wipes (we have found that baby wipes work best) before switching colors. Shape clay, pressing pieces firmly together. Wash hands after use.
Baking:
Begin by preheating oven to 275 °F (130 °C). After you are done creating; for best results bake clay on an oven-proof surface such metal, aluminum foil, an index card or the Sculpey® Clay Mat at 275°F (130 °C) for 15 minutes per ¼" (6 mm) thickness according to package directions. Oven safe glass or ceramic surfaces are also acceptable for baking; however please note that the baking times may take longer as the glass or ceramic surfaces take longer to heat up. For best baking results, use an oven thermometer. DO NOT USE MICROWAVE OVEN. DO NOT EXCEED THE ABOVE TEMPERATURE OR RECOMMENDED BAKING TIME.
Stage 1 – The pupils
Squeeze a thick line of Black Liquid Sculpey across the top of the tile.
Note: The line of liquid clay should not be longer than the width of the thin plastic piece you are using as the “squeegee”. Use the thin plastic piece or used gift card to spread the Black Liquid Sculpey in a thin layer over the surface of the tile. Bake the liquid clay on the tile for 15 minutes, let cool completely and leave attached to the tile.

Choose the pod size, on the jewelry template, which will fit best over the smallest round cavity in the cabochon mold. Hold the jewelry template on top of the Black Liquid Sculpey that was baked onto the tile in the previous step. Use the craft knife to cut out a pupil shape.
Note: It is a good idea to cut several pieces now so you have some for later. Set the cut pupils to the side.
Note: It is a good idea to cut several pieces now so you have some for later. Set the cut pupils to the side.

Stage 2 – Building the eye
Increase oven temperature to 300 degrees Fahrenheit. Pour some Clear Liquid Sculpey into the smallest round cavity in the cabochon mold. You only need to fill the cavity up to a level where the diameter of the surface level of the liquid clay is slightly larger than the length of the pupil piece. Bake the Clear Liquid Sculpey, in the mold, for approximately 8 minutes or until the liquid clay is set.
Increase oven temperature to 300 degrees Fahrenheit. Pour some Clear Liquid Sculpey into the smallest round cavity in the cabochon mold. You only need to fill the cavity up to a level where the diameter of the surface level of the liquid clay is slightly larger than the length of the pupil piece. Bake the Clear Liquid Sculpey, in the mold, for approximately 8 minutes or until the liquid clay is set.

Add a few drops of the Clear Liquid Sculpey onto your work surface. Pick up the pupil with the tweezers and drag one side of the pupil through the liquid clay until there is a thick coat of liquid clay on the pupil. Place the pupil onto the surface of the baked liquid clay that is in the cabochon mold. Use your fingers to press the pupil onto the surface of the baked liquid clay. When pressing down on the pupil you should see the excess liquid clay come out from under the edge of the pupil. Continue pressing until no more liquid clay comes out from under the edge of the pupil. The goal is to make sure there is no air trapped under the pupil. Trapped air will show as a bubble and distort the pupil.
- Choosing a selection results in a full page refresh.
- Opens in a new window.