DIY Patriotic BBQ Tags
DIY Patriotic BBQ Tags
Read More
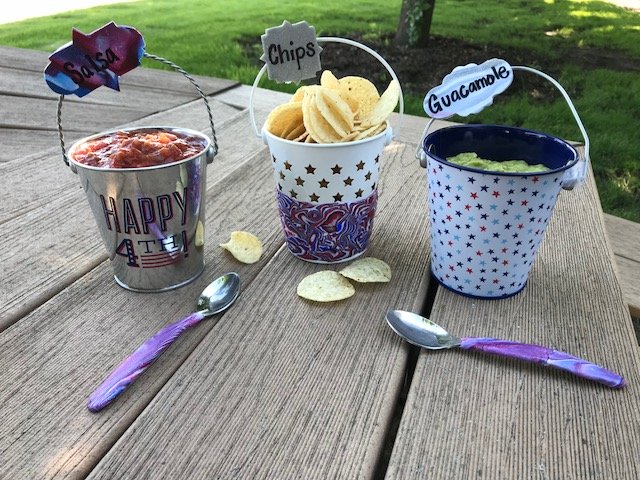
Create quick and easy patriotic bbq tags for your 4th of July celebrations!
Read Less
ADDITIONAL SUPPLIES
Craft Knife

Project Instructions
Getting Started:Please make sure your work area is covered and you are not working on an unprotected surface. We recommend working on the Sculpey® Work ‘n Bake Clay Mat, wax paper, metal baking sheet, or disposable foil. Uncured clay may damage unprotected furniture or finished surfaces. Be sure to cover your crafting area appropriately.Start with clean hands, unwrap and knead clay until soft and smooth, or condition by running clay though a Pasta Machine. We recommend using a designated machine for clay purposes only. When working with multiple colors, clean hands with soap and water or baby wipes (we have found that baby wipes work best) before switching colors. Shape clay, pressing pieces firmly together. Wash hands after use. Baking:Begin by preheating oven to 275 °F (130 °C). After you are done creating; for best results bake clay on an oven-proof surface such metal, aluminum foil, an index card or the Sculpey®® Clay Mat at 275 °F (130 °C) for 30 minutes per ¼" (6 mm) thickness according to package directions. Oven safe glass or ceramic surfaces are also acceptable for baking; however please note that the baking times may take longer as the glass or ceramic surfaces take longer to heat up. For best baking results, use an oven thermometer. DO NOT USE MICROWAVE OVEN. DO NOT EXCEED THE ABOVE TEMPERATURE OR RECOMMENDED BAKING TIME.
Condition and sheet premo Accent Frost White Glitter on the thickest setting of your clay conditioning machines. Lay Sculpey Design It Template onto clay and trace around it with an craft knife.


Condition and roll out 3 snakes from premo Accents Frost White Glitter, Blue Glitter and Red Glitter.

Twist the 3 snakes together. Continue to twist and create a marble effect. Roll into a ball.

Using your Sculepy Acyrlic Roller, roll the marbled ball into a pancake.

Pick your favorite spot of the design and trace around your Sculpey Design It Template.


To create your patriotic Mokume Gane slab, sheet 1 bar of premo White, Cobalt Blue Hue, Cadmium Red Hue and premo Accents Silver.

Assemble your slab. Alternate the colors and lay the silver in between the solids for a sparkle effect throughout. Roll over the slab with your Acrylic Roller.

Sheet the slab thought your clay conditioning machine on the thickets setting. You will get one long strip of clay. Slice and begin stacking the condensed slab onto each other. You will assemble a thick slab. Trim edges as needed.


Begin to manipulate the slab, pushing the Style & Detail, Clay tool and design it blocks and Etch n’ Pearl into it. The more the slab is ‘manipulated’ the more abstract your Mokume Gane design will be.

Using your hands, form the slab back together. Then using the Sculpey Super Slicer begin slicing pieces of the slab off the top. With each slice you will reveal a different color and pattern.


Apply the slices to the base of your tin can. This can has stars around the top so we embellished the bottom.

Take scraps from Mokume gane slab and roll into a ball. Flatten with roller.
Take spoon handle and lay onto clay. Trim to just slightly bigger then spoon


Take spoon handle and lay onto clay. Trim to just slightly bigger then spoon

Trim excess off top and smooth with fingers.

Bake piece as directed and allow to cool completely.

Once cooled, using a permanent marker to write on the Template Designs. Using glue or tape, apply the signs to tooth picks or plastic straws.


Use as you wish! These are perfect for chips and dips!!


