

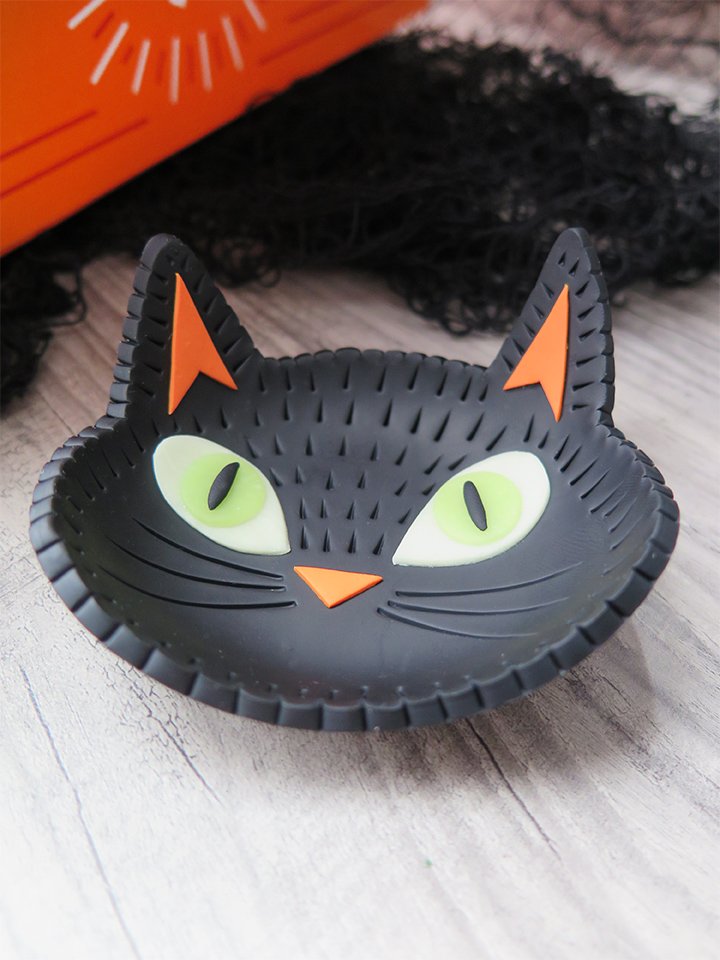
Black Cat Trinket Dish
Black Cat Trinket Dish
Read More
Your luck will change this Halloween when you create this glow-in-the-dark
Black Cat Trinket Dish for all your small items, keys & loose change.
Design by Swirly Designs - Lianne and Paul Stoddard
Read Less
ADDITIONAL SUPPLIES
Ceramic Tile
Paper/ Scissors/ Pencil
Xacto- knife
Wax Paper - Optional
3 1/2 Round glass bowl
Project Instructions
Your workspace: Please make sure your work area is covered and you are not working on an unprotected surface. We recommend working on the Sculpey® Work ‘n Bake Clay Mat, wax paper, metal baking sheet, or disposable foil. Uncured clay may damage unprotected furniture or finished surfaces. Be sure to cover your crafting area appropriately.
Getting Started: Start with clean hands, unwrap and knead clay until soft and smooth, or condition by running clay though a Pasta Machine. We recommend using a designated machine for clay purposes only. When working with multiple colors, clean hands with soap and water or baby wipe before switching colors. Shape clay, pressing pieces firmly together. Wash hands after use.
Baking: Begin by preheating oven to 275 °F (130 °C). After you are done creating; for best results bake clay on an oven-proof surface such metal, aluminum foil, an index card or the Sculpey® Clay Mat at 275°F (130 °C) for 15 minutes per ¼" (6 mm) thickness according to package directions. Oven safe glass or ceramic surfaces are also acceptable for baking; however please note that the baking times may take longer as the glass or ceramic surfaces take longer to heat up. For best baking results, use an oven thermometer. DO NOT USE MICROWAVE OVEN. DO NOT EXCEED THE ABOVE TEMPERATURE OR RECOMMENDED BAKING TIME.

Create a paper templateSketch out an oval shape approx. 3” ½ x 3” (your sketch size can be smaller or larger depending on the size glass bowl you are using. For this project, we are using a 3” ½ round glass bowl) sketch out two triangles for the ears. Cut your template out and place aside.
Making the Black cat shapeTake a block of Black clay, condition it and run it through the clay-conditioning machine on the #1 setting. Lay your cat head paper template on the black clay and cut carefully around the template with an x-acto knife. Place aside.

Making the cats eyes StepsTake the glow-in-the-dark clay, condition it, and run it through the clay-conditioning machine on the #7 setting. Take a 1” teardrop cutter and make the tear drop shapes (if you don’t have a tear drop cutter you could just cut out tear drop shapes with your xacto knife) Mix some Bright Pearl Green clay with your Glow in the Dark clay, condition it, and run it through the clay-conditioning machine on the #7 setting.Take the 1/2” circle cutter and cut out two circles for the center of the cat’s eyes and place them in the center of each of the teardrop shapes.Take a small piece of black clay and with your fingers, roll out two small 3/8” coil size pieces for the black center of the cats eyes.


Making the cats ears and noseTake Orange clay, condition it and run it through the clay-conditioning machine on the #7 setting.Use your super slicer and cut two arrow shapes (approx. ¾ long) for the center of the ears and a triangle (approx. ½ long) for the nose


Assembling your cats faceNow start layering the shapes onto the cat head to make the cat’s face.Using a clay knife, make whiskers and fur around your cat’s face. *Reminder: You want to press hard enough to make an impression but not too hard that you are cutting through to the bottom of your clay shape.Once you have your face decorated take your clay knife and make 1/8” indents around the edges of piece.


Bake it! Take your finished black cat tray and lay it in the center of a glass bowl.You will form the cat into the shape of a bowl, so it becomes curved. Place on a ceramic tile and bake it in the oven (while still in the bowl) according to the manufacturers instructions on the packaging. Let cool. Once cooled your black cat trinket dish should just pop right out of the bowl.

Tips:• If you want to create a thicker bowl you can run two separate pieces of clay through the clay-conditioning machine one on the #1 setting and the second on the #4 setting and sandwich them together.• Place your finished piece under a lamp or in a sunny window for a bit so you can activate the glow in the dark clay.** If you want protect the glass bowl from the clay, bake the piece on some wax paper before placing it your bowl for baking.
