
Table of Contents
Polymer clay is an exciting and fun crafting material. It’s a great medium you can use to make just about anything because of its versatility and flexibility, including beautiful earrings.
You can mix it to form different colors, from contrasting to complementary, and any other color palette on the color wheel. And, you can mold it to any shape you want, from defined geometrics to abstract craftsmanship.
If you’re a creative type, you’ll never get bored playing with polymer clay — and if you don’t consider yourself one, you’re about to discover the artist within you. You Can check out our variety of polymer clay options online.
What Is Polymer Clay?
If you’ve never heard of polymer clay, you may be asking yourself, “What is it, and how can I use it to make beautiful statement earrings?” Polymer clay isn’t something you dig up from the ground as you did with dirt as a child. Rather, polymer clay comes from polyvinyl chloride (PVC), plasticizer and pigment.
In short, polymer clay is a flexible plastic.
Although you won’t find it in nature, it’s extremely easy to find online — especially on our website, where we offer a wide variety of polymer clay options.
What Makes Polymer Clay So Great?
One of its most attractive qualities is its flexibility. You can make so many things with polymer clay, from cute animal figurines for your kids to awe over to gorgeous vintage-style brooches your friends will adore. And, of course, earrings you’ll love to wear.
Polymer clay is an excellent material for making all kinds of earrings, from studs to hoops. Plus, you can create polymer-clay earrings customized to match all of your favorite outfits. With so many ways to express yourself and your unique style, you’re bound to get inspired by polymer clay’s limitless opportunities.
Another attractive quality is how easy polymer clay is to work with. On the market, you can find many tools that make working with polymer clay even easier and more successful, such as cutters, stencils and molds.
Soon, your friends will be asking you to make them a pair of do-it-yourself DIY clay earrings, too! And, who knows, maybe you’ll tune into your entrepreneurial side and found your own handmade jewelry business!
Now, let’s hop into our comprehensive guide to making fun, beautiful clay earrings — which you can do right at home, no studio required.
How to Make Clay Earrings
What is Needed for Polymer clay Earrings?
To make anything with polymer clay including clay earrings, all you need is:
- Polymer clay
- A household oven
- A clean work area
- Any tools you want to use
- The ultimate tool – your hands
You can improvise a lot of tools and gather things from your kitchen, bathroom or garage until you become more advanced in your practice. For tools specifically, you’ll want something to:
- Etch designs
- Sculpt figures or shapes into the clay
- Cut the clay
The more experience you gain working with polymer clay, the more you’ll feel comfortable experimenting with different tools. The same prep-work applies to earring-making hardware, too. To make earrings, the only additional supplies you’ll need are a few accessories to form the earrings, as well as a pair of pliers.
Prepare your polymer clay and earring-making adventure by taking the following steps:
1. Prepare Your Workspace

First, you’ll need to prepare your workspace. Make sure your work area — a clear work area is a clear mind! — is clean and free of pet hair or other debris, which can get caught in the clay.
Make sure you protect your work surface, too, because the polymer clay can sometimes damage certain furniture finishes. Protect your work surface by covering your work area with a sheet of wax paper, metal baking sheet or disposable foil. Or, you can work on top of a glass or marble surface, if you happen to have those materials around. If you don’t have any of these options, save yourself a trip to the store and use a few sheets of clean copy paper.
Before you start crafting, prepare your hands by thoroughly washing them. If you don’t wash your hands while working with different tools and clays, you may accidentally contaminate or transfer different particles that will negatively alter your DIY earrings.
2. Choose Your Oven
Contrary to popular belief, or whatever your teacher told you in art class, you don’t need a special or separate oven to bake your polymer clay. Your regular household oven will work just fine. You can even use a toaster oven if you prefer it. Just avoid using a microwave because oven-bake clays aren’t formulated to be cured using the latter method.
Microwave ovens have hot spots, and it’s difficult to set exact temperatures, unlike when using an oven. If your baked polymer clay design rests in these hot spots, they can undergo thermal breakdown fairly quickly and may char or emit toxic fumes. So, stick with the previously-mentioned preferred alternatives.
Or, if you do choose to go with a polymer clay-specific oven, great! We recommend doing your research into the small, inexpensive ovens on your preferred search engine. You’ll want to choose an option that promises to apply even, controllable heat to your polymer clay crafts. You shouldn’t have to dig too deep into your pocket for a quality option, but if a dedicated oven is out of your price range, sticking with your home oven is fine.
3. Purchase Your Clay
Start off on the right foot by picking the best polymer clay for jewelry making.
Choose a type that is soft enough to bend but firm enough to hold intricate details. Also, you’ll want to use a durable clay so you can wear your handmade clay earrings instead of keeping them stashed in a jewelry box.
We recommend the following types of polymer clay formaking clay jewelry:
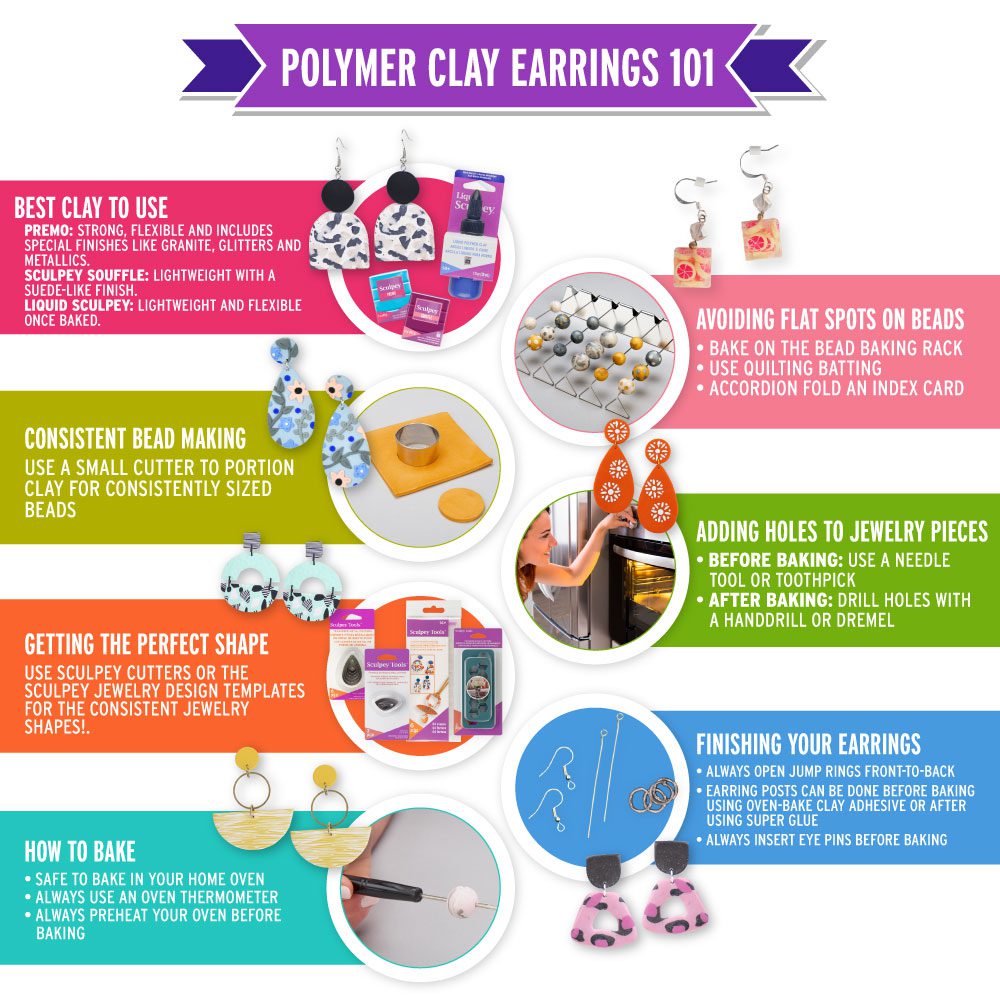
- Premo Sculpey®: This polymer clay, which is available in a variety of colors, is both strong and flexible. It’s a harmonious balance between firm and soft, making it perfect for jewelry because it holds any small detail you etch onto it. Even better, it includes baking instructions, so you’re never in doubt.
- Sculpey® Souffle™: Another quality option, this polymer clay is lightweight and quick to bend and shape yet strong enough to maintain fine details. Additionally, this polymer clay is a great option if you’re looking for a soft, matte finish. It also comes in an array of colors, from hot pink and royal purple to cherry red and classic blue.
If you’re not sure about the type of clay to pick for your earring design, our friendly team is always eager to discuss the best options for your creative endeavor. At any time during your project, feel free to contact a member of our team using our general inquiry form. We’ll be happy to answer any questions you might have!
4. Gather Your Supplies
You can easily find a lot of your supplies at home or your local craft store. Keep in mind that this is a list of general supplies, and you may opt for other niche supplies, depending on your project.
It’s wise to keep the following items on-hand, regardless of your craft idea, to help prevent any interruption to your creative flow:
- X-Acto or craft knives: Crafting knives make it easier to cut the clay into shapes or pieces.
- Needles: Sewing needles are a staple to your craft inventory. If you don’t have any on-hand, you can make your own by sticking a needlepoint needle in a small block of clay — used to form the handle — and baking it.
- Plastic toothpicks: If you’re short on sewing needles, use plastic toothpicks to poke small holes in the clay.
- Ball styluses: These are perfect for creating holes or indentations in your work.
- Plastic or acrylic rolling pins: Make sure your rolling pins are plastic or acrylic instead of wood. Wood is porous and will absorb the clay’s qualities.
- Scraper blades: Use this tool when shaving or cutting clay from a new polymer clay block.
- Foll pans or cookie sheets: When you make your polymer earring designs, you’ll need a foil pan or cooking sheet for baking the clay.
- Parchment or wax paper: Use parchment and wax paper to cover your work area and line your baking sheets.
- Toothbrush: Grab an old toothbrush and use the bristles to add texture to the clay.
- Paper towels or baby wipes: Keep your hands and workspace clean with a pack of baby wipes or some wet paper towels.
- Ziploc bags: After you open the polymer clay package, keep the clay safe and useable by storing any excess in a Ziploc bag.
You may also want to purchase or repurpose a container or tote for all your supplies to make it fast and simple to pick up your tools and get to crafting.
Tools You’ll Want to Have When Making Clay Earrings at Home
By now, you should have your table covered with parchment paper and a few blocks of colorful polymer clay waiting to be used. Now, you’re ready to get working on your first pair of DIY polymer earrings — well, you’re almost ready.
First, you’ll want to gather a few more tools. Hang in there. You’ll be a polymer clay master soon enough.
While not all-inclusive, because your needs will vary depending on your clay earring design, consider this list of earring-making tools and supplies you may want to use when crafting:
- Earring posts, hoops or hooks
- Jump rings
- Eye pins
- Industrial-strength glue
- Wire cutters
- Chain nose pliers
- Round nose pliers
And here are a few more add-ons you don’t necessarily need but may spark some inspiration:
- Glitter
- Accent beads or charms
- Crystals
- Acrylic paint
- Metal leaf
- Metallic paint pen
Now that you have all your supplies, you can get to the fun part — building your one-of-a-kind polymer clay earring design.
Different Types of Earrings
A helpful starting point when designing your earrings is to choose the style you want to create. Take inspiration by visiting your local fashion store or considering our list of go-to clay earring styles:
- Ear jackets or double-sided: Animals, food, flowers — what do you love? You can build polymer clay figurines inspired by your favorite things and turn them into self-expressive earrings using different components outlined later in this guide.
- Studs: Earring studs make a pleasant, straightforward earring style. They’re a fantastic choice for casual wear or as a delicate accent to your going-out attire. They’re easy to make, too, requiring only posts and backs.
- Dangling: With a hook and a jump ring, you can design whimsical polymer clay dangling earrings, like leaf-shaped earrings, wings and more.
- Chandelier: Taking a sophisticated twist on dangling earrings, chandelier earrings are elegant. And, believe it or not, they can involve polymer clay. To make these earrings, all you need are eye pins and jump rings.
- Hoops: You can make hoops either completely out of polymer clay or by attaching polymer clay beads or other shapes to premade metal hoops as a stylish twist.
- Spiral: Polymer clay spiral earrings are easy to make and look lovely with added accents, like glitter or metallics.
- Drop: These polymer clay drop earrings are great for adorning faux gems or faux marble styles, outlined in our next section — pattern ideas for your clay earrings.
- Disks: Disk-shaped polymer earrings make excellent canvases for a stamped earring pattern or a painterly design. It’s all up to your creativity when designing your disk earrings!
- Jhumka: Jhumka earrings are traditional, bell-shaped Indian earrings. You can form polymer clay into dome-shape beads to inspire the overall look.
- Mismatched: Mismatched earrings are the latest jewelry trend. Experiment and play with different shapes and styles!
No matter what style you choose, don’t be afraid to make a fashion statement as loud as your heart desires. But, before creating your clay earring design, you’ll also have to choose your earring hook type.
The different types of earring hooks you can choose from include:
- French or shepherd hook: This is a popular choice for jewelry makers. It sports a curved metal hook, which fastens through the ear and secures using a plastic back.
- Kidney wires: A lot of people love this hook type because it clasps shut and is inexpensive.
- Hoops: If you love accessorizing your earrings, you’ll want to consider this option because of its endless opportunities. You can add beads, gems or other charms to create a beautifully designed addition to your jewelry collection.
- Posts or studs: With these hooks, you can adhere a clay piece to the flat side of the post or stud, and use a back to secure the earring to your ear.
Feeling inspired yet? Once you’ve chosen an earring type, you’re one step closer to creating your very own pair of clay earrings!
How to Make Polymer Clay Stud, Unicorn Horn and Other Earrings
Although we welcome free-play with clay, we’re going to start you off with a few simple clay earring ideas. Let’s get straight into building your polymer-clay confidence!
First, here are some essential tips you’ll want to keep in mind:
- Bake your projects according to the manufacturer’s instructions.
- Store your clay by keeping open packages in plastic containers or plastic bags, as well as away from any heat sources.
With your tools and creative journey in front of you, we think you’re ready to start making a super-cool pair of polymer earrings! Take a deep breath — you can do it!
Some quality options of earrings you can make include:
1. Heart-Shaped Studs
Stud earrings are always in fashion. Heart-shaped studs are a good place to start in the world of earring-making because they’re simple and easy to make. To begin, you’ll need:
- Polymer clay in the color of your choice
- Earring posts
- Industrial-strength glue
- Heart-shaped clay clutters
- A toothpick or needle
Once you’ve gathered your materials, follow these steps to create your first pair of earrings:
- Work the clay in your hands until it’s soft.
- Make heart shapes using our heart-shaped clay clutters.
- Use a toothpick or needle to form a cleft at the top of the heart.
- Bake the clay according to the package instructions.
- Let the earrings cool.
- Glue your new pair of earrings to earrings posts.
Super easy, right? You can hand these out as gifts on Valentine’s Day or choose to wear your heart on your ears. For added flair, consider adding small jewels to them after they’re done baking.
2. Glittery Stud Earrings
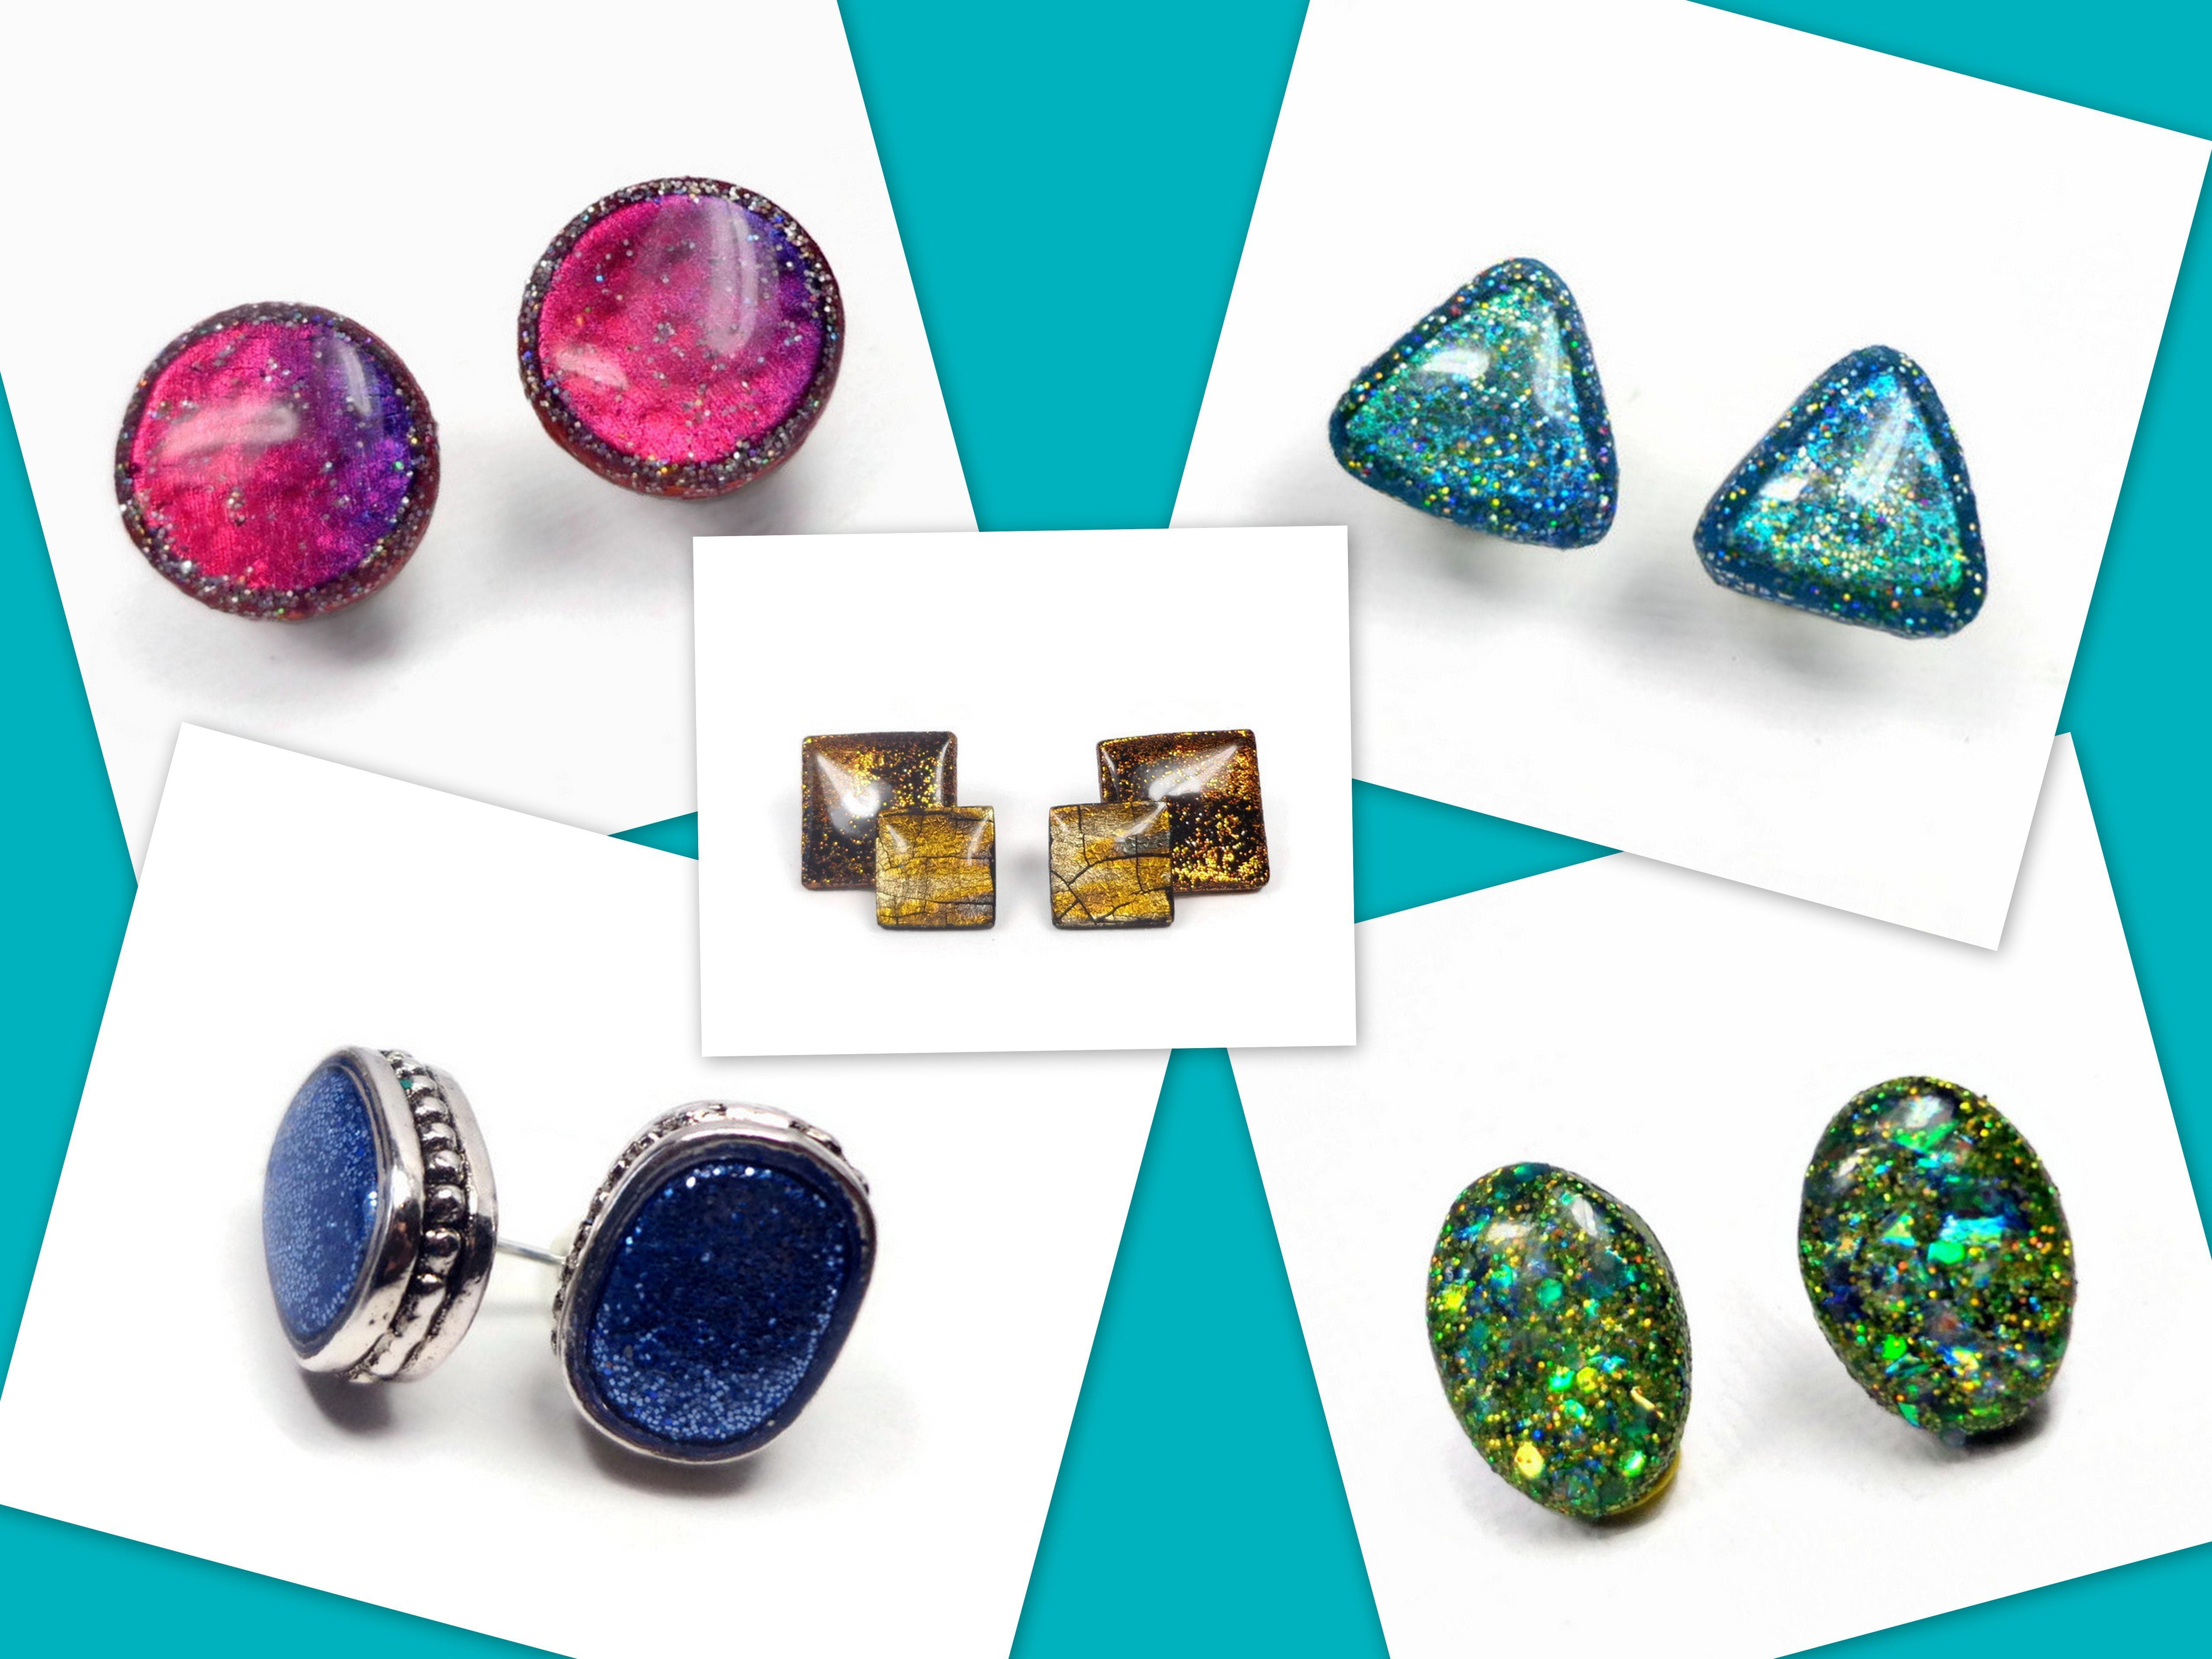
Colorful little stud earrings are easy to make, and fun to wear! The design possibilities are endless, limited only by your imagination! Try some of the foil ones at the top, use any small stamps to impress a design on the foil, or maybe a slice of an old cane, add a coat of resin, and Wha-la, the perfect sparkle for your ears.
This is a great project to try with kids, it’s easy and fun, and requires only a few supplies:
- Premo clay
- Earring Backs
- Mini Cutters
- Glitter
Use Mini Metal Cutters to cut out different shapes, they are just the right size for stud earrings. These make great gifts for teachers, birthday parties, or even for school fundraisers!
3. Fried Eggs Earrings
If you love your eggs fried, then you’ll love these fried eggs-inspired earrings. These earrings are sure to bring personality to your jewelry collection. Best of all, beginner jewelry-makers and chefs alike can whip up these eggs with no problem!
To make these earrings, you’ll need:
- White and yellow polymer clay
- Light brown and dark brown acrylic paints
- Gloss glaze
- Foil
- A toothpick
- An old brush
- A paintbrush
- Two earring hooks
- Four jump rings
- Pliers
Once you’ve gathered your materials, follow these steps to create a quirky pair of fried eggs earrings:
- Press two pieces of white clay — your “egg whites” — until they’re flat on your work surface.
- Roll two balls of yellow clay for the “yolks.”
- Gently poke the egg whites with stiff brush bristles, giving them a textured look.
- Push the yolks into the centers of each white.
- Push a toothpick all the way through the top of each egg to form the hole you’ll put the jump rings through.
- Bake the clay eggs according to the package instructions.
- After cooling, conservatively paint the egg white edges with the dark and light brown paint, giving it a crispy-fried look.
- Apply a gloss glaze for shine.
- Attach two jump rings to each egg, and then attach the hooks.
These earrings are fun, both to create and wear. If you’re not a fan of fried eggs, though, you can use your creative ability to make earrings shaped like donuts, pizza, bananas or any other tasty treat you love.
4. Easy Rose Studs
Roses are the epitome of romance, and they make a great jewelry design too. They aren’t too challenging to make and look more intricate than they really are.
Here’s what you’ll need to make these DIY rose earrings:
- A rose-colored polymer clay
- A razor blade
- Industrial-strength glue
- Earring posts
To make these easy rose studs, follow these simple instructions:
- Roll about six balls of clay.
- Flatten each ball with your finger.
- Fold one flattened ball in half. This one will be the center of the rose.
- Wrap the other flattened balls around the center in overlapping layers. These will be the petals.
- Slice the end of the rose, making a flat base.
- Repeat steps one through five for the second earring.
- Bake the clay according to the package instructions.
- Glue the roses to the earring posts.
If you want, you can add a glaze, glitter or metallic edging to enhance these rose earring’s elegance.
5. Unicorn Horns
Who doesn’t want to hang unicorn horns from their ears? Unicorn horns represent all that is mystical. Plus, they bring cheer to children and always lifts our spirits. Unicorn horns are whimsical, beautiful — and easy to make, too!
To make these unicorn horn charms to turn into cute earrings, you’ll need the following supplies:
- Polymer clay in whatever color you want for your unicorn horns
- Matching glitter
- Two eye pins
- Two hooks
- A glaze
Then, you’ll want to follow these instructions:
- Flatten two pieces of polymer clay.
- Add glitter to each piece of flattened clay, then roll it around to distribute the glitter evenly.
- Roll each ball of clay into a thin rope shape.
- Cut each rope in half, so you have four pieces in total.
- Apply pressure to the bottom of each piece to form a point. Now, the four tubes should be pencil-shaped.
- Line up two pieces parallel to each other and twist them together.
- Repeat step six with the remaining two tubes.
- Add an eye pin to each horn.
- Bake according to the package instructions.
- Apply a glaze and allow it to dry.
- Turn your horns into earrings by attaching earring hooks.
Now, you’re ready to show off your new clay earrings!
6. Cupcake Earrings
Craving a sweet treat? Cupcake earrings are a little more in-depth, but they’re a great way to prepare you for more complicated projects. If you need something sweet to brighten up a dreary day, the smiley faces featured on these cupcakes will do the trick! It’s tough to feel sad around these earrings.
Here’s what you’ll need to make these fun cupcake earrings:
- Pink, blue, black and white polymer clay
- Translucent liquid clay
- Eye pins
- Earring hooks
- Round nose pliers
- Wire cutters
- A toothpick or needle
- A dotting tool
- A rubber spatula
- A small paintbrush
- An old toothbrush or a hard-bristled paintbrush
- Plain copy paper
To make them, you’ll need to:
- Combine equal parts white and pink clay, then blue and white clay.
- Roll out the blue clay, then cut it into two equal pieces.
- Form the pieces into thimble shapes. These will be the base of the cupcake when it’s flipped right-side-up.
- Take a needle or toothpick and make indentations on the sides to make them look like cupcake wrappers.
- Flip them upside down so the flat, wider side faces up.
- Roll two balls of pink clay into a dome shape that’s a little bit larger than the cupcake bases.
- Put a dollop of translucent liquid clay on the top of each blue base.
- Add one pink dome to the top of each blue base.
- Poke the pink top with an old, hard-bristled brush to add texture.
- Use the dotting tool and make two eye-holes on your pink domes.
- Press the black clay with the dotting tool to create eyes for the smiley face.
- Roll a thin piece of black clay for the smile.
- Place the smiles on the cupcakes.
- Mix white clay with translucent liquid clay until you get a toothpaste consistency, which you will use for your frosting.
- Take a small spatula tool and add frosting to the top of each cupcake.
- Trim the eye pins and use pliers to bend them at the bottom so they stay in place after you insert them into the cupcakes.
- Insert the eye pins and curve into place.
- Bake according to the package instructions.
- Allow the clay to cool.
- Use pliers to open the earring hooks, then attach them to the eye pins.
You can apply this method to building shapes other than cupcakes, such as animals, food items or anything else you can dream up.
Pattern Ideas for Your Clay Earrings
An optional step of the design process is choosing a pattern, whether it be one you make by-hand or one you find in nature.
Fashion designers often draw inspiration from the outdoors because you can find beautiful symmetry in nature, like in starfish and snowflakes. Plus, symmetrical patterns are pleasing to the eye.
Comparatively, asymmetry creates visual interest. An asymmetrical design is still a pleasure to look at — but only if it’s balanced.
For example, the Zen Circle follows the Japanese principle of fukinsei, defined as creating balance through asymmetry. Because it consists of one hand-drawn, incomplete circle, the Zen Circle also symbolizes the beautiful imperfections found in nature. Balanced asymmetry, like the Zen Circle, is engaging and powerful when designed carefully.
You have full control of your creative process, so it’s up to you if you want a pattern on your polymer earrings. If you love prints and want to include them in your jewelry design, here are some ideas to spark your creativity:
1. Geometric Patterns
Geometric patterns are a trendy choice for jewelry-making. You may remember manipulating geometric patterns in school. They consist of repeated geometric shapes, like:
- Triangles
- Squares
- Rectangles
- Circles
Islamic art often features beautifully crafted geometric decorations, showcased in the architecture of Morocco, Iran and Turkey.
You can incorporate geometric patterns into your clay earrings in many ways. You may choose to draw geometric shapes using a metallic paint pen or opt to cut geometric shapes with mini geometric clay cutters. Cutters are a convenient option if you’re prone to shaky hands that make it difficult to draw intricate designs. Or, you may choose to do neither. Instead, consider layering geometric shapes with other accents.
2. Marble Patterns
Marble is a form of limestone, and people adore it for its unique color streaks and clean elegance. A marble pattern is actually very simple to recreate using polymer clay.
To make marbled clay earrings, you’ll need to mix white clay with a solid hue of your choice, following these steps:
- Create two ropes of colored clay. The easiest way to do this is by using your hands to roll out a “snake.”
- Once you’ve created your two ropes, twist them together using a gentle hand and keep twisting and folding until you get the pattern you want. This step will take some practice and intuition. A tip — be careful not to overmix, or else the white clay will absorb the hue and create one color.
- Roll out your twisted and folded clay. During this step, you should begin to see a marbled pattern.
With your marbled pattern, use your tools — remember that your hands count as tools, too! — to cut and shape the polymer clay to an earring design you like.
3. Tribal Patterns
Tribal patterns derive from tribal art. Tribal art reflects the art of indigenous people who used these meaningful patterns for ceremonial purposes. You can use tribal designs to inspire your creations.
Using your clay toolset, carve tribal patterns into your clay, or use them as inspiration for cutting shapes. You can find plenty of free tribal patterns online to get your creative juices flowing!
4. Tortoiseshell Patterns
If you’re feeling confident, consider creating a tortoiseshell pattern for your earrings. For a classic tortoiseshell look, you’ll need:
- Translucent clay
- Dark brown clay
- Black clay
- A clay conditioning machine
- A roller
- A clay-cutting blade
- Cookie-cutter shapes of your choice
Using these tools, follow these steps to create a beautiful tortoiseshell pattern:
- Combine a large piece of translucent clay and a small amount of dark brown clay with your hands. Then, pass them through the clay conditioning machine until they make a single, light-brown color.
- Repeat step one, this time with equal amounts of translucent and black clay. You should finish with a single, off-black color.
- Create one large rectangle of brown clay and a medium-sized rectangle of black clay. These rectangles are referred to as plates.
- Cut the brown clay plate in half, creating two squares. Put one square to the side for safekeeping in case you need extra later.
- Take the black plate and wrap it around the first brown clay plate, creating a singular brown-and-black plate. Both sides should be black, and the brown should be tucked into the middle.
- Gently roll this new plate to remove any air.
- Take your blade and carefully cut out differently-shaped circles, removing only the first black layer and exposing the middle brown layer. Then, using the same blade, create streaks following the same technique.
- Pass this design layer through the thickest setting of your clay conditioning machine. You should start to see a tortoiseshell pattern.
Finish your clay earring design by laying out your tortoiseshell plate, then cutting out a design using your cookie cutters.
5. Painterly Patterns
Painterly patterns are similar in appearance to watercolor paintings. To create this pattern, all you have to do is:
- Shape your clay into a smooth disc the size of your desired finish look.
- Dab a tiny, different-colored piece of clay onto the disc.
- Smudge out this second piece of clay until it thins out, creating the painterly effect.
You can use as many colors and pieces of clay as you like. The more colors you use, the more impactful your clay earring design will be.
6. Leaf Patterns
Steal mother nature’s patterns and use them in your clay earring designs. She won’t mind, and it’s easy to do, too!
Make lovely, earthy earrings by:
- Flattening out a piece of clay.
- Pressing the leaf or flower into the clay, imprinting its design.
- Flipping the imprinted clay over and gently rolling out the clay.
- Flipping the clay back to its original side, and carefully removing the flower or leaf.
When the clay has the texture you want, take a metal cutter and cut the imprinted clay into the shape you want.
7. Textured-Sheet Patterns
One of the easiest ways you can add a pattern to your polymer clay earrings is by using a textured sheet. You can find textured sheets in a vast selection of patterns, giving you endless options. From a landscape pattern to an edgy design, our team can help you find a texture sheet to match your design aesthetic.
To create a texture-sheet design pattern, all you need to do is:
- Roll your favorite color of clay into a ball.
- Press the texture sheet into the clay, flattening it.
- Remove the clay from the texture sheet.
Cut your textured design into the shape of your choice.
8. Mokume-Gane Patterns
Mokume-gane is a trendy polymer clay technique that traces back to 17th-century Japan. It involves stacking colors of clay together, then using tools and other things found around your house to make patterns in the stack of clay.
Follow the same process when creating your own mokume-gane pattern for yourclay earrings.
Once you complete your pattern, slice off the top layer to reveal your design. This is a great technique for beginners because it’s so easy to create and has impressive results!
9. Millefiori Bead Patterns
Like mokume-gane, millefiori beads are an easy-to-create pattern that is sure to impress your friends. This floral pattern is an Italian technique that means “a thousand flowers.” While first used for glasswork, millefiori also works for making beads for earrings, necklaces or other pieces of jewelry.
To create your own millefiori beads, you’ll need two contrasting colors of clay. Then, complete your design by following these simple steps:
- Roll out your first colored clay into a thick rope.
- Flatten your second colored clay into a sheet.
- Roll the second sheet around the first rope to create a new, thicker rope, called a cane. The exterior will be one color, and the core will be another. A tip — roll from the center and work your way out to eliminate any air bubbles.
- Cut the cane into five equal pieces.
- Take the little canes and create a larger, thicker cane by lining them up parallel to each other and smoothing it together using your fingers.
- Roll the thick cane with your fingers into a longer, thinner cane. This may take some time.
- Once your cane is rolled, set it to the side.
- Take a new piece of clay and roll it into a ball, slightly smaller than your desired bead shape.
- Revisit your cane and cut it into thin slices, revealing your floral design.
- Line those slices to the exterior of your balled clay, then smooth out the finish to create your end result.
You can use these beads as a single stud or integrate them into detailed hanging earrings. And, once you’ve created your earrings, you can use the beads to create a matching beaded bracelet or necklace set!
10. Faux Gem Patterns
Steal more of nature’s beauty tips by turning your polymer clay into faux gems. From opal to abalone, you can trick people into thinking you’re wearing the real deal — they don’t have to know that you created these beautiful gems with your own hands! And, if they do find out, they’ll be begging you to make them a pair, too.
The key to creating realistic-looking gems is to choose the right color. For an opal pattern, you’ll want:
- Translucent clay
- Bits of clay in red, blue, purple and green
- Prismatic glitter
- Sandpaper
Simply roll your clay into gem shapes. Then, once your gemstone earrings are baked, use the sandpaper to polish and perfect the gems.
Bring Your Polymer Clay Earring Designs to Life With Sculpey
Clay earrings are therapeutic to make, allowing you to express your creativity and pass quality time with your friends, kids or just by yourself. Your clay statement earrings don’t have to come out perfect, and you don’t have to keep your earrings, either — just as long as you’re having fun. But, we get it if you can’t part with your fried eggs earings.
clay earrings give you the platform to make a statement in a way no other accessory can. With polymer clay, you have the freedom and the space to make your vision come to life and to create clay jewelry that’s meaningful to you. Whatever your style, you can design earrings to suit your unique taste.
Plus, you can sell your handmade earrings for extra income, too, or gift them to your friends and family. Who knows? Maybe you’ll discover a new passion for earring-making and entrepreneurship! With polymer clay, anything is possible.
If you’re feeling inspired to become a clay crafter, visit our online store for all of your polymer clay needs. While you’re there, feel free to sign up for our newsletter or check out our additional polymer clay earring tutorials. If you have any questions about how to make clay earrings at home, you can always contact our enthusiastic team!
