

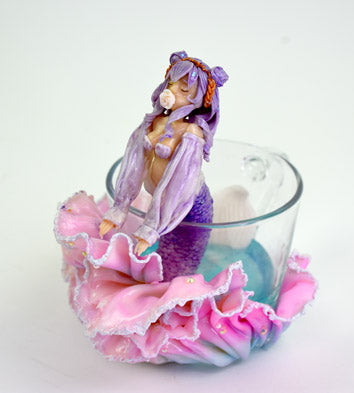
Sculpey Premo™ Veri Peri Mermaid
Sculpey Premo™ Veri Peri Mermaid
Designed by Cindy Luo
Read More
A mermaid rising from some Veri Peri waves created in an upcycled glass mug is a fun afternoon project. Add some resin for the water and she will swim happily on your desk!
TIME TO COMPLETION: Apx. 90 minutes including baking and resin curing
Read Less
ADDITIONAL SUPPLIES
- Silicone sculpting tools, dotting tool, needle tool
- Pasta machine
- Old glass mug
- Toaster oven
- UV resin, pigments, glitter, and UV lamp
- Paint brushes
- Soft pastels (blue, purple)
- Industrial glue
- White acrylic paint
Project Instructions
- Getting Started:
Start with clean hands, unwrap and knead clay until soft and smooth, or condition by running clay though a Pasta Machine. We recommend using a designated machine for clay purposes only. When working with multiple colors, clean hands with soap and water or baby wipes (we have found that baby wipes work best) before switching colors. Shape clay, pressing pieces firmly together. Wash hands after use.
- Baking:
I started out with this challenge thinking of using a glass mug for the upcycled component. It was old, unused, and the ideal size for the project. I wasn’t certain at this point what I wanted to make, but the mug suggested something involving fluids.

Using a tablet and my favorite digital drawing app, I sketched out the loose idea for my sculpture. One main requirement for this project was to use Pantone’s color of the year, Very Peri, which steered me towards a dreamy, pastel color palette. Inspired by oceans, nature, and the idea of motion, I landed on a concept that combined the notions of breaking free and new beginnings.

I rolled out thin sheets of translucent white polymer clay using a pasta machine. I specifically used unconditioned Premo Translucent for this step because its firm texture allowed the clay to form these rough edges.
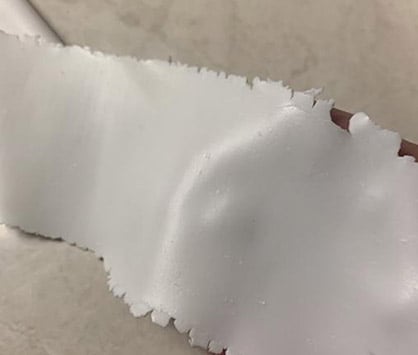
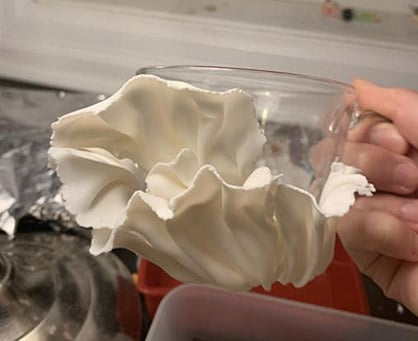
Folding the clay back and forth like an accordion allowed me to create what would become the waves. I made them in a variety of sizes and tried not to make them too uniform--the less perfect it is, the more natural it appears.
Tip: Apply a small amount of cornstarch on one or both sides of the clay with a paint brush before folding them so they are not too sticky!
Tip: Apply a small amount of cornstarch on one or both sides of the clay with a paint brush before folding them so they are not too sticky!

After assembling all the pieces on the outside of the mug, I had my waves! I prebaked the entire thing, mug included, in the oven for 375°F for 10 minutes.
After baking, I mixed equal parts of Premo White clay and Clear Liquid Sculpey in a small paint pot to make this very sticky concoction. I wanted to add a bit of detail and volume to the edges of the waves.

I poked and prodded the very soft clay until it assumed the desired roughness with the help of some silicone sculpting tools and ball tools..

After baking once again for 275°F and 10 minutes, I applied generous amounts of soft pastels to the waves with a fluffy paint brush. Be sure to coat both sides of the clay so that everything is fully covered!

Here are the finished waves! I decided to go with a blue-to-peri gradient to show an outburst of the Very Peri, as if new ideas and hope are springing from old waters. After adding a touch of white acrylic paint to the edges of the clay, the waves are basically done! I used some industrial glue to secure the clay to the mug.

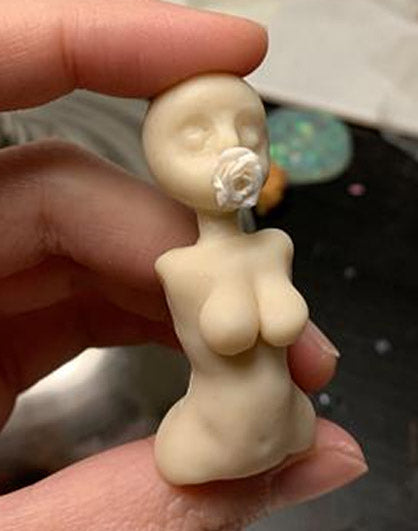
Moving on to the mermaid, I mixed Premo Beige with Translucent and pinches of Cad Yellow and Orange Premo until I was happy with the shade. I formed and pinched a rectangular prism of clay until it became the general shape for her torso. Although creating armatures using wire and aluminum foil is a popular technique for making dolls and humanoid sculptures, this one was small enough that it didn’t require it.
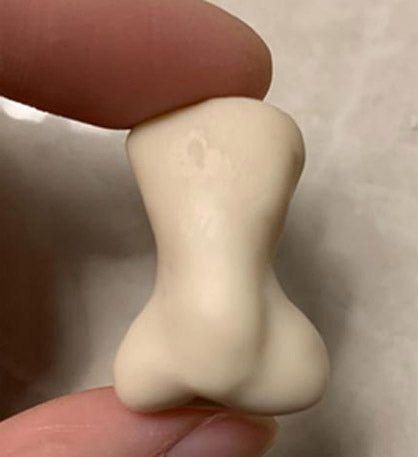
I sculpted a loose head shape as well using my fingers and some silicone tools and stuck a wire through the neck to make it more secure when I later attach it to the body. Both these parts were prebaked for 10 mins before the next step.

I poked a hole in the top of the torso with a needle tool, attached the head using Clear Liquid Sculpey, and added several features as well, such as the rose on her mouth, before prebaking again.
I added a few pieces of periwinkle-colored clay for the hair. Then, I formed a long, tapered snake of clay for the tail and smoothed it onto the bottom of the torso. I bent it in a way that followed the curve of the mermaid’s body so that it looked most natural.

To create the texture of the scales, I cut a small straw in half so that it formed a ‘u’ shape, and pressed it into the clay repeatedly. I textured from the top of the tail to the bottom, ensuring the pattern is even and uniform.
Bake again before finishing off the end of the tail and adding the final hair pieces. Instead of adding bare arms, I gave her puffy sleeves, which were made in a similar fashion to the waves, using TLS to adhere them.
Bake again before finishing off the end of the tail and adding the final hair pieces. Instead of adding bare arms, I gave her puffy sleeves, which were made in a similar fashion to the waves, using TLS to adhere them.

For the finishing touches, I brushed Liquid Sculpey Pearl mixed with purple mica pigments onto the tail. Then, of course, gave the entire piece a final bake for 30 mins at 275°F. This next step is optional, but I also coated the mermaid and the waves in a thin layer of UV resin as well, to give the piece a dewy look.

After everything was baked and finished, I filled 1/4 of the mug with blue UV resin and glitter.
I cured the piece under a UV lamp for 10 minutes, and the sculpture is done!

- Choosing a selection results in a full page refresh.
- Opens in a new window.