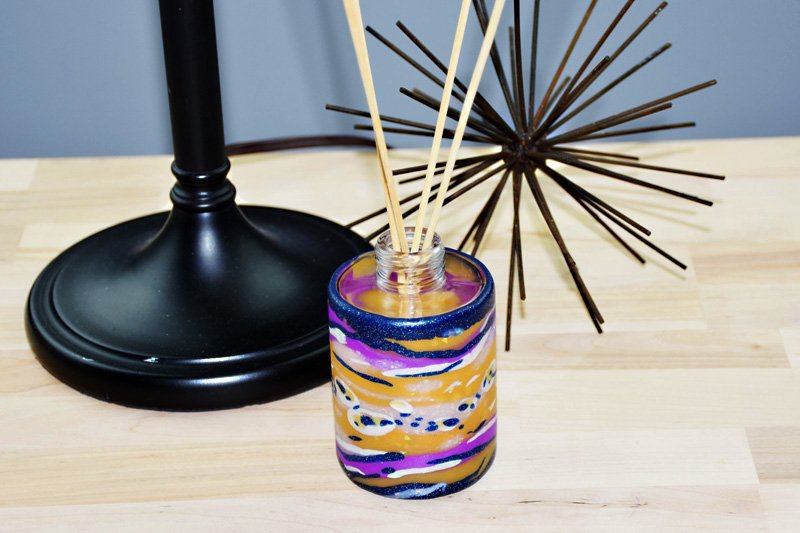

Sculpey Premo Amber Accents Reed Diffuser
Sculpey Premo Amber Accents Reed Diffuser
Designed by Amy Koranek
Read More
Read Less
It is now quick and easy to create organic looking layers which are perfect for home decor accents!
ADDITIONAL SUPPLIES
- Glass reed diffuser vase
- Scrap paper

Project Instructions
- Getting Started:
Start with clean hands, unwrap and knead clay until soft and smooth, or condition by running clay though a Pasta Machine. We recommend using a designated machine for clay purposes only. When working with multiple colors, clean hands with soap and water or baby wipes (we have found that baby wipes work best) before switching colors. Shape clay, pressing pieces firmly together. Wash hands after use.
- Baking:
Sheet Amber Translucent through the clay conditioning machine on the thickest setting. What you need is a narrow strip of Amber that will wrap all the way around the glass vase and be approximately half the height of the vase. The edges can be ragged as shown. Place the Amber sheet on a piece of scrap paper to keep it from sticking to your work surface. This project involves several instructions to roll the clay with the Acrylic Clay Roller and the paper will make the clay more manageable. Next, roll a thin uneven rope of Opal clay and smash it flat on top of the Amber

Next make some random sized oval shapes from Pearl clay and smash these flat on top of the Opal stripe.

Add little speckles of Galaxy Glitter on top of the Pearl. Roll over the clay with the Acrylic Clay Roller to flatten and smooth the pieces into each other

Border the top and bottom edges with uneven ropes of Purple Pearl. Roll again with the Acrylic Clay Roller.

Add more uneven pieces of Opal as shown. Roll again.

Add uneven pieces of Amber Translucent above and below the Purple Pearl. Do a check to make sure your clay piece is not taller than the height of the glass vase

Add some skinny uneven stripes of Galaxy Glitter as shown. Also add flecks of the Opal to the Amber areas to add shine.

Finally, add borders of Galaxy Glitter along the top and the bottom. At this point we want the clay to be at least as tall as the glass vase. Roll the clay again with the Acrylic Clay Roller to make it perfectly flat.

Carefully peel the clay from the paper and wrap it gently around the glass reed diffuser vase. Trim the ends to make a neat seam. Burnish the seam with your fingertips.

At the bottom of the vase, fold the excess clay over and trim it neatly.

At the top, trim excess clay along the edge.

Bake the glass vase following the baking instructions for Premo.

Allow the vase to cool completely before adding oil and reeds
