

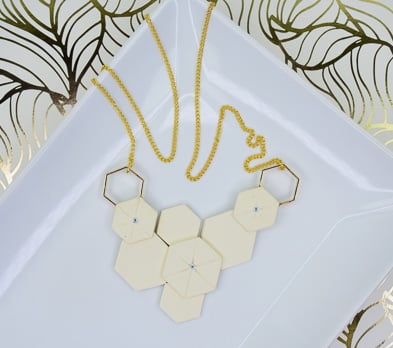
Sculpey Premo™ Honeycomb Necklace
Sculpey Premo™ Honeycomb Necklace
Designed by Amy Koranek
Read More
Hexagon cutters and Premo™ Butter are combined to design this asymmetric necklace.
COMPLETION TIME:
90 Minutes to make, bake (bakes twice), and assemble
Some additional time should be allowed for glue to dry
Read Less
ADDITIONAL SUPPLIES
- Printed grid on paper to help line up design
- Glass work surface
- Heat set crystals (3)
- Tweezers
- E-6000 (GOOP) Silicone glue
- Hexagon shaped gold tone connectors (2)
- 4mm Gold tone jump rings (2)
- 18” Gold tone chain with clasp
- Wire cutters
- Flat nose pliers
Project Instructions
- Getting Started:
Start with clean hands, unwrap and knead clay until soft and smooth, or condition by running clay though a Pasta Machine. We recommend using a designated machine for clay purposes only. When working with multiple colors, clean hands with soap and water or baby wipes (we have found that baby wipes work best) before switching colors. Shape clay, pressing pieces firmly together. Wash hands after use.
- Baking:
Sheet 1/2 bar conditioned Premo™ Butter Yellow through the pasta machine on the second thickest setting.
Use the Hexagon cutters to cut out shapes from the sheet of clay. You will need a total of three large hexagons and six small hexagons.
Use the Hexagon cutters to cut out shapes from the sheet of clay. You will need a total of three large hexagons and six small hexagons.

Place printed grid paper under a piece of glass. Lay out the asymmetric design on top of the glass using the grid below to make sure all the pieces are straight.
Notice that in my layout, several of the hexagon shapes are slightly overlapped. Be sure these overlapping pieces are connecting to each other well because this is what will hold the design together permanently.
Where the gold hexagon shaped connectors are placed is under one of the raised hexagons on each side. Press down gently to make an impression of the connector shape on the underside of the clay pieces.
Use the tip of the Small Etch ‘n Pearl to make radiating lines in some of the hexagons.

Either the Knife Tool or the Small Etch ‘n Pearl are good for making the details.

Gently press heat set crystals into the centers of each of the impressed pieces. Tweezers are useful for picking up and setting small crystals.
Bake the design on the glass following the baking instructions for Sculpey Premo™. Allow to cool completely before handling.
Bake the design on the glass following the baking instructions for Sculpey Premo™. Allow to cool completely before handling.

After baking, flip the design over. Add a small amount of E-6000 (or GOOP) to the area where the hexagon shaped connectors were imbedded.

Place the connectors back in their original position in the glue. You can prop the hexagon shape up so it doesn’t droop with some scrap clay as shown. Allow the glue to dry completely. My hexagon shaped connectors had little loops in them which I chose not to include in my design. So I turned the connectors so that the loops would be hidden on the back side.

After the glue has dried, add another of the small hexagon shapes over the glue area sandwiching the connector in place and hiding the glue.

This will make the back of the piece look neater.
Bake again following the baking instructions for Sculpey Premo™.

Allow to cool completely before turning the piece over for assembly.

Here is the layout for the necklace. Before assembling, cut the necklace chain in half directly at the midpoint using wire cutters.

Connect the two cut ends of the chain to the clay piece with jump rings using flat nose pliers.

- Choosing a selection results in a full page refresh.
- Opens in a new window.