Skip to product information
1 of 1

Original Sculpey® Shadowbox Wall Hanging

Original Sculpey® Shadowbox Wall Hanging

Designed by Precious Nunez
Read More
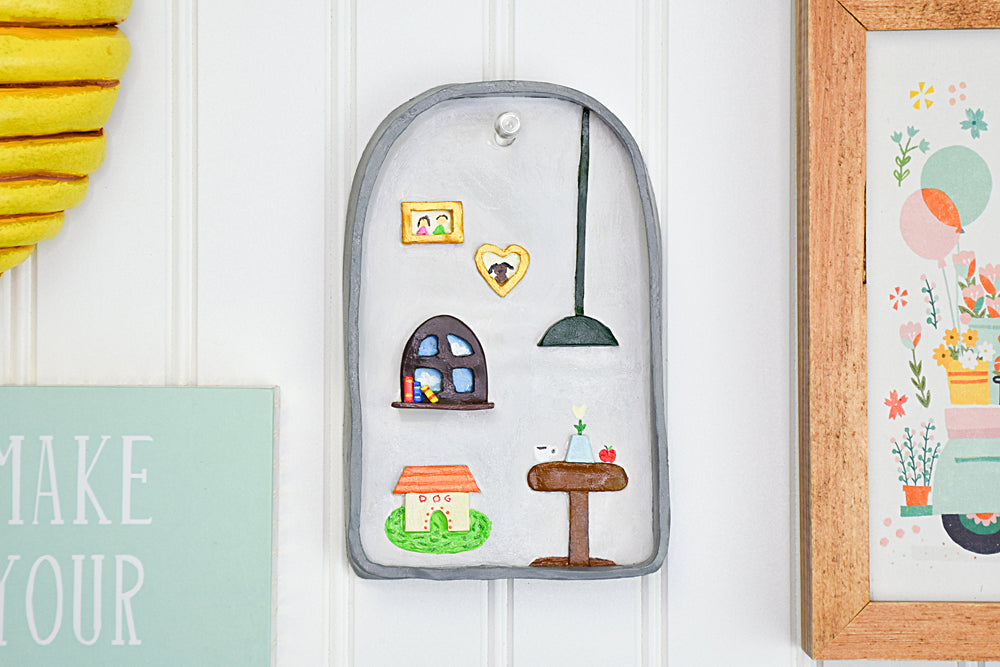
Craft a stunning wall hanging with Original Sculpey® Clay in White. Perfect as a unique piece of home decor or a thoughtful gift for a friend, this project adds a touch of creativity to any space. Time to complete – Sculpting time approximately 2 hours
Read Less
ADDITIONAL SUPPLIES
  • Glaze
  • Acrylic paint
  • X-acto knife
  • Paint brushes
  • Circle clay cutter
  • Parchment paper
View full details
Project Instructions

Step 1

Getting Started:

Please make sure your work area is covered and you are not working on an unprotected surface. We recommend working on the Sculpey® Oven-Safe Work Mat, wax paper, metal baking sheet, or disposable foil. Uncured clay may damage unprotected furniture or finished surfaces. Be sure to cover your crafting area appropriately.

Start with clean hands, unwrap and knead clay until soft and smooth, or condition by running clay though a Pasta Machine. We recommend using a designated machine for clay purposes only. When working with multiple colors, clean hands with soap and water or baby wipes (we have found that baby wipes work best) before switching colors. Shape clay, pressing pieces firmly together. Wash hands after use.

Baking (also called Curing):

Begin by preheating oven to 275 °F (130 °C). After you are done creating; for best results bake/cure clay on an oven-proof surface such metal, aluminum foil, an index
card or the Sculpey® Clay Mat at 275°F (130 °C) for 30 minutes per 1/4" (6
mm) thickness according to package directions. Oven safe glass or ceramic
surfaces are also acceptable for baking/curing; however please note that the
baking/curing times may take longer as the glass or ceramic surfaces take longer to heat up. For best baking results, use an oven thermometer. DO NOT USE MICROWAVE OVEN. DO NOT EXCEED THE ABOVE TEMPERATURE OR RECOMMENDED BAKING TIME.

Step 2

Roll a large amount of Sculpey clay through the clay conditioning machine on the
thickest setting. Roll until you have a long smooth slab, place on parchment paper.

Step 3

Cut off excess clay on the sides to make a long rectangular shape.


Step 4

Use a bendy blade to round out the top of the slab to create an arch.


Step 5

For a window, roll out an oval shape and cut one side to make a small arched shape. Take a needle tool and score where you would like to make cut outs.


Step 6

Cut along the scores with an X-Acto knife and take out the excess with a needle tool.

Step 7

Continue to make cut outs and shapes of details you would like to add on your wall
hanging. Refer to the photo for some ideas you can incorporate into your own.

Step 8

Roll out a long snake, long enough to wrap around the sides of the base. Roll
through the clay machine on the thickest setting to flatten.

Step 9

Wrap the slab along the sides of the base making sure to keep the sides straight.
Trim off any excess clay, and blend smoothly with your fingers.

Step 10

Use a small circle clay cutter to cut a hole at the top of the base to hang later.


Step 11

Bake/Cure according to Step 1.
Allow the cured piece to cool completely before painting details with acrylic paint. Apply a varnish if you wish!