

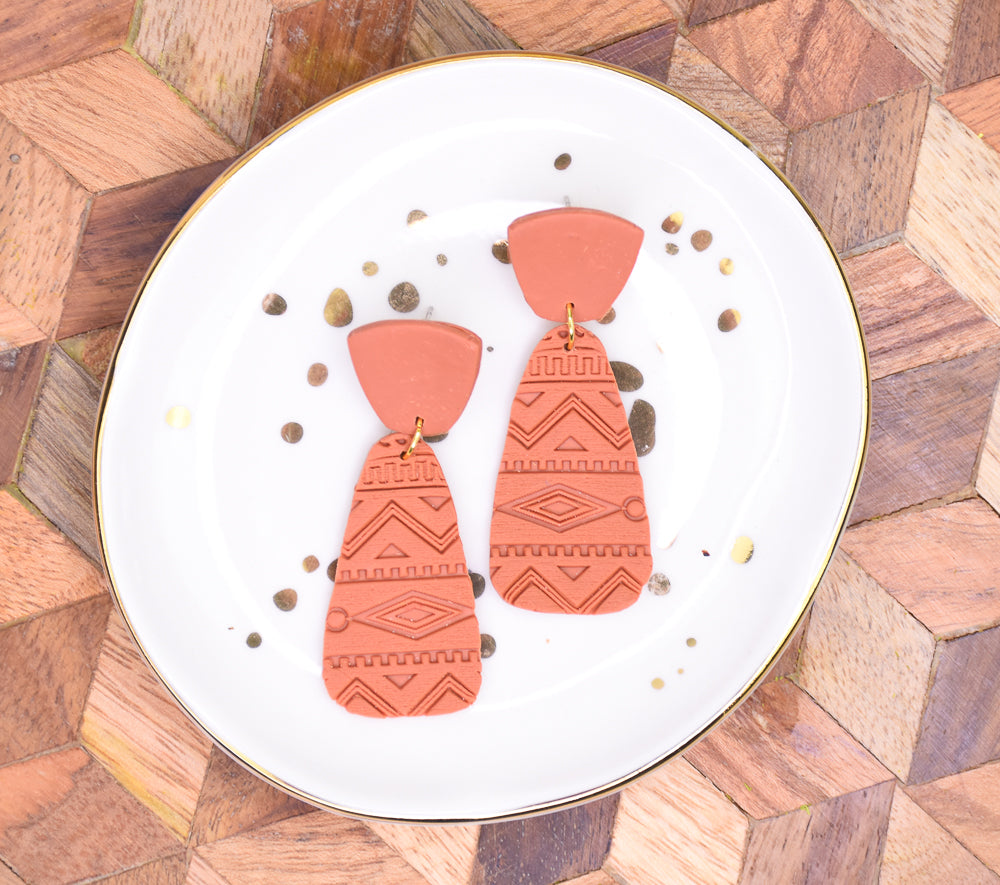
Sculpey Premo™ Sutton Slice Terra Cotta Earrings
Sculpey Premo™ Sutton Slice Terra Cotta Earrings
Designed by Cindi McGee
Read More
Tone on tone dimensional details make these Sculpey Premo™ Terra Cotta colored earrings stand out!TIME TO COMPLETION:30 minutes to make/30 minutes to bake
Read Less
ADDITIONAL SUPPLIES
- Deeply etched stamp
- Small cutter or template for top piece of earring
- Cutter or template for bottom piece of earring (or hand cut with a craft knife)
- Parchment paper
- Post earring backs and stops (2 of each)
- Gold tone jump rings (2)
- Jewelry pliers
Project Instructions
- Getting Started:
Start with clean hands, unwrap and knead clay until soft and smooth, or condition by running clay though a Pasta Machine. We recommend using a designated machine for clay purposes only. When working with multiple colors, clean hands with soap and water or baby wipes (we have found that baby wipes work best) before switching colors. Shape clay, pressing pieces firmly together. Wash hands after use.
- Baking (also called Curing):
Sheet out the conditioned clay on a medium setting and cut into 2 pieces large enough to cover your selected stamp.

Place one sheet over the stamp. Press the clay into the stamp. Be sure to use enough pressure to ensure the clay is uniformly down in the recessed area of the stamp.

Use a sharp blade to carefully cut away and remove the clay on the surface of the stamp, revealing the clay pushed down into the recessed areas.

Place the second sheet of clay over the surface of the stamp. Press firmly over the surface.

Flip the sheet over so the stamp is on the top. Carefully lift and remove the stamp to reveal the transferred details.

Place cutter/template on textured clay sheet and cut out shapes for bottom of earrings. I cut two pair from this sheet of clay.

Roll the scrap clay again to form a sheet of clay. Use cutter/template to cut two pieces for each of the top portions of the earrings (for 1 pair, cut 4 of these).

Sandwich an earring post between two of the top pieces for each earring. Add a touch of liquid clay or clay adhesive between the layers to help secure the post.
NOTE: If you wish, you can use a needle tool to place the holes for assembly before baking. (see next step)
Bake as directed in Step 1 above.
NOTE: If you wish, you can use a needle tool to place the holes for assembly before baking. (see next step)
Bake as directed in Step 1 above.

If you haven’t already put assembly holes in your pieces before baking, you can drill holes at bottom of post pieces and top of drop/dangle pieces.
Use jewelry pliers to add jump ring to connect the pieces for each earring.
Use jewelry pliers to add jump ring to connect the pieces for each earring.
