
Liquid Sculpey® Magical Color Changing Earrings
Liquid Sculpey® Magical Color Changing Earrings
Designed by syndee holt
Read More
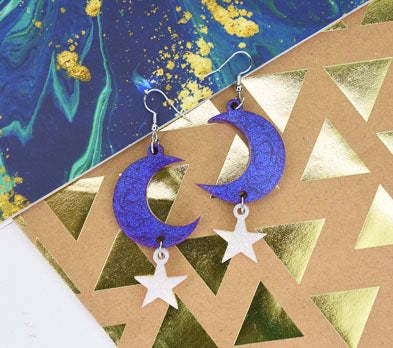
These earrings bring the magical drama due to our new Multi-Chromatic Purple Liquid Sculpey® that changes from purple to blue depending on the way that the light hits them!
TIME TO COMPLETION: 45 minutes
Read Less
ADDITIONAL SUPPLIES
- Silicone mold of moon and stars (we found this one on Etsy)
- Oven-bakeable silver glitter
- 8 mm silver jump rings (4)
- Stainless steel ear wires (2)
- Jewelry pliers
- Small piece of a washcloth or towel that is slightly larger than the mold
- Small silicone bowls or disposable bowls to stir the clays and add the glitter to the clear
- Toothpicks or something to stir the clays
- Small, sharp pair of scissors

Project Instructions
- Getting Started with Liquid Sculpey®:
- Baking:
- It is important to use oven thermometer when you bake the liquids so that you can ensure your oven is at the correct temperature.
- Do not microwave the liquids. They must be baked in a Preheated oven at 275 ºF (130 ºC) for liquid colors and 300 ºF (149 ºC) for Clear – Do not exceed baking temperatures.
- If your piece is less than 1/4” bake for 15 minutes. For thicker pieces that are 1/4” or above bake for 30 minutes.
- If your liquid project has become yellowed or discolored in the oven, when you remake it, tent it by placing either – folding an index card in half and placing your project under it or by using aluminum foil over your project.
Pour the Clear Liquid Sculpey (LS) into a small bowl and stir it thoroughly. Pour back the excess clay into the bottle. Add a pinch or two or silver bakeable glitter to the remaining Clear LS and stir well.

Slowly pour the LS into the star portions of the molds, using the toothpick to guide it into the points of the stars. Pay special attention to the area around the silicone post that will create the hole for assembling the earrings. I push the post down with the toothpick to allow the LS to flow freely around it.

Pour the stirred Chromatic LS into the moon mold, again, paying special attention to the area around the post. Use the toothpick to stir around in the Chromatic clay to swirl the chromatic elements in it! NOTE: I did NOT fill the molds to the top of the mold!
Dampen the small piece of towel and place the mold on this dampened cloth and put them on the baking sheet. Bake according to the directions in step one above. (The dampened towel helps to keep the clay from “creeping” up the edges of the mold)
Dampen the small piece of towel and place the mold on this dampened cloth and put them on the baking sheet. Bake according to the directions in step one above. (The dampened towel helps to keep the clay from “creeping” up the edges of the mold)

Once the clay has baked and cooled, you can use a small, sharp pair of scissors to clean up the edges if needed.

Here is how I assembled my earrings using the jump rings and ear wires.
If the ear wire has the wire loop at bottom going the wrong way, just grasp the wire as shown in this photo (both sides of the wire are supported by the pliers) and then use another pair of small pliers to gently turn the loop 90 degrees. Test the loop to make sure that you didn’t snap the wire.
If the ear wire has the wire loop at bottom going the wrong way, just grasp the wire as shown in this photo (both sides of the wire are supported by the pliers) and then use another pair of small pliers to gently turn the loop 90 degrees. Test the loop to make sure that you didn’t snap the wire.

OPTIONAL: You can use a pre-heated heat gun to help shine up the surfaces of the LS and really bring out the chromatic effect of the LS and to further clarify the Clear LS so that the glitter really sparkles. (You can even see where I stirred the clay in the mold to disturb the chromatic elements!) Just keep the gun at least 5 inches from the clay and keep the gun moving! It should only take about 30 seconds. Make sure that you have the clay on a heat proof surface when using the heat gun.
