
Sculpey Soufflé™ Textured Earrings
Sculpey Soufflé™ Textured Earrings
Designed by Amy Koranek
Read More
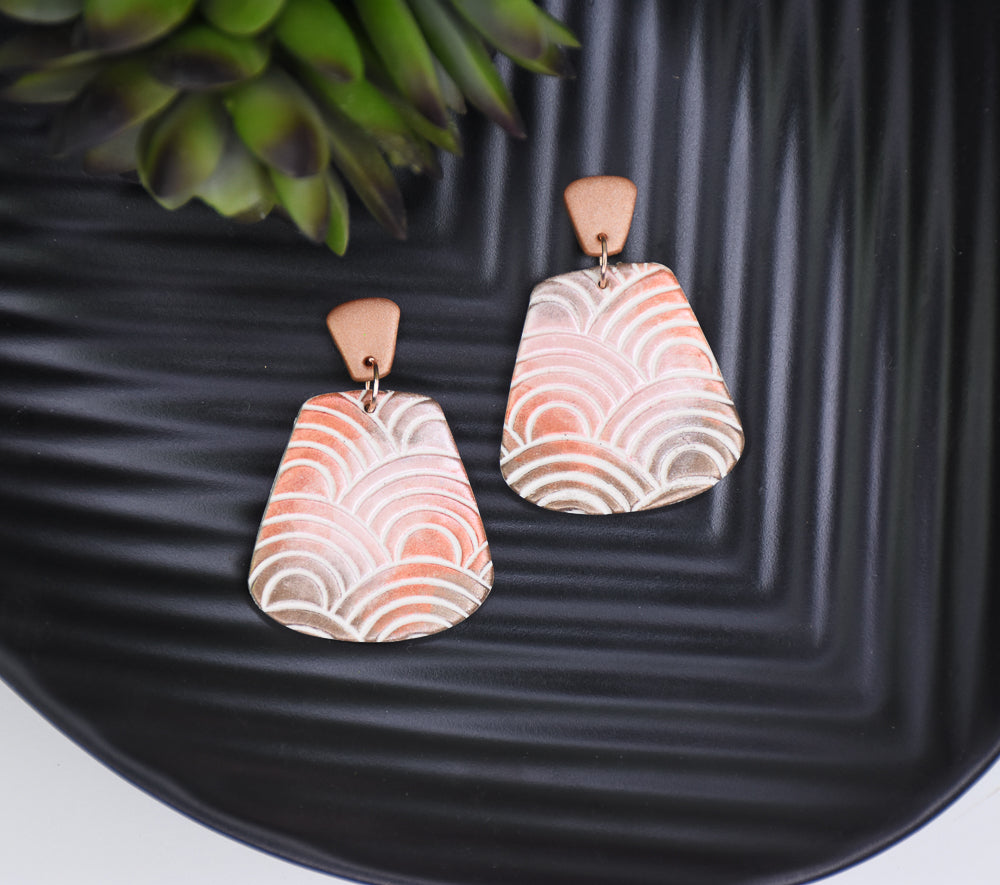
Sculpey Soufflé™ is a perfect clay for texturing with rollers and adding color and sparkle with mica powders to its unique surface. Team the clay with some cutters and rollers for texture and you have a quick project that looks like a million bucks!
COMPLETION TIME:
45 Minutes to make, bake, and assemble
Read Less
ADDITIONAL SUPPLIES
- Rainbow Texture Roller Craft Smart®
- Pendant Clay Cutters by Craft Smart®
- Warm Resin Mica Powders by Craft Smart®
- 8 mm Gold tone jump rings (2)
- Ear posts with backs (2 sets)
- Silicone or instant drying glue
- Flat nose pliers
Project Instructions
- Getting Started:
Start with clean hands, unwrap and knead clay until soft and smooth, or condition by running clay though a Pasta Machine. We recommend using a designated machine for clay purposes only. When working with multiple colors, clean hands with soap and water or baby wipes (we have found that baby wipes work best) before switching colors. Shape clay, pressing pieces firmly together. Wash hands after use.
- Baking (also called Curing):
Sheet 1/2 bar Igloo to a little sheet 1/8” thick. Make sure you can cut two of the large shapes out of the little sheet.

Roll the rainbow texture roller over the clay using heavy hand pressure to make a nice deep texture.

Cut out two of the large pendant shapes.
Use your fingertip to spread the mica powder over the raised surface of the clay sheet. Start with the lightest color (Blush) in the center. Add the medium color (Bronze) in a couple areas with your fingertip blending the colors together. Finally add the darkest color (Olive) in the areas remaining and blend the edges of each color into the one beside it.
Use your fingertip to spread the mica powder over the raised surface of the clay sheet. Start with the lightest color (Blush) in the center. Add the medium color (Bronze) in a couple areas with your fingertip blending the colors together. Finally add the darkest color (Olive) in the areas remaining and blend the edges of each color into the one beside it.

Use the Acrylic Clay Roller to roll a little sheet of Copper Premo™. Cut out two of the smaller shapes.

Lay out the clay pieces with the findings. Use the Needle Tool to poke holes as needed in the clay pieces so that they can be later assembled with jump rings.
Bake the clay pieces following the baking instructions for Sculpey Soufflé™.
Allow to cool completely before handling.
Bake the clay pieces following the baking instructions for Sculpey Soufflé™.
Allow to cool completely before handling.

After baking, use flat nose pliers to open and close the jump rings to attach the clay elements.

Attach the posts using your favorite method to secure them to the clay, such as silicone glue.

- Choosing a selection results in a full page refresh.
- Opens in a new window.