


Sculpey Soufflé™ Stack of Beaded Bracelets
Sculpey Soufflé™ Stack of Beaded Bracelets
Designed by Amy Koranek
Read More
Create a dynamic set of stackable Sculpey bracelets in trending colors for yourself or as a gift!
COMPLETION TIME:
90 Minutes to make, bake, and assemble
Read Less
ADDITIONAL SUPPLIES
- Wire mesh
- 20” Gossamer stretch floss - black
- Beadalon Elastic Cord Needle 10.75”
- Scissors
- Tweezers
- Silver tone charms like hamsa or evil eye
- 6 mm jump rings
- Flat nose pliers

Project Instructions
- Getting Started:
Start with clean hands, unwrap and knead clay until soft and smooth, or condition by running clay though a Pasta Machine. We recommend using a designated machine for clay purposes only. When working with multiple colors, clean hands with soap and water or baby wipes (we have found that baby wipes work best) before switching colors. Shape clay, pressing pieces firmly together. Wash hands after use.
- Baking:
We will start by mixing custom colors. Make Light Guava by mixing White and Guava 2:1. Don’t mix the Light Guava completely so that it has variation in it.
Make Light Poppyseed by mixing Poppyseed and Concrete 1:1.
Roll ropes of the new colors. Make the Light Guava rope slightly larger (about 3/8”) than the Light Poppyseed (about 1/4”) for a variety of different sized beads.
Make Light Poppyseed by mixing Poppyseed and Concrete 1:1.
Roll ropes of the new colors. Make the Light Guava rope slightly larger (about 3/8”) than the Light Poppyseed (about 1/4”) for a variety of different sized beads.

From the 1/4” Light Poppyseed rope, cut off 1/4” pieces. Each 1/4” x 1/4” piece will make one bead. Save a little of the color for adding to the marbled beads. Roll the pieces into balls and pierce with a skewer from the Bead Baking Rack. Fill up a skewer with Light Poppyseed ball beads.

From the Light Guava rope, cut off 3/8” pieces. Each 3/8” x 3/8” piece will make one bead. Roll the pieces into balls.

Pinch off flat pieces from Igloo, Concrete, and Light Poppyseed and press the bits onto the sides of the Light Guava balls.

Roll into smooth balls and pierce with a skewer from the Bead Baking Rack. Fill up a skewer with the marbled beads.

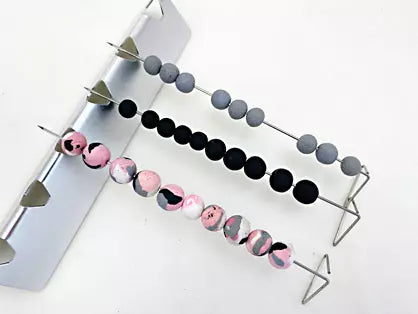
For the Concrete textured beads, shape a rope of Concrete about 1/4” thick and cut off 1/4” pieces. Roll each piece on the wire mesh.

Pierce with a skewer from the Bead Baking Rack. Fill up a skewer with the Concrete textured beads.

Place the skewers on the Bead Baking Rack and bake following the baking instructions for Sculpey Soufflé™. Allow the beads to cool completely before handling.
I love this big needle from Beadalon. It is 10.75” long so you can easily thread all the beads needed for a bracelet onto it at once. One end has a large loop in it so that your beads cannot fall off. It has a little barbed hook on the other end that holds the beading floss in place. Then you just slide the beads off the needle and onto the floss.
Thread the beads in the pattern that you want onto a long Beadalon Needle. You can add a charm on a jump ring at any point in the design.
Thread the beads in the pattern that you want onto a long Beadalon Needle. You can add a charm on a jump ring at any point in the design.

Double a 20” strand of stretchy beading floss and place the loop onto the Beadalon Needle.

Slide the beads from the needle onto the doubled floss.Keep pulling the beads onto the floss until all the beads have transferred from the needle to the floss.

Tie an overhand knot in the floss and trim the tails. Here’s a look at several different designs featuring the same three bead styles.
